background image

Set Up and Installation

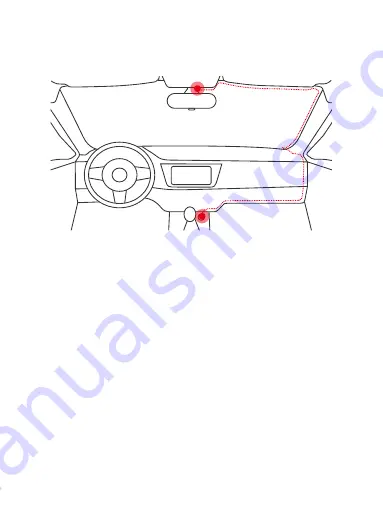
1. Use the sticker mount or the suction cup mount to install the 

   CE45 dash cam on the windshield, recommended position is 

   near the rearview mirror near the passenger seat, adjust 

   both lens angle for best coverage.

2. Plug the included power adapter into the car cigarette lighter 

   socket, the indicator will light up meaning power is on.

3. Connect the power adapter and the dash cam, and route 

   the excess cable alongside the interior trim for better looking.

4. Start your car, the camera will automatically power on, check 

   the lens angle and coverage, make sure all functions works 

   well before going on the road.

Cigarette lighter Socket 

3

Содержание CE45

Страница 1: ...Toguard CE45 Dual Channel Full HD 1080P Dash Camera ...

Страница 2: ......

Страница 3: ...format the memory card in camera menu first 4 This camera records video at high resolution Be sure to use high speed Micro SD card memory card with writing speed over Class 10 or above is recommended 16GB or 32GB cards are recommended 5 For safety reasons this camera has a relatively small built in battery It s used only for parking monitor optional and saving the video file after external power s...

Страница 4: ......

Страница 5: ...TANT NOTICE 1 LED Indicator 2 LCD Screen 3 OK Shutter 4 UP Display Switch 5 Power 6 Down Audio Switch 7 Mode Menu 8 A Lens 9 B Lens 12 Mini USB 13 AV out 10 Reset 11 Card Slot 1 2 3 4 5 6 7 8 10 11 12 13 9 1 ...

Страница 6: ...art stop video recording or take a photo In Setting Menu short press to confirm selection and adjustment In Playback short press to select and play recorded files OK In Setting Menu Short press to select option and adjust values In Playback short press to select and play recorded files In video recording mode short press to turn on off audio recording Down In Standby short press to access the setup m...

Страница 7: ... coverage 2 Plug the included power adapter into the car cigarette lighter socket the indicator will light up meaning power is on 3 Connect the power adapter and the dash cam and route the excess cable alongside the interior trim for better looking 4 Start your car the camera will automatically power on check the lens angle and coverage make sure all functions works well before going on the road C...

Страница 8: ...on to switch between different modes and access the mode you want Watch the icon on top left corner of the screen for each mode Video Recording Mode The camera will automatically enter Video Recording Mode and start recording when powered on The blue LED indicator flashes and a Red dot flashing on the top left corner indicates recording is in progress Press the OK to stop recording or start record...

Страница 9: ... Status 11 Time Date Video Recording Mode Setup Menu In all 3 operating mode you can press the M button once to access the menu setup for that particular mode and press twice to enter System Setup Menu The System Setup Menu is common to all modes In Setup press UP and Down to scroll through the various setting options and press OK to select and confirm selection Press M button again to exit the se...

Страница 10: ...hen storage fills up it will automatically loop back to the earliest file and record over it WDR Wide Dynamic Range turn on to optimize video quality with wider light range and image details Motion Detection Turn ON OFF motion detection function when Motion Detection is on the camera will only start recording when the camera detects certain movement However with Motion Detection on the camera migh...

Страница 11: ...ion As default The A lens is facing backward used to record inside of the car The B lens is facing forward used to record outside of the car cover the road If you want to switch the direction you need to manually switch the lens direction and then turn on Lens Exchange to correct the image direction Photo Taking Mode The CE45 camera can operate in Photo Taking Mode and take HD photo up to 12 Mega ...

Страница 12: ...P 8MP 5MP 3MP VGA available Exposure Compensation Adjust exposure value to adjust the brightness of the photo Date Stamp Enable Disable the date and time marks in image files System Setup Menu In standby under any mode short press M button twice to access System Setup Menu 8 ...

Страница 13: ...quency to 50Hz or 60Hz according to your local system Screen Saver Set the time to automatically turn off the LCD display after no operation 30 seconds 1 minutes 3 minutes available Format Format the memory card Default Setting Reset all settings back to factory default Version Check firmware version Specification Model Toguard CE45 Image Sensor High Resolution CMOS Sensor Screen 3 inch LCD Displa...

Страница 14: ...ng Power on recording WDR G Sensor Lock English French Spanish Portuguese German Italian Chinese Russia Japanese Built in microphone ON OFF optional Micro SD Card up to 32GB Mini USB Windows 7 10 or MAC Built in Li ion Battery DC 5V 1 5A 20 C 60 C 10 C 50 C Language Audio Recording Storage USB interface Operating System Internal Power External power supply Storage temperature Operating Temperature...

Страница 15: ...card there might be too many locked video that the loop recording won t work right 2 The Video is somehow upside down Solution The A B lens are designed to cover both inside and outside of the car As default The A lens is facing backward used to record inside of the car The B lens is facing forward used to record outside of the car cover the road If the image direction is wrong you can manually sw...

Страница 16: ...the wrong light frequency enter the setup menu and choose the right light frequency 50HZ 60HZ according to your local regulation 5 Suction mount cannot attach on windshield well Solution 1 Please clean the windscreen with a cleaning wipe 2 Make sure the protective film on the suction cup is removed 3 Rub some water around the edge of the suction cup 4 Please soak the suction mount in warm water fo...

Страница 17: ...yer is recommended 7 Without external power supply the camera only lasts very short time or it just can t turn on Solution For safety reasons this camera has a relatively small built in battery It s used only for parking monitor optional and saving the video file after external power supply cuts off car turns off 13 8 The camera continuous turns on off automatically Solution Please make sure this ...

Страница 18: ...cc Australia au support toguard cc Europe eu support toguard cc We will offer prompt and authoritative reply within 24 hours and try our best to resolve your problem ASAP More Safe Guarantee with toguard If you are not satisfied with our product Please tell us about your thought That will be much appreciated 14 ...

Страница 19: ......

Страница 20: ......

Отзывы: