■
FEATURES
• Compact yet full-range, sealed type that relizes wide frequency reproduction.
• Inorganic compound resin enclosure with excellent acoustic characteristics.
• Attractive, tetrahedron design for mounting on the wall or at the corner of the room without additional
brackets.
• Three LEDs for visual effects.
■
HANDLING PRECAUTIONS
Perform impedance settings before speaker installation (F-10MW and F10BM only).
■
NOMENCLATURE
■
IMPEDANCE CHANGING (F-10WM and F-10BM only)
The speaker's impedance is preset to 2 k
Ω
(100 V line, 5 W) by the factory. To change the impedance, check
to confirm whether the speaker line is 100 V or 70 V, then connect the red lead wire connected to the built-in
transformer's terminal to the correspondingly-labeled terminal.
Important:
When the speaker line voltage is 100 V, never use the 3 W or 5 W terminal of 70 V line as the
speaker may be damaged, resulting in amplifier malfunction.
■
INSTALLATION
●
Wall or Ceiling Mounting
[Method A]
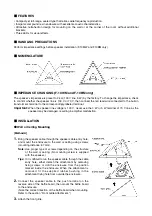
1.
Bring the speaker cable through the speaker cable entry hole,
and mount the enclosure to the wall or ceiling using screws
(mounting distance: 67 mm).
Note:
Use proper type of screws depending on the structure
of the wall or ceiling. (No mounting screw is supplied
with the speaker.)
Tips:
If it is difficult to run the speaker cable through the cable
entry hole, either detach the attachment by removing
fixing screws or drill the enclosure from the position
marked inside the enclosure. When the attachment is
removed, fit the supplied rubber bushing in the
attachment fixing hole from outside the enclosure.
2.
Connect the speaker cable to the push terminal on the
reverse side of the baffle board, then mount the baffle board
to the enclosure.
(Note the correct direction of the baffle board when mounting.
Refer to the section "Front Grille Attachment.")
3.
Attach the front grille.


