background image


In addition, these icons  will  flash  when there is  an issue requiring attention. For example, if 

 then the SD card icon will flash. Similarly, if you have the 

wrong types of microphones connected, the microphone icon will flash.  

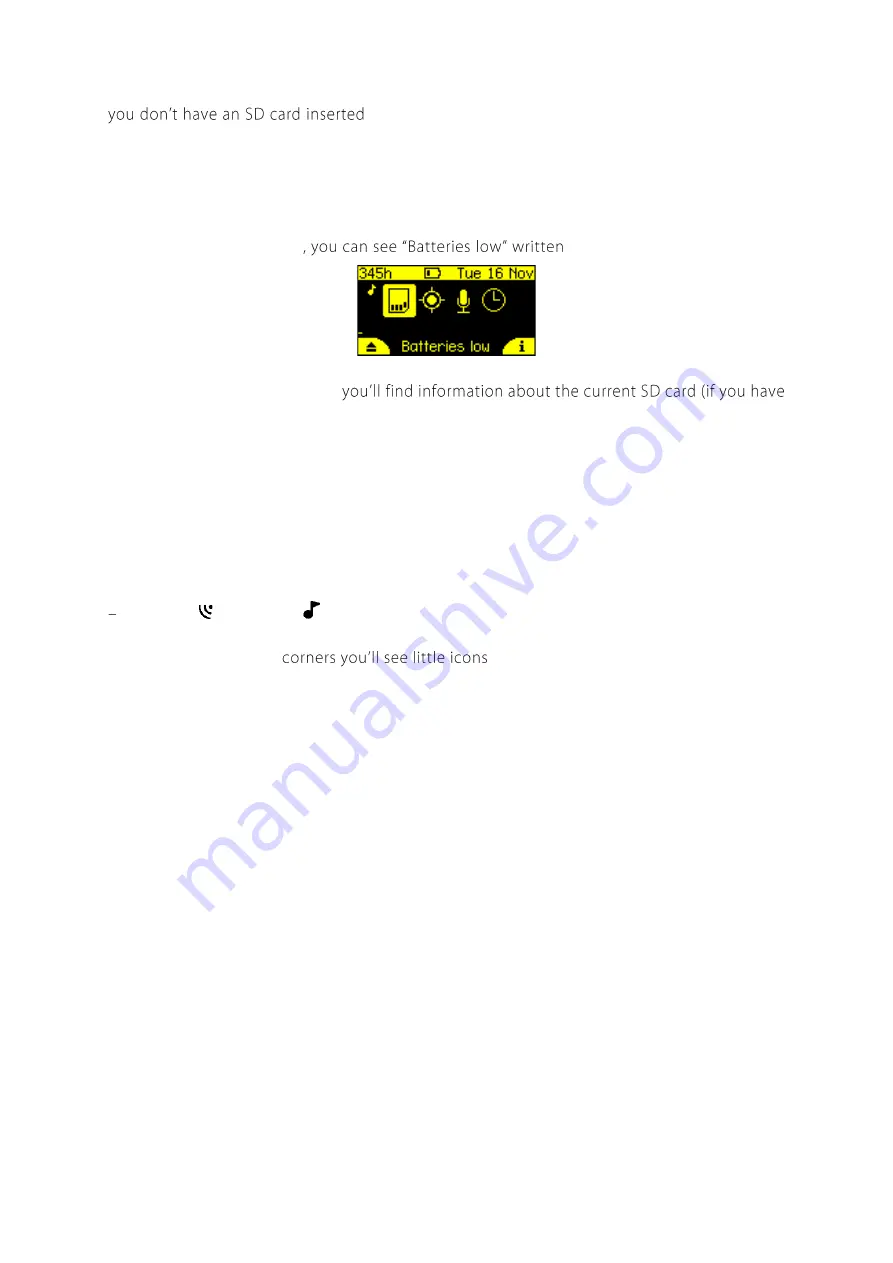
When an icon is flashing, you can see more information about the issues in the status area at 

the bottom of the  dashboard. All issues  requiring your attention will be shown there.  In the 

example screenshot below

below. 


Along the top of the dashboard 

one inserted), indicators for low battery and headphones (if plugged in), and the current date, 

time, and temperature. 

On  the  left  and  right  sides  of  the  dashboard  are  VU  (Volume  Unit)  meters  that  will  appear 

when microphones are connected to the left and right  channels respectively. These bars will 

move up and down in response to the loudness of sounds, so you can see your microphones 

working. The symbol at the top of the VU meter will indicate what type of microphone is fitted 

 ultrasonic   or acoustic 

.


In the bottom left/right 

 referring to the soft keys (buttons below 

the screen). These change to indicate what pressing the soft keys will do in different menus. 

On  the  dashboard  menu  the  left  will  eject  the  SD  card  (making  it  safe  to  remove  from  the 

device) and the right button will show the device information screen.  


MICROPHONES 

The  Chorus  comes  supplied  with  one  acoustic  microphone.  You  have  the  choice  of  adding 

another  of  our  low-profile,  user-replaceable  acoustic  or  ultrasonic  microphones.  Both 

microphone types can be used with our flexible-gooseneck microphone extender accessory. 

The Chorus has two channels, so you can customise your microphone setup to record in mono 

acoustic,  mono  ultrasonic,  dual  acoustic  and  ultrasonic  (not  simultaneously),  or  stereo 

acoustic. 


Содержание CHORUS

Страница 1: ...CHORUS User Manual Version 1 0 ...

Страница 2: ...ey scientific com uk titley scientific com ask titley scientific com us www titley scientific com General Enquiries info titley scientific com AUTHORS AND ACKNOWLEDGMENTS This manual was written by Julie Broken Brow Dean Thompson We greatly appreciate the time comments and assistance given by those people who were beta testers for the Chorus and this manual The testing and troubleshooting have imp...

Страница 3: ...THE CHORUS 13 STEP BY STEP GUIDE 13 TURNING THE RECORDER ON OFF SLEEP 16 UPDATING FIRMWARE 16 RECORDING MODES 17 Night Only Recording Mode 17 Dusk Dawn Recording Mode 17 Day Only Recording Mode 18 Continuous Recording Mode 18 Schedule Recording Mode 18 Selecting a Recording Mode 18 RECORDING SETTINGS 19 SAMPLE RATE FILE TYPE ACOUSTIC OR ULTRASONIC RECORDING 19 SELECT THE MICROPHONE 20 ACOUSTIC REC...

Страница 4: ...mum File Time 23 10k High Pass Filter 23 GPS SETTINGS 24 TRANSECT MODE 24 CHECK LOCATION 25 OTHER SETTINGS 26 FILENAME PREFIX 26 CLOCK SCHEDULE 26 Time Zone 26 Time Format 26 Check Sunset Sunrise Times 27 RESET SETTINGS 27 RECORDER STATUS INFO 27 TESTING YOUR CHORUS 28 FLASHING STATUS ICONS OR CHECK LED 29 PASSIVE DEPLOYMENT CONSIDERATIONS 32 WEATHERPROOFING 32 MOUNTING PLACEMENT 33 EQUALIZATION C...

Страница 5: ...5 DIAGNOSTIC LOG FILES 36 SOFTWARE 36 CREATING SCHEDULES 36 CHECKING SCHEDULES 42 METADATA 43 TROUBLESHOOTING FAQS 43 How do I set up the detector for ultrasonic bat recording 43 How do I set up the recorder for acoustic audible sound recording 44 FURTHER INFORMATION 48 ...

Страница 6: ... 300 hours acoustic on 4 AA batteries Built in GPS Stand alone recorder no phone apps required for setup Built in temperature sensor Automatic schedules for easy deployment or create your own custom schedule Transect mode available Analyse recordings with our free software Anabat Insight Headphone output to check microphone performance GETTING TO KNOW THE CHORUS The outside of your Chorus case has...

Страница 7: ...7 EXTERNAL FEATURES ...

Страница 8: ...e and time SD card free space and microphone information The four large icons in the middle of the dashboard represent the main aspects of your detector the SD card GPS microphone s and the clock You can use the left and right arrow buttons on the front of the Chorus to select one of the icons then press K button to see more information and settings ...

Страница 9: ...e up and down in response to the loudness of sounds so you can see your microphones working The symbol at the top of the VU meter will indicate what type of microphone is fitted ultrasonic or acoustic In the bottom left right referring to the soft keys buttons below the screen These change to indicate what pressing the soft keys will do in different menus On the dashboard menu the left will eject ...

Страница 10: ...c microphones Useable frequency response of 10kHz to 140kHz response rolls off beyond this point A note on frequency response All m at different frequencies A microphone may be sensitive at 40kHz then somewhat less sensitive at 60kHz then be very sensitive again around 80kHz Micro after a certain frequency When w this is the point where the frequency response has begun to taper off However the mic...

Страница 11: ...ype of batteries being used as well as ambient temperature length of your recording session and amount of bat activity ambient noise if using triggered ultrasonic recording Four high quality alkaline AA batteries last up to 300 hours of acoustic recording or up to 40 nights of triggered ultrasonic recording based on 10 bat activity at 25o C and 10 hour nights However in practice recording conditio...

Страница 12: ...Acoustic 48Ksps 330MB 660MB Acoustic 44 1Ksps 303MB 606MB Acoustic 32Ksps 220MB 440MB Acoustic 22 05Ksps 152MB 303MB Please note In all modes except Schedule mode when there is an SD card present the Chorus will periodically display the remaining recording time for your SD card in the top left of the display based on the currently chosen sample rate A note on triggered ultrasonic recording During ...

Страница 13: ...nd you check for firmware updates see UPDATE FIRMWARE STEP BY STEP GUIDE 1 Connect your chosen microphone s to the appropriate side see below acoustic can be on side A latch or B hinge ultrasonic on side B hinge only refer to the image below Carefully insert the microphone jack into the microphone socket with locking tabs in correct alignment until it clicks into place Rotate the microphone clockw...

Страница 14: ...cked and correctly orientated as per the diagram on the control panel when inserting Refer to the Data Storage Requirements and Power Requirements above for more information on what size SD card and batteries to use Align jack and locking tabs Turn 1 8th turn to stop B A Ultrasonic mic Acoustic mic Acoustic mic only OR ...

Страница 15: ...S fix is obtained the GPS icon on the screen will stop flashing The GPS fix will automatically set the clock record the GPS location and determine the sunset sunrise times 7 If an issue requires your attention the corresponding status icon will be flashing as well as the Check LED on the outside of the unit Check the Dashboard status messages for more information regarding the issue see Flashing S...

Страница 16: ...Sleep mode and press the K button again In sleep mode the screen will be off but the device will still record To turn the screen back on briefly press the K button again The Chorus will also automatically enter sleep mode to save power if there has been no user interaction for one minute Power off Sleep UPDATING FIRMWARE It is important to keep the firmware on the Chorus up to date to ensure troub...

Страница 17: ...indicate which mode is selected if no LEDs are lit the recorder is in Inactive Mode and will not record Inactive mode is useful while configuring your recorder to avoid creating unwanted recordings Most modes require a GPS fix on the deployment day as the recorder automatically calculates the sunset and sunrise times based on the current longitude and latitude If the recorder is left on it will co...

Страница 18: ...ule created with the Scheduler Tool in Anabat Insight see CREATING SCHEDULES You can create schedules based on sunset sunrise times or on absolute times You can create multiple tasks to activate different microphones and sample rates at different times The schedule is saved on the SD Card so keep this in mind when swapping out the SD card Schedule mode requires a GPS fix if your schedule is based ...

Страница 19: ...onic Microphone Different recording options will be available depending on whether you select an ultrasonic or acoustic sample rate To change the sample rate ensure Sample Rate is selected in the Recording Settings menu then use the left right arrow buttons to change the sample rate Notes on sample rate and file type The chosen sample rate should be at least double the highest frequency sound of i...

Страница 20: ...tude of the recorded microphone signal You can adjust the gain of each of the two acoustic microphones independently in increments of 3dB up to 15dB Use the up down arrow buttons to select Gain and then use the left right arrow buttons to choose the gain that you want a higher dB represents an increased amplitude A higher gain setting will pick up more sounds but the recording will become distorte...

Страница 21: ...ode selected Night Only Dusk Dawn Day Only Continuous or Schedule The trigger is dependent on the trigger settings such as Sensitivity and Minimum Frequency amongst others Triggered activation mode is most often used for ultrasonic bat recording The constant activation mode will record all sound constantly without triggers in whichever recording mode is selected Night Only Dusk Dawn Day Only Conti...

Страница 22: ...e Max Freq then use the left right arrow buttons to change the frequency The default value is 250 kHz It is generally not necessary to adjust this setting unless you would like to exclude triggering on higher frequencies Minimum Event This is the minimum duration sound that will trigger a recording You can set this to the minimum duration sound e g bat pulse to be recorded To change this use the u...

Страница 23: ... have the filter On unless intending to record sounds under 10KHz To change this use the up down arrow buttons to select the 10k HP Filter then use the left right arrow buttons to choose between On and X Off Division Ratio ZC File Type Only The division ratio affects the amount of data which is saved in Zero Crossing recordings the lower the division ratio the greater the number of data points in ...

Страница 24: ...on on the dashboard see below then press the K button to select TRANSECT MODE Transect mode will use the built in GPS to save your track as a GPX file by logging GPS points once per second To turn on transect mode use the up down arrow buttons to select Transect Mode then use the left right arrow buttons to choose between On and X Off Note that using transect mode will approximately halve the batt...

Страница 25: ...ocation Altitude When the last GPS fix was received The number of satellites currently in use typically more satellites indicates a more accurate fix HDOP horizontal dilution of precision The lower the number the more accurate the position Numbers less than one typically indicate good accuracy Whether the fix is 2D inaccurate or 3D more accurate Whether the GPS is currently on GPS will automatical...

Страница 26: ...ULE To check or change the time zone setting on your detector use the left right arrows to navigate to the Clock Settings see below and press the K button use the up down arrows to navigate the Clock Settings menu Time Zone Your time zone relative to Greenwich Mean Time GMT will be shown Use the left right arrows to change the time zone in 15 minute increments Remember to account for any daylight ...

Страница 27: ... down arrow to navigate to the bottom of the settings menu Reset to defaults Once selected press the K button to reset all settings in this particular menu to the factory defaults RECORDER STATUS INFO To see the recorder status and other information press the right soft key on the dashboard This will display Recorder serial number Firmware version Bootloader version Main battery AA voltage around ...

Страница 28: ...ingers in front of the microphone you should be able to hear the ultrasonic audio signal in frequency division in both ears When checking acoustic microphone s you will hear an audio reproduction in the left and or right ears either mono or stereo depending on the number of acoustic microphones The amplitude of the acoustic audio will depend on the gain chosen in the microphone settings 3 To test ...

Страница 29: ...full eject the SD card and replace it Card Locked The SD card is locked remove the card and unlock the write protection switch lock before reinserting Bad SD Card If the card is corrupt or cannot be read Either replace the card or attempt to reformat the card Remove SD Card W this message will disappear once you have removed the SD card Cannot Eject Now The card cannot be ejected wait a moment and...

Страница 30: ...r side whereas the ultrasonic microphone must be connected to side B Ensure you have the ultrasonic microphone connected when using ultrasonic recording accidentally leave an acoustic microphone connected on side B or vice versa Your recording settings must match your installed microphone configuration Make sure your chosen sample rate and microphone are correct Clock Time Zone Not Set Time zone i...

Страница 31: ...low 4 5V replace the batteries before starting recording Clock Battery Low The CR2032 Coin Cell battery has dropped below 2 6V replace the clock battery Leave AA batteries installed while changing the clock battery to avoid loss of your settings ...

Страница 32: ...nt reducing its sensitivity 3 If recording is required during rain the microphone should be mounted in such a way so that water cannot land on the microphone element 4 Dry off the case and microphone before opening the recorder or removing the microphones This prevents moisture from entering the recorder 5 The recorder should not be partially or fully submerged in water 6 Desiccant sachets can be ...

Страница 33: ...s off the microphone s and doesn t settle on the element s Also make sure that the magnetic lanyard or the device itself is not being blown around in the wind as this may create unwanted noise on your recordings It is also important to avoid surface noise such as vegetation brushing against the recorder case or microphone You can also purchase a gooseneck microphone extender which we recommend for...

Страница 34: ...nside of the case is completely dry before closing the lid To turn the recorder off open the case press the K button to bring up the Sleep Off menu continue holding the button until the unit shuts down or release then then press the K button again to shut down immediately If the recorder does not respond to the power button the batteries may have gone flat Remove the SD card to download the data t...

Страница 35: ...the log file with the recording files Files will be arranged on the card in folders as follows Acoustic This folder contains the acoustic sound recordings Ultrasonic This folder contains the ultrasound recordings Log This folder contains the log files for the deployment This should be kept in case and future troubleshooting is required GPS This folder contains the transect GPX files FILE NAMES Log...

Страница 36: ...splay metrics for passes and individual bat pulses View customize metadata Generate reports to present your analysis results Use built in mapping to view your tracks waypoints Export mapping data to GIS programs Listen to and view spectrograms of stereo and mono acoustic recordings Create custom recording schedules to be used on the Chorus CREATING SCHEDULES In Anabat Insight you can create a cust...

Страница 37: ...he recording If you want to have multiple periods per day these should created as separate tasks You can choose when to start end relative to sunset sunrise an absolute time as well as end relative to start time e g end 3 hours after start time d Duty Cycle If you wish recording to start and stop for fixed periods within your schedule e g record 5 mins on then 5 mins off By default a schedule will...

Страница 38: ...hedule ensure you have connected the appropriate microphone s to the correct sides of the Chorus b Choose the settings appropriate to your microphone and survey goals Task Settings Sample Rate The sample rate the recorder will use for this task Gain A Set the gain for the acoustic microphone on Side A Gain B Set the gain for the acoustic microphone on Side B Activation Choose between Constant or T...

Страница 39: ...rgence Please note Not all Task settings listed above will be available it will depend on your Microphone and Activation For more information on each setting click the setting name 7 Ensure all schedule tasks you would like enabled are checked in the Schedule Manager see below 8 Once you have finished creating your schedule task you can either add another task repeat steps 2 5 or you can save the ...

Страница 40: ... onto multiple SD cards to use on Example schedules are shown on the following pages Example 1 The above schedule will record daily from 8 22 October from 1hr before sunset to 2hrs after sunset in ultrasonic full spectrum default settings Every file recorded will include the metadata Bat Survey Dusk ...

Страница 41: ...Every file recorded will include the metadata Bird Survey Dawn Example 3 The above schedule will record Monday Wednesday Friday and Sunday nights from 8 October for 1 month from 2hrs after sunset to 90 mins before sunrise in ultrasonic zero crossing sensitivity 17 minimum frequency 17 Every file recorded will include the metadata Bat Survey Night Activity ...

Страница 42: ...schedule 1 Insert the SD card with the schedule csv saved on it 2 Turn the detector on using the K button then use the arrows to select the Clock Settings and press the K button again 3 Use the down arrow to select Schedule then press the K button 4 Your schedule tasks will be listed by name to view a task use the up down arrows to navigate to it then press the K button 5 It will display the date ...

Страница 43: ...ettings Battery voltage Custom metadata if using a schedule TROUBLESHOOTING FAQS How do I set up the detector for ultrasonic bat recording If you are using the Chorus with an ultrasonic microphone to record ultrasonic frequencies e g bat echolocation you will need to check the following settings 1 Mount an ultras side B 2 Place the recorder in your desired Recording Mode e g Night Only Continuous ...

Страница 44: ...loyment Do not deploy until you resolve the issue To check the issue s open the case and look at the status message s on the dashboard See Flashing Status Icons for more information on how to resolve these issues Can I record ultrasonic and acoustic at the same time You are unable to record ultrasonic and acoustic simultaneously however you can create a schedule to record ultrasonic and acoustic d...

Страница 45: ...pable of recording stereo acoustic files Dual Dual recording is recording multiple files from two microphones on a schedule but not simulta 2pm This is possible using a custom schedule with the Chorus Simultaneous Simultaneous recording is the ability to record multiple files from two or This is not possible with the Chorus There are a lot of echoes in the spectrogram When recording in full spectr...

Страница 46: ...recording analysis The advantage of zero crossing analysis is the small file size so memory space is not an issue and many published guides to bat calls are based on zero crossing analysis The disadvantages of zero crossing are that spectral information is lost which may be helpful to species identification and that in cases of high frequency ambient noise e g insects bat calls may not be recorded...

Страница 47: ...ry conditions will allow the detection of bat calls over greater distances The sensitivity of the recorder also has a major influence on detection distance and while there is always some variability in sensitivity among units the biggest influence is the sensitivity setting Given all the above it is obvious that detection distances will vary enormously Many bats are easily detected over 30m under ...

Страница 48: ...ower the recorder using solar panels or external battery No the Chorus cannot be powered externally FURTHER INFORMATION For further information please visit the Titley Scientific website www titley scientific com ...

Отзывы: