background image

USBG-COMi-M  USB-to-RS232/422/485 Adapter User’s Manual 

11 

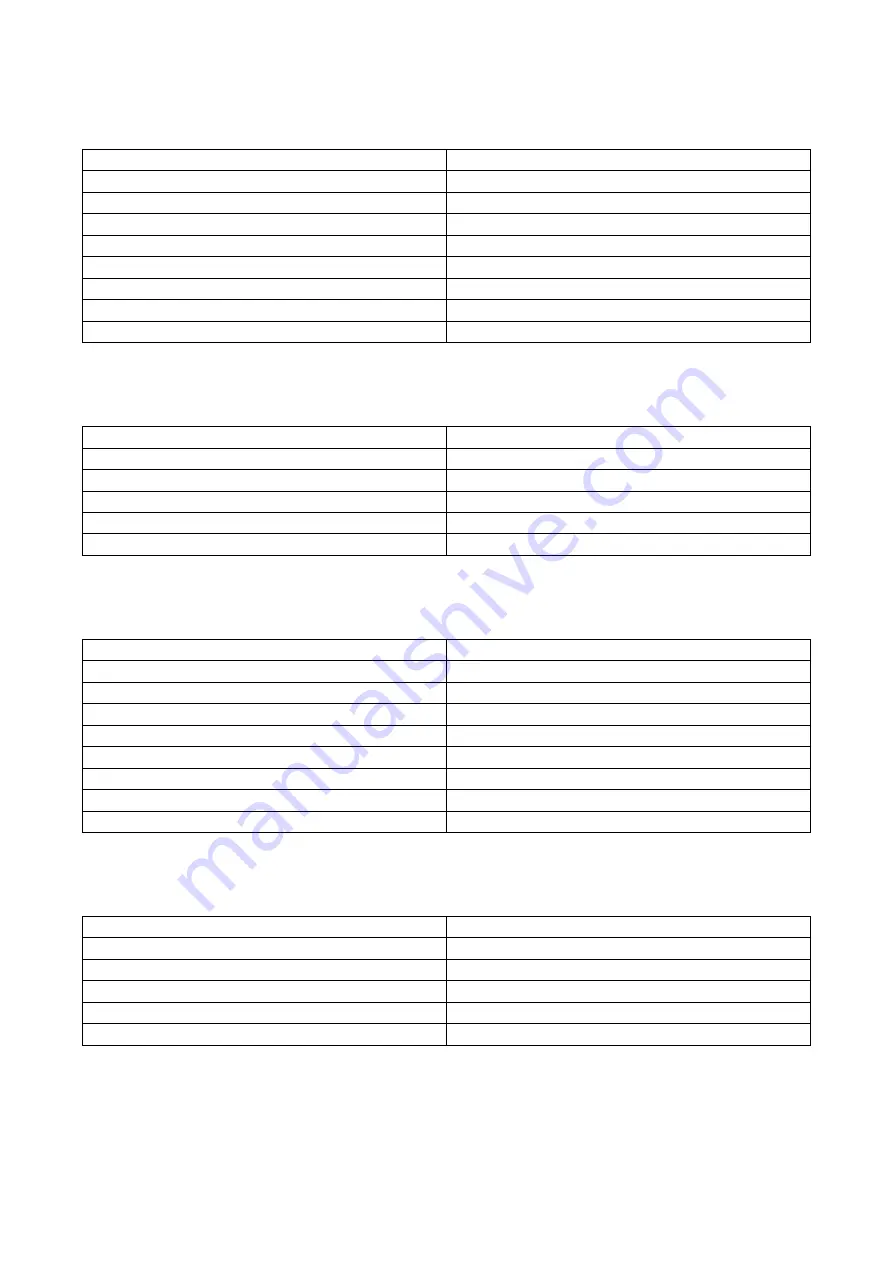
RS-232 Signal Pin-outs of DB-9 Male (CN2) 


Pin 1 

DCD 

Pin 2 

RxD 

Pin 3 

TxD 

Pin 4 

                  DTR 

Pin 5 

GND


Pin 6 

DSR 

Pin 7 

RTS 

Pin 8 

CTS 

Pin 9 

                    RI 


RS-232 Signal Pin-outs of Terminal Block (TB1) 


Pin 1 

DCD 

Pin 2 

RxD 

Pin 3 

TxD 

Pin 4 

                  DTR 

Pin 5 

+5V 

Pin 6 

GND 


RS-422 Signal Pin-outs of DB-9 Male (CN2) 


Pin 1 

Tx- (A) 

Pin 2 

Tx+(B) 

Pin 3 

Rx+(B) 

Pin 4 

Rx- (A) 

Pin 5 

GND


Pin 6 

RTS- (A) 

Pin 7 

RTS+(B) 

Pin 8 

CTS+(B) 

Pin 9 

CTS- (A) 


RS-422 Signal Pin-outs of Terminal Block (TB1) 


Pin 1 

Tx- (A) 

Pin 2 

Tx+(B) 

Pin 3 

Rx+(B) 

Pin 4 

Rx-(A) 

Pin 5 

+5V


Pin 6 

GND 


Содержание USBG-COMi-M

Страница 1: ...ons Each port is individually configurable The USB to Industrial Serial Adapter provides instant connectivity to RS 232 422 485 communication devices for factory automation equipment multi drop data collection devices barcode readers time clocks scales data entry terminals PC to PC long distance communications ATMs and serial communication in harsh environment The USB to Industrial I O Adapter pro...

Страница 2: ...eration You will need to set the switch settings to RS 232 mode or RS 422 or RS 485 mode as per the requirements of your application The Mode Block Configuration Settings are listed as follows SW External DIP Switch for Mode Setting Operation Mode S1 S2 S3 S4 RS 232 Standard RS 232 Mode OFF ON ON ON RS 422 4 wire with Handshaking ON ON ON ON RS 485 Full Duplex 4 wire ON OFF ON ON Half Duplex 2 wir...

Страница 3: ... Bias resistor This jumper should be populated for pull up Rx 11 12 Pull down Rx to GND by 750 Ohm Bias resistor This jumper should be populated for pull down Rx 13 14 CTS Termination of 120 Ohm This jumper should always be populated for RS 422 mode Note Sometimes when operating in RS 422 or RS 485 it is necessary to configure termination and biasing of the data transmission lines Generally this m...

Страница 4: ... CD dialog box appears 3 Under Driver Installation double click Windows 7 Vista 2003 XP 2000 driver to install the device driver 4 The USB COM install program will auto detect the OS type and install the driver automatically Note in Windows 7 or Vista OS you will find another dialog box please click on OK to confirm the drivers install program 5 After the message FTDI CDM Driver installation proce...

Страница 5: ...You will see that the USB Serial Port installation has been changed to the new COM Port Number Uninstalling Windows 2003 XP 2000 Drivers Please proceed with the following steps to uninstall the 2003 XP 2000 driver 1 Insert the USB COM Series Driver and Utility CD into your CD ROM 2 The USB COM Series Driver and Utility CD dialog box appears 3 Under Driver Uninstalling double click Windows 2003 XP ...

Страница 6: ...r User s Manual 6 6 Double click Yes to confirm it 7 Click No to proceed 8 When the message Status System clean completed appears double click Exit to complete the USB to serial drivers uninstall 9 Press Start button and select Control Panel ...

Страница 7: ...ndows Driver Package FTDI CDM Driver Package 12 Click Chang Remove and Yes to remove the first Windows Driver Package 13 Remove the second Windows Driver Package FTDI CDM Driver Package 14 Click Chang Remove and Yes to remove the second Windows Driver Package 15 Reboot the computer to complete the driver uninstall ...

Страница 8: ...wing steps to uninstall the Windows 7 Vista driver 1 The USB to serial devices must connect to the PC 2 Press Start button and select Control Panel 3 Select Classic View from the top left hand corner and then System from the list 4 Select Device Manager from the top left hand corner 5 Locate your Device under the Ports COM LTP section and right click on it to bring up the menu shown ...

Страница 9: ...tware for this device in the next window and press OK Note if you have more than one USB Serial Port COMx installed in your PC you need to repeat from step 5 to step 6 to delete the driver software for each port 7 Locate your Device under the Universal Serial Bus Controllers section and right click on it to bring up the menu shown ...

Страница 10: ...install and be sure to click the box for Delete the driver software for this device in the next window and press OK Note if you have more than one USB Serial Converter installed in your PC you need to repeat step 7 and step 8 to delete the driver software for all devices ...

Страница 11: ...in 8 CTS Pin 9 RI RS 232 Signal Pin outs of Terminal Block TB1 Pin 1 DCD Pin 2 RxD Pin 3 TxD Pin 4 DTR Pin 5 5V Pin 6 GND RS 422 Signal Pin outs of DB 9 Male CN2 Pin 1 Tx A Pin 2 Tx B Pin 3 Rx B Pin 4 Rx A Pin 5 GND Pin 6 RTS A Pin 7 RTS B Pin 8 CTS B Pin 9 CTS A RS 422 Signal Pin outs of Terminal Block TB1 Pin 1 Tx A Pin 2 Tx B Pin 3 Rx B Pin 4 Rx A Pin 5 5V Pin 6 GND ...

Страница 12: ... Point to Point 4 Wire Full Duplex RS 422 with Handshaking 2 Tx B Rx B Rx A Tx B Tx A GND USB COMi M RS 422 Device 1 Tx A 3 Rx B Rx A 5 GND 7 RTS B CTS B 6 RTS A CTS A 8 CTS B RTS B 9 CTS A RTS A 4 2 Tx B Rx B Rx A Tx B Tx A GND USB COMi M RS 422 Device 1 Tx A 3 Rx B Rx A 5 GND 4 ...

Страница 13: ...Pin 4 Rx A Pin 5 GND RS 485 4 Wire Full duplex Signal Pin outs of Terminal Block TB1 Pin 1 Tx A Pin 2 Tx B Pin 3 Rx B Pin 4 Rx A Pin 5 5V Pin 6 GND RS 485 2 Wire Half duplex Signal Pin outs of DB 9 Male CN2 Pin 1 Data A Pin 2 Data B Pin 5 GND RS 485 2 Wire Half duplex Signal Pin outs of Terminal Block TB1 Pin 1 Data A Pin 2 Data B Pin 5 5V Pin 6 GND ...

Страница 14: ...ultidrop RS 485 2 Wire Half duplex All brand names and trademarks are the property of their respective owners Manual Part No USBG054 2 Tx B Rx B Rx A Tx B Tx A GND USB COMi M RS 485 Device 1 Tx A 3 Rx B Rx A 5 GND 4 RS 485 Device Data B Data A GND RS 485 Device x Data B Data A GND USB COMi M 2 Data B 1 Data A 5 GND ...

Отзывы: