


GARANZIA INTERNAZIONALE TIMEX
L’orologio TIMEX® è garantito contro difetti di produzione
dalla Timex Corporation per un periodo di UN ANNO dalla
data di acquisto originaria. Timex e le sue affiliate di tutto il
mondo onoreranno questa Garanzia Internazionale.
Si prega di notare che la Timex potrà, a sua discrezione,
riparare l’orologio installando componenti nuove o accu-
ratamente ricondizionate e ispezionate, oppure sostituirlo
con un modello identico o simile. IMPORTANTE — SI
PREGA DI NOTARE CHE QUESTA GARANZIA NON COPRE I
DIFETTI O I DANNI ALL’OROLOGIO:
1)
dopo la scadenza del periodo di garanzia;
2)
se l’orologio non era stato acquistato originariamente
presso un dettagliante autorizzato Timex;
3)
causati da servizi di riparazione non eseguiti da
Timex;
4)
causati da incidenti, manomissione o abuso; e
5)
a lenti o cristallo, cinturino in pelle o a catena, cassa
dell’orologio, periferiche o batteria. La Timex potrebbe
addebitare al cliente la sostituzione di una qualsiasi di
queste parti.
QUESTA GARANZIA ED I RIMEDI IN ESSA CONTENUTI SONO
ESCLUSIVI E SOSTITUISCONO TUTTE LE ALTRE GARANZIE,
ESPRESSE O IMPLICITE, INCLUSA QUALSIASI GARANZIA
IMPLICITA DI COMMERCIABILITÀ O IDONEITÀ AD UN USO
171
ITALIANO
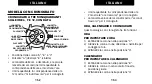
RIMONTAGGIO:
1. Riunire le parti del
bracciale.
2. Spingere di nuovo lo
spillo nella maglia, in
direzione opposta alla
freccia.
3. Premere con fermezza
lo spillo nel bracciale finché non resta a filo con esso.
BATTERIA
La Timex raccomanda caldamente di portare l’orologio
da un dettagliante o un gioielliere per far cambiare la
batteria. Se pertinente, premere il pulsante di ripristino
quando si sostituisce la batteria. Il tipo di batteria
necessario è indicato sul retro della cassa. Le stime
sulla durata della batteria si basano su determinati
presupposti relativi all’uso; la durata della batteria varia
a seconda dell’uso effettivo dell’orologio.
NON SMALTIRE LE BATTERIE INCENDIANDOLE.
NON RICARICARLE. MANTENERE LE BATTERIE
SFUSE FUORI DALLA PORTATA DEI BAMBINI.
170
ITALIANO


