background image

13

Care and Maintenance

There are no user serviceable parts inside this radio. Please refer all service problems to a qualified service facility.
If the cabinet becomes dusty wipe the exterior with a soft dust cloth only. Never use dusting sprays or polishes on the 

cabinet.
If the cabinet becomes dirty or smudged with fingerprints it may be wiped with a soft cloth that has been slightly dampened 

with a mild soap and water solution. Always disconnect the power cord from the AC outlet before cleaning and never allow 

any liquid to get inside the cabinet.

4.  Press and hold the 

MONTH/DATE button

 for 3 seconds. The month and date (MM/DD) will appear briefly followed by 

a flashing “0”. Use the SimpleSet keypad to enter the correct month and date in the MM/DD format and then press the 

ENTER button

. The clock will beep twice to confirm the setting. The Day indicator will automatically change to match 

the Year, Month, and Date you selected.

5.  Press and hold the 

TIME button

 for 3 seconds until a flashing “0” appears in the display. Use the SimpleSet keypad to 

enter the correct time, press the 

AM/PM button

 if necessary, and then press the 

ENTER button

 to save the setting. 

The clock will ‘beep’ twice to confirm that the setting was accepted and the clock will begin to run.

6.  After  you  have  reset  the  Year,  Month/Date,  and  Time  displays,  check  your  alarm  time  and  alarm  mode 

settings and adjust as required.

Lithium Battery Precautions

•  Dispose of exhausted battery properly, in accordance with your local regulations.
•  Do not leave the exhausted battery lying around where a young child or pet could play with or swallow it. If the battery is 

swallowed, contact a physician immediately.

•  Battery may explode if mistreated. Do not attempt to recharge it or disassemble it. Do not dispose of the old battery in a 

fire.

P17

Содержание T736

Страница 1: ...or other products please call our toll free number 1 800 888 4491 For additional information online registration and exclusive special offers visit our website www timexaudio com Model T736 AM FM Dual Alarm Clock Radio With Redi Set Automatic Time Setting System Time Projector Simple Set Keypad and Soothing Sounds P1 ...

Страница 2: ...ocs électriques ne pas utiliser cette fiche polarisée avec un prolongateur Une prise de courant ou une autre sortie de courant sauf si les lames peuvent étre insérées à fond sans en laisser aucune partie à decouvert The apparatus shall not be exposed to dripping or splashing and that no objects filled with liquids such as vases shall be placed on apparatus L appareil ne doit pas être exposé aux éc...

Страница 3: ...eceptacles and the point where they exit from the apparatus It is always best to have a clear area from where the cord exits the unit to where it is plugged into an AC outlet 11 Cleaning Unplug this product from the well outlet before cleaning Do not use liquid cleaners or aerosol cleaners Clean only with a dry cloth 12 Non Use Periods The power cord of the unit should be unplugged from the outlet...

Страница 4: ...r relocate the receiving antenna Increase the distance between the equipment and the radio or TV Use outlets on different electrical circuits for the equipment and the radio or TV Consult your dealer or an experienced radio television technician if the problem still exists Modifying or tampering with your system s internal components can cause a malfunction and might invalidate the system s warran...

Страница 5: ...does need to be replaced a low battery indicator begins flashing in the display Please read this manual completely to understand all of the great features included in your model Please retain this manual for future reference and because the warranty and product service info are printed at the end of this manual Preparation For Use Unpacking And Set Up Remove the radio from the carton and remove al...

Страница 6: ...ot try to force it and do not try to file the wider blade to make it fit Contact a qualified licensed electrician to replace your outdated outlet Sure Alarm Battery Back Up System This Timex Redi Set Clock Radio includes a Sure Alarm battery back up circuit that will wake you up even if the power is off at the selected wake up time If your power is off at the wake up time the clock display will be...

Страница 7: ...te Button Radio ON OFF Button Soothing Sounds Selector Alarm 1 Button Alarm 2 Button Projector On Off Button Alarm 1 Selector Off Radio Buzzer Alarm 2 Selector Off Radio Buzzer Tuning Control Line Input Jack AM FM Sounds Selector FM Antenna Wire Back Up Battery Compartment On Bottom Cabinet Display Dimmer Control Flip Projector Image Switch Projector Focus Control Volume Control AC Power Cord Spea...

Страница 8: ...e You only do this one time and the Redi Set internal computer will remember the new default zone setting and will always return to that setting after a power interruption There are 7 time zones programmed into your Redi Set clock radio ZONE 01 Atlantic Time ZONE 02 Eastern Time Default Setting ZONE 03 Central Time ZONE 04 Mountain Time ZONE 05 Pacific Time ZONE 06 Alaskan Time ZONE 07 Hawaiian Ti...

Страница 9: ...ht on February 28th in a Leap Year the calendar display will automatically change to 2 29 Note If you live in an area that does not observe Daylight Saving Time DST you may disable the automatic Daylight Saving Time DST feature Depress and hold the TIME ZONE button for 5 seconds The display will briefly show OFF and then return to the correct time The automatic DST feature is now disabled and the ...

Страница 10: ...p time and press the ENTER button again Selecting The Alarm Mode Your Redi Set clock radio allows you to select from among three different alarm operation modes for either alarm The alarm modes are Everyday the alarm will turn on all 7 days Weekdays only the alarm will only turn on Monday through Friday Weekends only the alarm will only turn on Saturday and Sunday To check the Alarm Mode setting f...

Страница 11: ...splay will change from time to radio frequency for 5 seconds and then return to time display 5 Adjust the VOLUME control to the desired setting 6 When you are finished listening press the RADIO ON OFF button to turn the radio Off Antenna Information AM The AM bar antenna is inside the cabinet If AM reception is weak change the position of the cabinet until the internal antenna picks up the stronge...

Страница 12: ...firm that the alarms are set 4 At the selected wake up time the selected sound will turn On It will play for one hour and then shut off automatically 5 To stop the sound sooner press either the appropriate ALARM 1 or ALARM 2 button or press the RADIO ON OFF button The sound will stop but the alarm remains set and will turn on again at the same time on the following day depending on the Alarm Mode ...

Страница 13: ...time that the radio will play before shutting off hold the Sleep button for 3 seconds until a 0 begins flashing in the display then use the SimpleSet keypad to enter the desired sleep timer setting between 1 minute and 99 minutes When the desired time is showing on the display press the ENTER button to save the new setting The clock will beep twice to confirm that the new setting has been accepted...

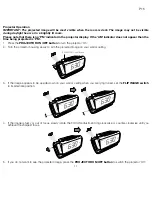
Страница 14: ...tton to turn the projector On 2 Turn the projector housing slowly to aim the projected image on your wall or ceiling 3 If the image appears to be upside down on your wall or ceiling when you are lying in bed set the FLIP IMAGE switch to its alternate position 4 If the image is fuzzy or out of focus slowly rotate the FOCUS adjustment ring clockwise or counter clockwise until you achieve the sharpes...

Страница 15: ...that secures the battery holder and slide the battery holder out of the cabinet 5 Remove the original battery from the battery holder and insert the new battery into the holder in the same way with the side facing up Slide the battery holder with the new battery back into the cabinet and secure the holder with the small screw 6 Turn the radio right side up and confirm that the Low Battery indicato...

Страница 16: ...clock will beep twice to confirm the setting The Day indicator will automatically change to match the Year Month and Date you selected 5 Press and hold the TIME button for 3 seconds until a flashing 0 appears in the display Use the SimpleSet keypad to enter the correct time press the AM PM button if necessary and then press the ENTER button to save the setting The clock will beep twice to confirm ...

Страница 17: ...rder of SDI Technologies Inc for the sum of 5 00 or 15 00 if after the warranty period or without proof of purchase 4 Send the unit prepaid to the Factory Service Center listed below Consumer Repair Department SDI Technologies Inc Timex Audio Products Division 1330 Goodyear Drive El Paso TX 79936 6420 NOTE This warranty is valid only if the product is used for the purpose for which it was designed...

Отзывы: