Timex Expedition 810-095009-NA Скачать руководство пользователя страница 21

37

E

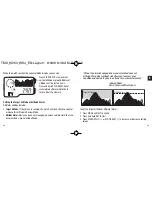
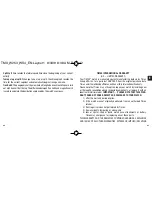
The watch also has five Altitude Reference Points (REFERENCE HOME,
REFERENCE BASE 1, REFERENCE BASE 2, REFERENCE BASE 3, and REFERENCE
MAN-ALT) which allow you to set the altitude of a known location ahead of time,
and then re-calibrate your watch at that point with one push of a button.

ATTENTION: 

Sudden changes in barometric pressure can impact

your altimeter reading. If possible, re-calibrate to a known altitude
when drastic pressure changes occur.

NOTE:  

While setting an alarm, quickly scroll through the setting 

values by holding down START/SPLIT (+) or STOP/RESET (-). 

— 

The AM/PM value will (+) only appear if you have set the watch to

display the 12-hour format.

When the alarm is armed, a bar is shown in alarm and time of day
modes above the alarm icon.

CALIBRATION MODE

The WS4

watch has the ability to take extremely accurate measurements. You

should calibrate either the Altimeter (HOME) or the Barometer (BARO), and the
Weather Icon (WEATHER) prior to first use. And, as with any precision instrument,
you should calibrate frequently to maintain accuracy. 

NOTE: 

For the best accuracy, choose the calibration method based on

the most accurate reference source available. For example, if you are
standing at a trail head and know the correct altitude, then the most
accurate calibration will be altitude. If you don’t know your altitude,
you can find out the current sea level pressure (published online or in
a newspaper) and calibrate the sensor to barometric pressure. 

36

HOME

(HOME 1 ALTI)

(ie. 800 M)

TRAIL HEAD

(BASE 1 ALTI)

(1200 M)

PEAK

(BASE 2 ALTI)

(2000 M)

LODGE

(BASE 3 ALTI)

(1000 M)

EXAMPLE: FAVORITE HIKE

TMX_W253_WS4_EN:Layout 1  9/3/09  8:38 AM  Page 36

Содержание Expedition 810-095009-NA

Страница 1: ...W253 810 095009 NA TM TM USER MANUAL TMX_W253_WS4_Cover_NA Layout 1 8 27 09 12 07 PM Page CVR2...

Страница 2: ...English page 1 Fran ais page 51 Espa ol p gina 99 TMX_W253_WS4_Cover_NA Layout 1 8 27 09 12 07 PM Page CVR4...

Страница 3: ...S 8 Time 8 Altimeter 8 Barometer 9 Temperature 9 Compass 9 Chronograph 9 Timer 10 Alarm 10 QUICK START 11 Setting the Time and Date 11 Calibrating the Compass 11 Calibrating Altitude or Barometer and...

Страница 4: ...ECAST 21 COMPASS MODE 23 Calibrating the Compass 23 Using the Compass 26 CHRONO MODE 27 Laps and Splits 29 REVIEW MODE 30 Reviewing Activity Data 30 E TIMER MODE 32 Setting the Timer 32 Operating the...

Страница 5: ...s advanced sensors that have precision accuracy and coupled with the intuitive user interface you can rely on it to give you all the right answers in even the most extreme conditions The first few pag...

Страница 6: ...at needs exercise Take it outdoors and put it and yourself through the paces Conrad Anker World Renowned Mountaineer Timex Expedition Brand Ambassador 7 6 E START SPLIT INDIGLO BUTTON SET DONE MODE NE...

Страница 7: ...to a declination angle for maximum accuracy Chronograph Stopwatch feature that will time up to 100 hours and 99 laps WATCH FEATURES Time Hours minutes and seconds displayed in 12 or 24 hour format Da...

Страница 8: ...inish Calibrating the Compass Prior to calibrating remove the watch from your wrist hold it in your hand and choose a declination angle from the table on pages 24 and 25 1 Press MODE until COMPASS app...

Страница 9: ...east 15 seconds per revolution and then press MODE 4 Press START SPLIT or STOP RESET to increase or decrease setting values to match your chosen declination angle 5 Press MODE to advance to the next s...

Страница 10: ...RR current The current altitude Note If during a hike you climb 400 meters and descend 100 meters then your accumulated altitude is 300 meters INSTRUCTIONS TIME MODE Your watch shows the time for two...

Страница 11: ...current altitude display you can also Press START SPLIT view numeric current altitude or graphic display of altitude over the last 36 hours Press and hold STOP RESET Reset accumulated altimeter stati...

Страница 12: ...EXT to advance to the next setting option 5 Press SET DONE to finish NOTE The altimeter will display in either FT feet or M meters depending on which display unit you chose in Time Mode See page 14 fo...

Страница 13: ...differ from the actual temperature by 10 degrees or more Long periods of exposure to direct sunlight may also affect accuracy The watch can also measure the temperature in water but make sure you don...

Страница 14: ...since magnetic force in these objects may interfere with the magnetic field and give you inaccurate compass readings Note that the Indiglo night light feature does not work while calibrating the compa...

Страница 15: ...dels struts calcDeclination Once you know your declination angle 1 Press MODE until COMPASS is shown 2 Hold SET to start 3 Keeping the watch level and facing up rotate it twice taking at least 15 seco...

Страница 16: ...setting values to match your chosen declination angle 5 Press MODE to advance to the next setting option 6 Press SET to finish If you see CAL OK at the end of the calibration process you have successf...

Страница 17: ...n be a good tool for mountain biking skiing or trail running You can take splits at specified trail points along the way periodically check your altimeter to see how high you ve climbed or descended a...

Страница 18: ...gh a series of graphs that show altitude barometric pressure and temperature changes over time ATTENTION To save the life of your watch battery when the chrono reaches 100 hours the watch will stop ti...

Страница 19: ...wo hours to spend on a hike You set the timer for 60 minutes and when it beeps you know it s time to turn around and start heading back to the trail head Timer information is not connected to Review M...

Страница 20: ...o dawn and the rhythm of your partners cadence are the intangible part of the expedition experience Conrad Anker World Renowned Mountaineer NOTE While setting the timer quickly scroll through the sett...

Страница 21: ...f day modes above the alarm icon CALIBRATION MODE The WS4 watch has the ability to take extremely accurate measurements You should calibrate either the Altimeter HOME or the Barometer BARO and the Wea...

Страница 22: ...tton until you hear a beep Setting and Calibrating Your Reference Points 1 Press MODE until CAL is shown 2 Hold SET to begin the calibration 3 Press START SPLIT to scroll among the reference points HO...

Страница 23: ...justed for difference in the altitude of a location Typically local pressure will be lower than sea level pressure because air pressure decreases with altitude GLOSSARY This glossary provides definiti...

Страница 24: ...repair services not performed by Timex 4 from accidents tampering or abuse and 5 lens or crystal strap or band watch case attachments or battery Timex may charge you for replacing any of these parts...

Страница 25: ...IMPLIED WARRANTY OF MERCHANTABILITY OR FITNESS FOR PARTICULAR PURPOSE TIMEX IS NOT LIABLE FOR ANY SPECIAL INCIDENTAL OR CONSE QUENTIAL DAMAGES Some countries and states do not allow limitations on imp...

Отзывы: