


3. Press
p
button, ensure iPod responds to the command correctly. If
not, remove receiver from iPod and repeat steps 2 and 3 until iPod
responds correctly.
You are now ready to wirelessly control your iPod with your watch!
TIPS:
•
Q
will be visible on display in modes where iPod use is possible
(TIME, CHRONO, INTERVAL TIMER and TIMER modes).
• There will be a slight delay in the iPod's response to button presses
on the watch. This is normal.
3 G iPod NANO & iPod CLASSIC:
• Your iPod may exhibit a slightly longer delay when responding to
iControl® watch commands.
• The volume level will not be displayed when changing volume using
your iControl® watch.
• Fast-forward or reverse through the currently playing track is not
available, therefore holding
U
or
u
watch buttons has no effect.
• It is not possible to turn your iPod off by holding
p
button.
• The iControl® watch is designed to operate up to a range of about 10
ft. (3 m). Range will be affected by watch and iPod battery voltage. If
range is greatly reduced even with iPod fully charged, it may be nec-
essary to replace watch battery. Refer to battery change instructions
at the end of these instructions.
• Receiver is powered by iPod, therefore use of the iControl system
will reduce time between charges for the iPod. Unplug receiver from
iPod when not using the iControl system.
3 G iPod NANO ONLY:
• The backlight may cause interference with iControl® operation,
especially with backlight timer settings greater than 10 seconds.
If iControl® operation is unreliable when the backlight is on, try
reducing the Backlight Timer setting. This setting can be found in the
settings menu on the iPod.
iPod TOUCH ONLY
• The volume will increase or decrease two steps for each press of the
iControl® volume up (+) or volume down (–) key.
BASIC OPERATIONS
When setting, each button has a different function as indicated above.
Display indicates when button changes function.
iPod CONTROL
GETTING STARTED WITH YOUR iControl® WATCH
Perform these steps each time you are attaching the receiver device to
your iPod to ensure reliable operation:
1. Press MODE until watch is in TIME mode.
Q
will be visible on display.
2. Plug receiver into iPod dock connector.
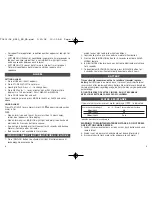
2
3
START/SPLIT
INDIGLO
®
BUTTON
STOP/RESET/SET
OR DONE (To save
changes and exit
setting)
MODE OR NEXT
(Proceed to next step)
VOLUME UP
OR Increase value.
Hold to increase rapidly
NEXT TRACK
OR Proceed to next step
VOLUME DOWN
OR Decrease value.
Hold to decrease rapidly
iPod® ICON
PREVIOUS TRACK
(Refer to Mode
descriptions for
operation)
PLAY/PAUSE
(Refer to Mode
descriptions for
operation)
VOLUME UP
NEXT TRACK
VOLUME DOWN
T0801-06_W240_EN_NA.qxd 1/21/08 10:29 AM Page 2