Timewatch ULTraFace 331 Скачать руководство пользователя страница 45

5. Enter the Live View page and double-click the added device to start live view.

Note

For details about operations in the Live View page, see Live View in the user manual of the

client software.

6. Right click the live view image to open the right-click menu.

7. Click Start Two-Way Audio to start two-way audio between the device and the client software.

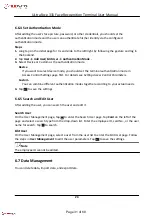
6.14.4 Call Room from Device

Steps

1. Get the client software from the supplied disk or the official website, and install the software

according to the prompts.

2. Run the client software and the control panel of the software pops up.

3. Click Device Management to enter the Device Management interface.

4. Add the indoor station and the device to the client software.

Note

For details about adding device, see Add Device.

5. Link a user to an indoor station and set a room No. for the indoor station.

6. Call the room.

-

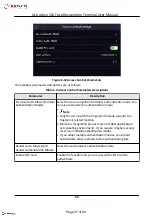
If you have configured a specified room No. in the Basic Settings , you can tap 

 to call the

room.

-

If you have not configured a specified room No. in the Basic Settings , you should tap   on

the authentication page of the device. Enter the room No. on the dial page and tap   to call

the room.

7. After the indoor station answers the call, you can start two-way audio with the indoor station.

38

ULtraFace 331 Face Recognition Terminal User Manual

Page 45 of 68

Содержание ULTraFace 331

Страница 1: ...ULtraFace 331 Face Recognition Terminal User Manual Page 1 of 68...

Страница 2: ...Cable 9 Chapter 5 Activation 10 5 1 Activate via Device 10 5 2 Activate via SADP 11 5 3 Activate Device via Client Software 12 Chapter 6 Basic Operation 13 6 1 Select Language 13 6 2 Set Application...

Страница 3: ...asic Settings 27 6 10 Set Biometric Parameters 28 6 11 Set Access Control Parameters 29 6 12 Time and Attendance Status Settings 31 6 12 1 Disable Attendance Mode via Device 31 6 12 2 Set Manual Atten...

Страница 4: ...45 7 5 7 Network Settings 45 7 5 8 Set Video and Audio Parameters 47 7 5 9 Set Video Intercom Parameters 48 7 5 10 Set Access Control and Authentication Parameters 49 7 5 11 Set RS 485 Parameters 50 7...

Страница 5: ...n 74 8 4 10 Configure Additional Information 74 8 4 11 Import and Export Person Identify Information 75 8 4 12 Import Person Information 75 8 4 13 Import Person Pictures 75 8 4 14 Export Person Inform...

Страница 6: ...vent 103 8 8 3 Configure Device Actions for Card Swiping 104 8 9 Door Control 105 8 9 1 Control Door Status 105 8 9 2 Check Real Time Access Records 106 8 10 Event Center 107 8 10 1 Enable Receiving E...

Страница 7: ...ing Comparing Face Picture 133 Appendix B Tips for Installation Environment 135 Appendix C Dimension 136 Appendix D Communication Matrix and Device Command 137 xiv ULtraFace 331 Face Recognition Termi...

Страница 8: ...20 000 captured pictures storage Face recognition duration 0 2 s User face recognition accuracy rate 99 Capture linkage and captured pictures storage Transmits card and user data from or to the client...

Страница 9: ...ecording or capturing videos or pictures 4 Camera 2 Recording or capturing videos or pictures 5 microUSB Interface Connect to USB flash drive via a microUSB to USB cable 6 Tamper After installation if...

Страница 10: ...desk or other flats by using the mounting bracket Steps 1 Route the cables through the cable hole of the bracket and connect the terminals with external devices cables 2 Align the device two holes wit...

Страница 11: ...ng template on the wall or other surface 1 45 meters higher than the ground Figure 3 2 Mounting Template 2 Drill holes on the wall or other surface according to the mounting template and install the g...

Страница 12: ...through the cable hole of the mounting plate and connect the terminals with the external devices cables 5 Align the device with the mounting plate and hang the device on the mounting plate Figure 3 5...

Страница 13: ...ght here is the recommended height You can change it according to your actual needs For easy installation drill holes on mounting surface according to the supplied mounting template 6 ULtraFace 331 Fa...

Страница 14: ...e distance between the power supply and the device should be no more than 80 m If the device has no peripherals to be wired it supports wiring with the power supply by using the supplied adaptor 4 1 T...

Страница 15: ...e 485 B3 Black GND Ground Group C C1 Door Lock Orange NC Lock Wiring NC C2 Green COM Common C3 Grey NO Lock Wiring NO C4 White SENSOR Door Contact Sensor C5 Purple BTN Exit Door Wiring C6 Black GND Gr...

Страница 16: ...ectly 4 3 Wiring with Power Cable Wire the device with power supply directly by using the supplied power cable if the device has no other peripherals to be wired The wiring diagram is shown below Figu...

Страница 17: ...age create a password and confirm the password Tap Activate and the device will activated Figure 5 1 Activation Page Caution The password strength of the device can be automatically checked We highly...

Страница 18: ...er activation you should select an application mode For details see Set Application Mode After activation if you need to add the device to the client software or other platforms you should edit the de...

Страница 19: ...word in the password field and confirm the password Caution The password strength of the device can be automatically checked We highly recommend you change the password of your own choosing using a mi...

Страница 20: ...e page select Indoor or Others from the drop down list Figure 6 1 Welcome Page 2 Tap OK to save Note You can also change the settings in System Settings If you install the device indoors near the wind...

Страница 21: ...nal and tap Next Figure 6 2 Add Administrator Page 2 Select a credential to add Note Up to one credential should be added Face forward at the camera Make sure the face is in the face recognition area...

Страница 22: ...ter the device room No and tap OK to call Tap to call the center Note The device should be added to the center or the calling operation will be failed Enter password to authenticate 6 4 Login Login th...

Страница 23: ...Figure 6 4 Home Page Note The device will be locked for 30 minutes after 5 failed attempts 3 Optional Tap and you can enter the device activation password for login 4 Optional Tap and you can exit the...

Страница 24: ...d field and enter the device activation password 3 Tap OK to enter the home page Note The device will be locked for 30 minutes after 5 failed password attempts Figure 6 5 Home Page 6 5 Communication S...

Страница 25: ...device s IP address and the computer IP address should be in the same IP segment 6 5 2 Set Wi Fi Parameters You can enable the Wi Fi function and set the Wi Fi related parameters Steps Note The funct...

Страница 26: ...subnet mask and the gateway automatically If disable DHCP you should enter the IP address the subnet mask and the gateway manually 6 Tap OK to save the settings and go back to the Wi Fi tab 7 Tap to...

Страница 27: ...add edit delete and search the user 6 6 1 Add Face Picture Add user s face picture to the device And the user can use the face picture to authenticate Steps Note Up to 300 face pictures can be added 1...

Страница 28: ...ures see Tips When Collecting Comparing Face Picture After completely adding the face picture a captured face picture will be displayed at the upper right corner of the page 7 Tap Save to save the fac...

Страница 29: ...the Name field and input the user name on the soft keyboard Note Numbers upper case letters lower case letters and special characters are allowed in the user name The suggested user name should be wit...

Страница 30: ...plicated 4 Tap the Name field and input the user name on the soft keyboard Note Numbers upper case letters lower case letters and special characters are allowed in the user name The suggested user nam...

Страница 31: ...l Parameters Custom You can combine different authentication modes together according to your actual needs 4 Tap to save the settings 6 6 5 Search and Edit User After adding the user you can search th...

Страница 32: ...ame_Department_Employee ID_Gender jpg If the file enroll_pic cannot save all imported pictures you can create another files named enroll_pic1 enroll_pic2 enroll_pic3 enroll_pic4 under the root directo...

Страница 33: ...res stored in the device 6 8 1 Authenticate via Face If the authentication mode is Face position the face looking at the camera to start face authentication If authentication completed a prompt Authen...

Страница 34: ...authentication page including the QR code function the call function and the password entering function Voice Settings You can enable disable the voice prompt function and adjust the voice volume Not...

Страница 35: ...1 Biometric Parameters Page Table 6 1 Face Picture Parameters Parameter Description Select Application Mode You can select either others or indoor according to actual environment Face Liveness Level Y...

Страница 36: ...era to authenticate faces in the low light or dark environment And you can set he ECO mode threshold ECO mode 1 N and ECO mode 1 1 ECO Threshold When enabling the ECO mode you can set the ECO mode s t...

Страница 37: ...dule supports the fingerprint related function Biometric recognition products are not 100 applicable to anti spoofing environments If you require a higher security level use multiple authentication mo...

Страница 38: ...ime and attendance function on the client software 6 12 1 Disable Attendance Mode via Device Disable the attendance mode and the system will not display the attendance status on the initial page Tap T...

Страница 39: ...marked as a valid attendance 6 12 3 Set Auto Attendance via Device Set the attendance mode as auto and you can set the attendance status and its available schedule The system will automatically chang...

Страница 40: ...e 5 Tap Confirm 6 Repeat step 1 to 5 according to your actual needs Note The attendance status will be valid within the configured schedule Result When you authenticate on the initial page the authent...

Страница 41: ...nter the T A Status page 2 Set the Attendance Mode as Manual and Auto Figure 6 16 Manual and Auto Mode 3 Select an attendance status and set its schedule 1 Select Check In Check Out Break Out Break In...

Страница 42: ...Maintenance You can view the system information and the capacity You can also upgrade the device restore to factory settings and restore to default settings Long tap on the initial page for 3 s and s...

Страница 43: ...ce from the client software call the master station from the device call the client software from the device or call the indoor station from the device 6 14 1 Call Client Software from Device Steps 1...

Страница 44: ...ation page Note For details about the operation see the user manual of the master station 6 Call the center If you have configured to call center in the Basic Settings you can tap to call the center I...

Страница 45: ...panel of the software pops up 3 Click Device Management to enter the Device Management interface 4 Add the indoor station and the device to the client software Note For details about adding device se...

Страница 46: ...age Enter the device user name and the password Click Login Login via Remote Configuration of Client Software Download and open the client software After adding the device click to enter the live view...

Страница 47: ...stream Select the window division type when starting live view Full screen view 7 3 Person Management Click and add the person s information including the basic information card authentication mode a...

Страница 48: ...re format should be JPEG and the size should be less than 200K Click Save to save the settings Add Authentication Mode Click User Add to enter the Add Person page Set the authentication mode Click Sav...

Страница 49: ...puter and click Save You can also click Open to open the file folder to view details Set Captured Pictures Saving Path Click Configuration Local to enter the Local page Select a saving path from your...

Страница 50: ...nually or check Sync with Computer Time to synchronize the device time with the computer s time 7 5 4 Set DST Steps 1 Click Configuration System System Settings DST Figure 7 4 DST Page 2 Check Enable...

Страница 51: ...n Import and Export Parameters Click Configuration System Maintenance Upgrade Maintenance Export Click Export to export the logs or device parameters Note You can import the exported device parameters...

Страница 52: ...s and special characters in order to increase the security of your product And we recommend you change your password regularly especially in the high security system changing the password monthly or w...

Страница 53: ...ver Set the preferred DNS server and the Alternate DNS server according to your actual need Set EHome Parameters Set the EHome parameters for accessing device via EHome protocol Steps Note The functio...

Страница 54: ...me password and encryption type Click Connect When the Wi Fi is connected click OK 4 Optional Set the WLAN parameters 1 Click TCP IP Settings 2 Set the IP address subnet mask and default gateway Or ch...

Страница 55: ...s after the configuration 7 5 9 Set Video Intercom Parameters The device can be used as a door station or outer door station You should set the device No before usage Set Device No Click Configuration...

Страница 56: ...dress After setting the parameters you can communicate among the access control device door station indoor station master station and the platform Click Save to save the settings after the configurati...

Страница 57: ...your actual needs from the drop down list Display Result with Check Face Picture Name or Employee ID When authentication is completed the system will display the selected contents in the result Min Re...

Страница 58: ...connect the device to a controller set the RS 485 address according to the door No Baud Rate The baud rate when the devices are communicating via the RS 485 protocol Output Type If you select Access...

Страница 59: ...d provide clear images with details Brightness Contrast Saturation Sharpness Drag the block or enter the value to adjust the live video s brightness contrast saturation and sharpness Start end recordi...

Страница 60: ...are not 100 applicable to anti spoofing environments If you require a higher security level use multiple authentication modes Live Face Detection Security Level After enabling the face anti spoofing f...

Страница 61: ...t And you can set the ECO mode threshold ECO mode 1 N and ECO mode 1 1 ECO Mode 1 1 Set the matching threshold when authenticating via ECO mode 1 1 matching mode The larger the value the smaller the f...

Страница 62: ...hen no operation with the configured sleep time Customize Screen Saver Enable the function and you can upload the screen saver pictures from the local PC You can also set the slide show interval for t...

Страница 63: ...picture below Do not wear hat sunglasses or other accessories that can affect the facial recognition function Do not make your hair cover your eyes ears etc and heavy makeup is not allowed Posture In...

Страница 64: ...134 ULtraFace 331 Face Recognition Terminal User Manual Page 64 of 68...

Страница 65: ...ue Candle 10Lux Bulb 100 850Lux Sunlight More than 1200Lux 2 Install the device at least 2 meters away from the light and at least 3 meters away from the window or door 3 Avoid backlight direct and in...

Отзывы: