Timco Tools 101604279 Скачать руководство пользователя страница 19

SODIUM BICARBONATE   

Loading SODA media   
Before loading Soda media, please clear common abrasive if it is existed in the tank.  
Unscrew the plug (44) and remove the composite gasket (43). Pour soda into the storage tank through the 

sand mouth (42) using a funnel. Do not overfill. Reinstall the combination gasket and the plug.   
  

1.


Pull off the Air Hose (38), unscrew Delicate Media Regulator by Bushing (4). Use the 

Funnel, pour the Soda media into the tank (7). Do not fill the tank more than 3/4 full.  

2.


Screw Delicate Media Regulator by Bushing (4), insert the Air Hose (38), assuring o-ring is 

in place. 3. Insert the Air Hose (38) into the Quick Disconnect Fitting (41)   
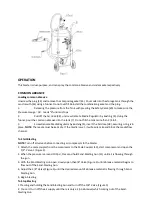
  

To Start Blasting  
1.


Connect air compressor to the Male Coupler (30).  

2.


Start compressor and open 1/4” Valve-1 (Figure 3).  

3.


Turn on the 1/4” Valve-2 (Figure 3) to release the media when the pressure to exceed 100 psi.  

4.


Picked up the Soda Media Nozzle shown Figure 3, towards the sandblasting parts, you can adjust Media 
Flow Control Knob to increase or decrease the media flow rate. (


Clockwise increases


counterclockwise decreases )  


To Stop Blasting  
Turn the 1/4” Valve-2 (Figure 3) to the closed position.`  
Note: Select the proper nozzle for its caliber suitable to the size of the sand media particles. Please 

contact with local dealer if you need other ceramic nozzle.   

Always keep the sand media in dry condition.If the sand medium moisture, the flowing pipe is easy to be 

clogged. When the flow rate of the blasting is slow down, you can shake the tank (7) by hand to loose 
media particles conducive to flow. In this way, the effect of sandblasting will be improved greatly.  
  

INSPECTION, MAINTENANCE, AND CLEANING  

1.


WARNING! Prior to performing any inspection, maintenance, or cleaning of the Pressurized Abrasive  

Blaster, turn off the air compressor. Turn the 1/4” Valve-1 (Figure 3) and the 1/4” Valve-2 (Figure 3) to the 

“OFF” position. Use the Safety Valve (40) to release any remaining air pressure in the Tank (7). Check to 
make sure the Pressure Gauge reads “0” PSI. Then, disconnect the compressor hose from the Male 
Coupler (30) of the unit.  

2.


Every day, when the air supply, according to the component manufacturer's instructions for 
maintenance, day-to-day maintenance of the shock wave in the gas supply will make the operation 
safer and will also reduce the wear and tear of the shock wave.  

3.


Check screw loosening, dislocation or a combination of moving parts, cracked or broken parts, air hose 
damage, as well as any other conditions that may affect the safe operation before you each use.  

4.


To clean the exterior of the Pressurized Abrasive Blaster, wipe with a clean, damp cloth using a mild 
detergent or mild solvent. Do not immerse the tool in liquids.  

5.


When storing, always store the Pressurized Abrasive Blaster in a clean, dry, safe location out of reach of 
children and other unauthorized people.  

6.


Have the internal mechanism cleaned and inspected, by a qualified technician.  


PLEASE READ THE FOLLOWING CAREFULLY  

THE MANUFACTURER AND/OR DISTRIBUTOR HAS PROVIDED THE PARTS LIST AND ASSEMBLY DIAGRAM IN  
THIS MANUAL AS A REFERENCE TOOL ONLY.NEITH-  
ER THE MANUFACTURER OR DISTRIBUTOR MAKES ANY REPRESENTATION OR WARRANTY OF ANY KIND TO  

Содержание 101604279

Страница 1: ...amista ja k ytt Ohjeiden noudattamatta j tt minen voi aiheuttaa vakavan loukkaantumisen PID OHJE TALLESSA S ILYT N M OHJEET Kiitos ett ostit tuotteemme Lue ohje huolellisesti ennen soodapuhaltimen k y...

Страница 2: ...a 3 pit ksesi kosteuden poissa s ili st 8 Kiinnit ty kappale tukevasti niin ettei se p se liikkumaan ty st n aikana Vahinkojen v ltt miseksi suosittelemme ett testaat puhallinta matalalla puhallinaine...

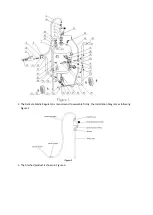
Страница 3: ...2 Suosittelemme ett kokoat s timen ensin kuva 2 3 Kuva 3 kuvastaa valmiiksi koottua tuotetta...

Страница 4: ...t Puhalluksen aloittaminen HUOMAA Sulje kaikki venttiilit ennen kuin kytket kompressorin puhaltimeen 1 Liit kompressorin urosliitin laitteen urosliittimeen 30 k ynnist kompressori ja avaa nelj nnestuu...

Страница 5: ...ROITUS Sulje kompressori ennen tarkastus yll pito tai puhdistustoimia Sulje nelj nnestuuman venttiili 1 kuva 3 ja nelj nnestuuman venttiili 2 kuva 3 Vapauta s ili n 7 paine avaamalla varoventtiili 40...

Страница 6: ...silukko 3 Vett s ili ss Tyhjenn s ili ja t yt se uudelleen Kompressori ylikuormittuu 1 Liian pienitehoinen kompressori K yt tehokkaampaa kompressoria tai jaksota k ytt 2 Liian suuri suutin K yt pienem...

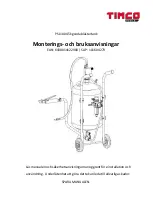
Страница 7: ...Maahantuoja Suomi Trading Oy Areenakatu 7 37570 Lemp l asiakaspalvelu suomitrading fi...

Страница 8: ...nk Monterings och bruksanvisningar EAN 6438014122908 SAP 101604279 L s manualen och s kerhetsanvisningarna noggrant f re installation och anv ndning Underl tenhet att g ra detta kan leda till allvarli...

Страница 9: ...ss luftslangen n r du avslutar anv ndningen ppna f rsiktigt kvartal tums ventil 1 p nytt f r att frig ra trycket i beh llaren St ng kvartal ventil 1 bild 3 kvartal ventil 2 bild 3 och 3 8 tums ventile...

Страница 10: ...ATION Observera Anv nd g ngtejp i alla fogar f r att undvika l ckage 1 Montera produkten enligt bild 1 2 Vi rekommenderar att du monterar regulatorn f rst bild 2 3 I bild 3 visas en f rdigt monterad p...

Страница 11: ...l bl stringsmedlet torrt Fuktigt bl stringsmedel t pper till fl det Att p b rja bl stringen OBSERVERA St ng alla ventiler innan du kopplar kompressorn i bl stern 1 Koppla fast kompressorns hankoppling...

Страница 12: ...kurmedel minskar kan du skaka p beh llaren 7 f r hand f r att f rb ttra fl det Bra fl de f rb ttrar betydligt sodabl sterns effekt KONTROLL UNDERH LL OCH RENG RING 1 VARNING St ng kompressorn innan ko...

Страница 13: ...stringsmedlet r v tt Byt ut eller torkabl stringsmedlet 2 Luften r f r fuktig Avrinn vattenl set 3 Vatten i beh llaren T m beh llaren och fyll den p nytt Kompressorn verbelastas 1 En kompressor med f...

Страница 14: ...Import r Suomi Trading Oy Areenakatu 7 37570 Lemp l asiakaspalvelu suomitrading fi...

Страница 15: ...ilure to do so may result in serious injury SAVE THIS MANUAL SAVE THESE INSTRUCTIONS Thank you for purchasing our 100lb Dual Tank Soda Blaster Before use your blaster please read manual instruction ca...

Страница 16: ...vent moisture from being drawn into the tank 8 Keep the work piece stable and firmly secured to prevent movement when using this blaster It is strongly recommended testing the blaster in small media f...

Страница 17: ...2 The Delicate Media Regulator is recommend to assemble firstly the Installation Diagram as following Figure 2 3 The finished product is shown in Figure 3...

Страница 18: ...is in place NOTE The media must be kept dry If the media is wet it will easily cake and block the media flow channel To Start Blasting NOTE Turn off all valves before connecting air compressor to the...

Страница 19: ...he tank 7 by hand to loose media particles conducive to flow In this way the effect of sandblasting will be improved greatly INSPECTION MAINTENANCE AND CLEANING 1 WARNING Prior to performing any inspe...

Страница 20: ...ller grit size 3 Nozzle plugging Use larger Nozzle 4 Nozzle plugging Adjust Abrasive Control Valve 5 Wet media Dry media Drain water from Water Trap Moisture in abrasive media 1 Wet media Change or us...

Страница 21: ...Imported by Suomi Trading Oy Areenakatu 7 37570 Lemp l asiakaspalvelu suomitrading fi...

Отзывы: