background image

MENU

Still

16:9

Favorite

OK

Swap

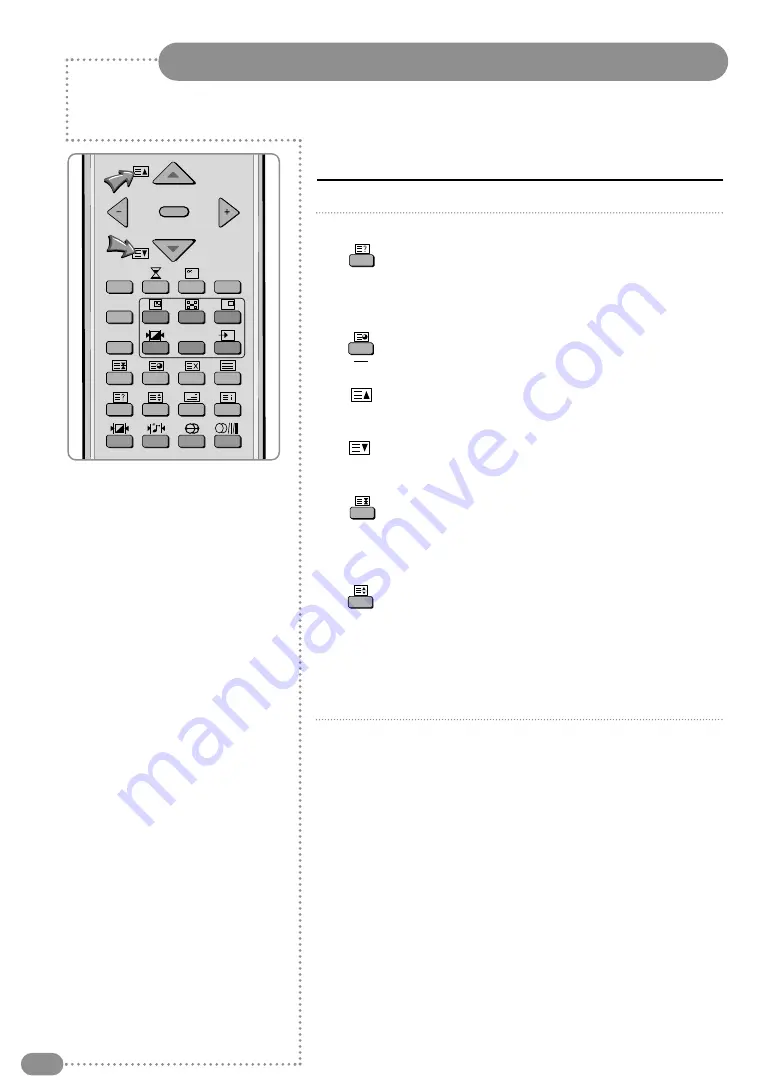
Selecting a Special Teletext Functions

28

REVEAL

Displays concealed text such as answer to
quiz games.
To return to normal viewing, press this
button again.

SUB-PAGE

Displays a secondary page by entering its
number.

PAGE UP

Displays the next page.

PAGE DOWN

Displays the previous page.

HOLD

When the secondary pages are displayed in

sequence, press the HOLD button.

To freeze the current display page, press the
HOLD button again to resume.

SIZE

Whenever you press this button, the letter 
size of the page will be changed.
Once press : The letter of the top half page

enlarge to double size.

Twice press : The letter of the bottom half

page enlarge to double size.

Three times press : Return to the normal

viewing.

Selecting a Special Teletext Functions

MENU                Functions

Содержание TV/17/FR

Страница 1: ...17 TileVision Operating instructions P O RT E R L A N C A S T R I A N PORTER LANCASTRIAN LIMITED www tilevision tv ...

Страница 2: ...You can switch among the Music Movie News and Normal options or you can configure the settings yourself Favourite Channel Memory You can store your favourite channels in the order of preference for easy channel selection Teletext Function You can display teletext information at any time on your TileVision CAUTION RISK OF ELECTRIC SHOCK DO NOT OPEN This symbol is intended to alert the user to the p...

Страница 3: ...s coming from the unit unplug it immediately and contact an authorised dealer or repair service This may cause an electric shock or fire If an outside antenna is connected to the unit ensure the external to internal cable entry is fully sealed This may cause an electric shock or fire Do not connect too many extension cords or plugs to an outlet This may cause a fire Keep the power adaptor away fro...

Страница 4: ...2 Tools Required Suction Lifter Silicone Isopropyl Alcohol Isopropyl Alcohol Soft Cloth ...

Страница 5: ...5 Customising the Sound 16 Adjusting the Speaker Volume Selecting the Speaker Sound Source 17 Listening to Stereo Sound Dual Sound 18 Setting the Sound Effect 18 Setting the Date Time 19 Setting the Preset Time On Off 20 Setting the Sleep Timer 20 Setting Restrictions On Button Input 21 Reducing Picture Noise 21 Setting the OSD Display Time 22 No Key Operation Auto Power Off 22 No Signal Auto Powe...

Страница 6: ...ing contact your dealer Two boxes supplied 1 Back Box Assembly first fix 2 speakers 2 lengths speaker cable 1 12V DC Adaptor 1 12v DC Power cord 1 back box 1 Back box Installation instructions 2 Front Assembly second fix 1 front plate assembly complete with velcro sealing strips 1 remote control 1 Installation and instruction manual ...

Страница 7: ...atus Connector Inputs Power Input Jack Power Input Jack 7 pin Not Used RGB Video Input Connector PC DTV DVD Video Y Pb Pr Input DTV DVD Audio Input 1 2 3 4 5 AV1 S Video Input AV1 Video Input AV1 Audio Input Antenna Input Jack EURO SCART Jack 6 7 8 9 10 12VDC Y Pb Pr L R S VIDEO VIDEO L R Audio ANT Audio DTV DVD AV1 EURO SCART RGB POWER 4 6 3 2 1 5 7 8 9 10 ...

Страница 8: ... give the lead a slight pull to make sure that it is gripped correctly Connect the other wires in the same way To ensure that the speakers are in correct phase the conductor with the stripe should be connected to the negative terminal L or R and the plain conductor should be connected to the corresponding positive terminal L or R Antenna Feed Plug the antenna feed into the ANT Input jack 9 See pag...

Страница 9: ...l must be received by the set from one of the following sources an outdoor antenna a cable television system or a satellite dish Connect the antenna or input cable to the 75Ω coaxial input on the rear of the TV If you are using an indoor antenna you may need to turn it when tuning your television until you receive a clear picture ...

Страница 10: ...rnal equipment such as a VCR camcorder and some video game devices B For S Video Input 1 Connect the S Video RCA audio L R of AV1 or AV2 cable to the input jacks on the TV and output jacks on the external equipment such as a VCR camcorder and some video game devices 2 If the external equipment has mono audio output connect it only to left jack of the Audio Input Output S Video VIDEO L R AV1 VCR Ca...

Страница 11: ...ctor is used for external equipment with RGB output such as a VCR satellite receiver camcorder or video game devices You can select and set one among the three types of cables A B appropriate for the output jack of external device All connections must be made prior to sealing the front plate into the back box 1 Connect the video cables to the Y Pb Pr input jacks AV3 on the TV and the Y Pb Pr outpu...

Страница 12: ...nce you are satisfied that the unit is tuned and working correctly press the Power 0 I button to put the unit in standby mode Gently remove the front plate using a suction lifter please do not use a lever to remove the front plate as this will invalidate your guarantee Next remove the self adhesive protectors from the side and bottom Velcro strips and press the front panel in the back box with rea...

Страница 13: ...e er ri ie es s r ru un n o ou ut t Remote Control 11 Power On Off button Numeric buttons Previous Channel ON Screen Display and MENU and Channel Up Down Page 15 Teletext Page Up Down Page 30 Favourite Channel selection See page 25 Sleep Timer See page 22 Picture Still See page 28 Picture size selection See page 28 Teletext Functions See page 29 30 Teletext On Off Cancel Sub Page On Page Hold Inde...

Страница 14: ...r more times INPUT 1 2 3 4 5 6 PC DTV 7 8 9 Q View 0 VIDEO Pr C S Selecting a Picture from External Sources VIDEO After your various systems audio and video have been connected you can view any of the sources by selecting the appropriate external input 1 Press the MENU button 2 Press the button to select the language and then press the OK or button 3 Select the appropriate language by pressing the...

Страница 15: ...select the Sound System in the following order I L L M BG DK U Us se e t th he e A Au ut to o t tu un ni in ng g d du ur ri in ng g a a b br ro oa ad dc ca as st t a af ft te er r c co on nn ne ec ct ti in ng g t th he e a an nt te en nn na a Press the button to select Manual tuning Press the button to select C broadcast channels or S cable channels and press the channel number with the number 0 9...

Страница 16: ...n set the channel lock by pressing the button to move to the channel position you want to lock and pressing the button You can set a channel skip by pressing the button to move to the channel you do not want to watch or do not need and pressing the button You can delete a channel by pressing the button to move to the channel you do not want to watch or do not need and pressing the button Delete De...

Страница 17: ...brightness of the whole screen Sharpness Corrects the contours of the image Colour Adjusts the colour saturation of the image Tint Adjusts the colours of the image I If f y yo ou u a ad dj ju us st t t th he e T TV V i in n s st te ep p w wh hi il le e i it t i is s i in n S St ta an nd da ar rd d S Sp po or rt ts s N Na at tu ur ra al l o or r M Mi il ld d m mo od de e t th he e m mo od de e w wi...

Страница 18: ...just the setting manually Press the button to select Custom and press the button to select the frequency that you want to adjust The frequency range will be selected as following order 100 300 1K 3K 10K Press the button to adjust I If f y yo ou u a ad dj ju us st t t th he e f fr re eq qu ue en nc cy y H Hz z 4 4 H Hz z K KH Hz z 4 4K KH Hz z K KH Hz z i in n S St ta an nd da ar rd d M Mu us si ic...

Страница 19: ...e button to adjust the speaker volume Press the button to select the Input Source of the speaker Press the button to select the sound source of the speaker Main PIP TV SCART AV1 AV2 DTV 1 2 3 4 5 6 MENU Favorite OK Picture Sound Clock Install Language Advanced MENU Previous Select INPUT Exit OK Select Position Balance R5 Equalizer Volume 2 Input Source Main MENU Previous Adjust INPUT Exit Position...

Страница 20: ...ol to select Mono or Stereo Mono or Stereo be will selected in turn whenever you press the button S Se el le ec ct t M Mo on no o s so ou un nd d w wh he en n y yo ou u h ha av ve e d di if ff fi ic cu ul lt ty y w wi it th h s st te er re eo o s so ou un nd d 1 1 Still 16 9 Favorite OK Swap Setting the Sound Effect Press the button on the remote control to select Off or Pseudo Off or Pseudo will ...

Страница 21: ...or OK button Press the button to move between Date Month Year Press the or number 0 9 buttons to adjust the Date and repeat the above steps 3 4 to adjust the Month and Year in the same way You can erase and reset the Date by pressing the OK button Press the button to select Clock and press the OK or button to move to time adjust Press the or number 0 9 buttons to adjust the Hour and Minute Adjust ...

Страница 22: ...button to select Off time Press the button to move to the Hour or Minute Press the or Number 0 9 button to adjust the Hour or Minute and then press the button You can erase and reset the Hour and Minute by pressing the OK button 1 2 3 4 5 Setting the Sleep Timer Press the button Whenever you press this button the sleep timer will select times in the following order Sleep off Sleep5 Sleep10 Sleep20...

Страница 23: ... fu un nc ct ti io on n w wi it th h t th he e r re em mo ot te e c co on nt tr ro ol l Use this function when you have a bad image with the picture noise Press the MENU button The Main menu screen will display Press the button to select the Advanced group and press the or OK button You will see the Advanced group screen Press the button to select NR Press the button to select On Whenever you pres...

Страница 24: ...U b bu ut tt to on n a af ft te er r a ad dj ju us st ti in ng g t th he e O OS SD D t ti im me eo ou ut t t th he e m me en nu u s sc cr re ee en n w wi il ll l d di is sa ap pp pe ea ar r a au ut to om ma at ti ic ca al ll ly y a af ft te er r t th he e s se et t t ti im me e 7 7 I If f y yo ou u s se et t o o m me en nu u s sc cr re ee en n w wi il ll l n no ot t d di is sa ap pp pe ea ar r a a...

Страница 25: ...nnel Press the button to move the position and press the button to select Program No AV etc You can select up to 5 Program No AV etc You can direct select input sources by pressing the PC DTV and Video button or select them by pressing the or button The input sources are changed in following order Pr00 Pr99 SCART AV1 VIDEO AV1 S VHS AV2 VIDEO AV2 S VHS DTV PC also you can direct input program No b...

Страница 26: ...while watching the TV PC or in VIDEO the main image 2 Y Yo ou u c ca an n c ch ha an ng ge e t th he e m ma ai in n p pi ic ct tu ur re e c ch ha an nn ne el l b by y p pr re es ss si in ng g t th he e b bu ut tt to on n Press the button on the remote control The PIP position will change among 5 positions whenever you press this button 1 Changing the PIP Position Still 16 9 Favorite OK Swap 4 1 3 ...

Страница 27: ...press this button 1 Changing the PIP Size Press the button on the remote control The PIP mode will change whenever you press this button Standard Sports Natural Mild Custom 1 Changing the PIP Mode Press the button on the remote controller The Main image and PIP image will switch with each other whenever you press this button 1 Swapping the Main Sub Picture Still 16 9 Favorite OK Swap Swap ...

Страница 28: ...ng the main and PIP images at the same time The PIP image will change only from 4 3 to 16 9 4 3 Broadcast or video images 16 9 Images created using a 16 9 horizontal to vertical ratio Zoom Magnifies the size of the image 16 9 on screen Waterglass Magnifies the size of the image 16 9 naturally 1 16 9 4 3 16 9 Waterglass Zoom Press the Still button on the remote control The picture does not move but...

Страница 29: ... programme times News bulletins Weather forecasts Travel information or Sports results Select the channel providing the teletext service using the or button Press the TEXT button to activate the teletext mode The contents of page 100 are displayed To display the index page press the INDEX button To display the teletext page simultaneously with the actual broadcast press the MIX button To return to...

Страница 30: ...plays the previous page HOLD When the secondary pages are displayed in sequence press the HOLD button To freeze the current display page press the HOLD button again to resume SIZE Whenever you press this button the letter size of the page will be changed Once press The letter of the top half page enlarge to double size Twice press The letter of the bottom half page enlarge to double size Three tim...

Страница 31: ... currently available on TileVision If the PC mode is selected use the Input button to return to the required input Connecting to the PC 29 To use the TileVision as a PC Display 1 2 3 4 5 6 PC DTV 7 8 9 Q View 0 VIDEO Pr C S ...

Страница 32: ...he button to select Brightness Press the button to adjust the brightness Press the button to make the image darker and the button to make it brighter 1 Adjusting brightness 2 Press the button to select Colour Press the button to adjust the colour 1 Adjusting colour 2 Press the button to select Hue Press the button to adjust the tint 1 Adjusting tint 2 Mode Custom Contrast 50 Brightness 50 Colour 5...

Страница 33: ...to increase the volume Make sure the channel using a stereo broadcast by pressing the Display button Select Mono The sound quality of a stereo broadcast may be unstable in an area with a weak signal See page 20 Make sure the channel selection is correct Change the antenna direction to the right or left Adjust the fine tuning of the channel Adjust the fine tuning of the channel Make sure there is n...

Страница 34: ...te Control Operating Instructions Power Cord DC Adaptor Speaker 2 Speaker Cable 2 Back Box Front Plate Size Display Size Pixel Pitch Pixel Number Colour Depth Type Brightness Contrast Ratio Viewing Angle Colour System Sound System Video System YPbPr Video Input Audio Input RGB Input LCD TV VIDEO DTV SCART Audio Output Power Supply Power Consumption Power Saving Dimension WxDxH Weight of Fitted Ass...

Страница 35: ......

Страница 36: ...PORTER LANCASTRIAN LIMITED www tilevision tv P O RT E R L A N C A S T R I A N TV 17 FR 17 Tilevision Operating Instructions Part No TVS 00114 04 ...

Отзывы: