Thor Broadcast H-16QAM-IP-RF Скачать руководство пользователя страница 8


H-16QAM-IP-RF


                  Thor Fiber 2018                  Tel: (800) 521-8467              Email: [email protected]                http://www.thorbroadcast.com  

Chapter 2 - Installation Guide


This section is here to explain the cautions you should adhere to so you don’t hurt yourself or 

anyone else. That would not be good for anyone; so read through before operating your new 

Thor Broadcast equipment.   

2.1 General Precautions 


Must be operated and maintained in an area free of dust and debris. 


The cover should be securely fastened, do not open the cover of the chassis when thepower is on. 

This will also void Thor’s manufacturer’s warranty. 


After installation, securely stow away all loose cables, external antenna, and others. 

2.2 Power precautions 


Be careful when connecting a power source to the device. 


Do not operate in wet or damp areas. Make sure the extension cable is in good condition 


Make sure the power switch is off before you start to install the device 


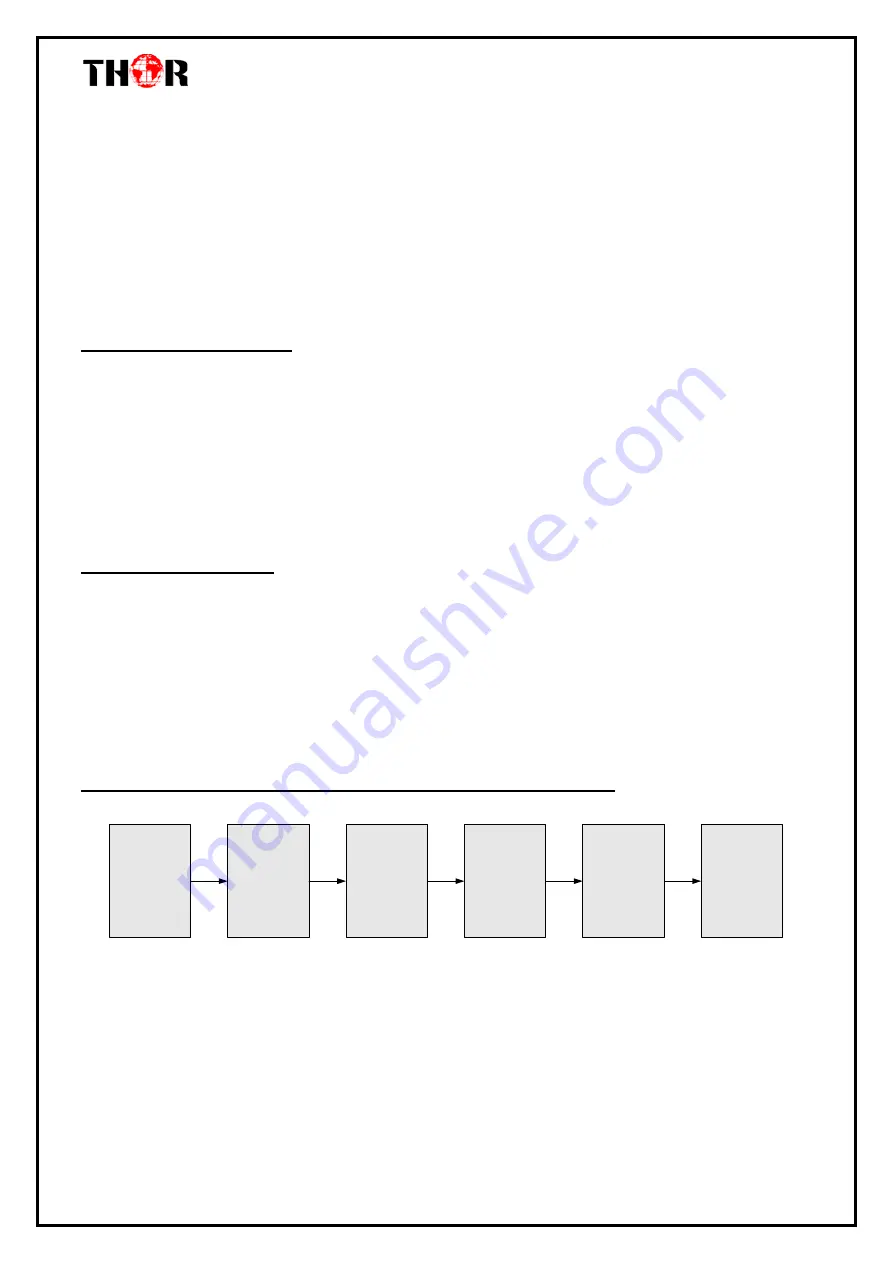
2.3 Device’s Installation Flow Chart Illustrated (as following) 

Connecting 

Grouding 

Wire and 

Power 

Cord

Acquisition 

Check

Installing 

Device

Setting 

Parameter

Running 

Device

Connecting 

Signal 

cable


Содержание H-16QAM-IP-RF

Страница 1: ...Thor Fiber 2018 Tel 800 521 8467 Email sales thorfiber com http www thorbroadcast com User Manual H 16QAM IP RF...

Страница 2: ...part of this document may be reproduced in any form without the written permission of Thor Broadcast The contents of this document are subject to revision without notice due to continued progress in m...

Страница 3: ...4 FLOW CHART 3 1 5APPEARANCE AND DESCRIPTION 4 CHAPTER 2 INSTALLATION GUIDE 5 2 1 GENERAL PRECAUTIONS 5 2 2 POWER PRECAUTIONS 5 2 3 DEVICE S INSTALLATION FLOW CHART ILLUSTRATED AS FOLLOWING 5 2 4 ENVI...

Страница 4: ...ower packed device integrates tuner demodulation and IP gateway functionality which can demodulate the signals from 16 tuners into 16 MPTS or 512 SPTS via UDP and RTP RTSP protocols 1 2 Features 16 QA...

Страница 5: ...t Frequency 45 960MHz Output 512 SPTS IP mirrored output over UDP and RTP RTSP protocol through GE1 and GE2 port Unicast and Multicast 16 MPTS IP output for Tuner passthrough over UDP and RTP RTSP pro...

Страница 6: ...2 SPTS NMS WEB PC ASI Input1 ASI Input2 H 16QAM IP 1000M Switch GE1 Port GE2 Port for bac kup IP Output 1 2 3 512 SPTS SPTS output Tuner 1 Tuner 2 Tuner 3 Tuner 14 Tuner 15 Tuner 16 IP Output 1 2 3 16...

Страница 7: ...tion 1 2 3 4 5 6 1 Power Indicator 2 Reset Reset webmaster IP address recover to default IP address 3 USB Port for Updates 4 NMS Network Management Interface 5 Data Ports 1 2 IP Output for SPTS MPTS 6...

Страница 8: ...be securely fastened do not open the cover of the chassis when thepower is on This will also void Thor s manufacturer s warranty After installation securely stow away all loose cables external antenn...

Страница 9: ...7 1X10¹⁰ Grounding current limiting resistance 1M Floor bearing should be greater than 450Kg Environment Temperature 5 40 sustainable 0 45 short time installing air conditioning is recommended Relativ...

Страница 10: ...on smoothly General rule of them make sure the device is grounded when installing anywhere Always use copper wire When applied correctly the ground must be wrapped well to ensure maximum conduction so...

Страница 11: ...ge the device IP to 192 168 99 xxx xxx can be 0 to 255 except 252 to avoid IP conflict Use any web browser to connect the device with the PC by inputting the Encoder Modulator s IP address in the brow...

Страница 12: ...m http www thorbroadcast com 4 2 2 Status Page Status When we login it will display the status interface as shown in Figure 2 Figure 2 Click any item here to enter the corresponding interface to check...

Страница 13: ...Email sales thorfiber com http www thorbroadcast com Parameters Tuner input From the menu on left side of the webpage click Tuner Input it displays the interface where you can check the 16 Tuner input...

Страница 14: ...800 521 8467 Email sales thorfiber com http www thorbroadcast com Parameters ASI input From the menu on left side of the webpage click ASI Input it displays the interface where you can check the 2x A...

Страница 15: ...l sales thorfiber com http www thorbroadcast com Parameters BISS From the menu on left side of the webpage click BISS it displays the interface where you can configure BISS and descramble the input ch...

Страница 16: ...rogram Parse From the menu on left side of the webpage click Program Parse it displays the interface where you can parse the program from the input channels When you disable the ASI input the RF to IP...

Страница 17: ...Fiber 2018 Tel 800 521 8467 Email sales thorfiber com http www thorbroadcast com When you enable the ASI input the RF to IP Gateway can support 14 Tuner inputs and 2 ASI inputs with 16 MPTS IP outputs...

Страница 18: ...ut in IP 16 MPTS format through the GE1 or GE2 port Click IP Stream it will display the interface where to set IP out parameters Figure 8 Figure 8 This RF to IP Gateway supports 16 Tuner inputs and 2...

Страница 19: ...ales thorfiber com http www thorbroadcast com Parameters Tuner Input SPTS MODE From the menu on the left side of the webpage click Tuner Input it displays the interface where you can check the 16 Tune...

Страница 20: ...67 Email sales thorfiber com http www thorbroadcast com Parameters ASI Input SPTS MODE From the menu on top side of the webpage click ASI Input it displays the interface where users can check the 2 ch...

Страница 21: ...21 8467 Email sales thorfiber com http www thorbroadcast com Parameters TS Config SPTS MODE Click TS Config it displays the interface where you can set the output TS and configure TS ID and ON ID the...

Страница 22: ...67 Email sales thorfiber com http www thorbroadcast com Parameters BISS SPTS MODE From the menu on left side of the webpage click BISS it displays the interface where you can configure BISS and descra...

Страница 23: ...uttons in Operation Area Instructions are as below To filter not filter the source CA information To enable disable the PID remapping To refresh the input program information To refresh the output pro...

Страница 24: ...on The multiplexed program information can be modified by clicking the program in the output area For example when clicking it triggers a dialog box Figure 14 where you can input new information Figur...

Страница 25: ...he menu on left side of the webpage click Date Time it will display the screen as in Figure 16 where to set date and time for the device Figure 16 System Password From the menu on left side of the web...

Страница 26: ...re From the menu on left side of the webpage clicking Save Restore it will display the screen as Figure 18 where to save or restore your configurations Figure 18 System Backup Load From the menu on le...

Страница 27: ...orbroadcast com Figure 19 System Firmware From the menu on left side of the webpage click Firmware it will display the screen as in Figure 20 where to update firmware for the device Figure 20 Select I...

Страница 28: ...aking sure the unit has plenty of ventilation for the heat sink on the rear panel and other heat sink bores if necessary Checking the AC input within the power supply and ensure it is working the conn...

Страница 29: ...521 8467 Email sales thorfiber com http www thorbroadcast com Chapter 6 Packing List H 8QAM IP RF 1PC User s Manual CD 1PC Power Cord 1PC RF In and Loop out Cables 16PCS For Further Tech Support 1 80...

Отзывы: