background image

3-5 

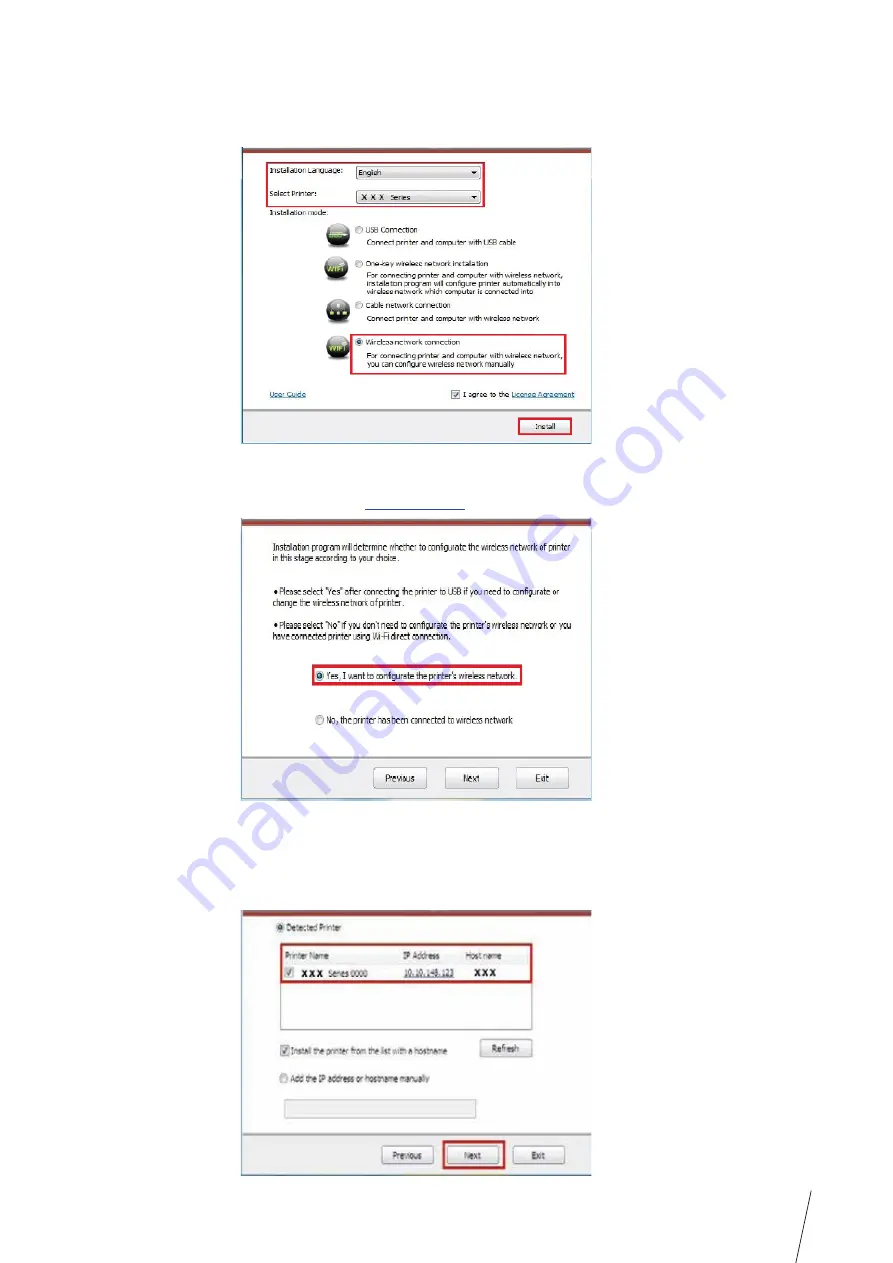
4. Read and agree to the licensing agreement, select installation language and printer model,
select “Wireless network connection” and then click “Install”.

5. Select “Yes, I want to configurate the printer’s wireless network” on the wireless setup
window popped out, and operate according to the prompts to set up the printer 
to wireless network (please refer to 

Chapter 5.1.1

 for setup method).

6. After wireless network setup succeeds, the installation program will search for printer
automatically, and it may take a while.

7. Select the printer needs to be connected and click “Next”.

Содержание TH-2500

Страница 1: ...User Guide TH 2500 Laser Printer with wireless connectivity MONOCHROME...

Страница 2: ...rs and they are referred for instructions only Copyright The copyright of this User Guide is owned by Group SFIT SAS It is prohibited to copy translate modify and transmit this User Guide by any means...

Страница 3: ...Class 1 laser products under CFR standard The printer The following label is attached to the laser components inside the printer Safety Warning Please note the following safety warnings before using...

Страница 4: ...ervice personnel for maintenance Liquid has been spilled into the equipment The equipment has been exposed to rain or water The equipment falls or the cover is damaged Signi cant changes in the equipm...

Страница 5: ...e Statement This equipment complies with Canada and FCC radiation exposure limits set forth for uncontrolled environments This equipment should be installed and operated with a minimum distance of 20c...

Страница 6: ...rinting 6 2 3 Driver installation and uninstallation 3 2 3 1 Driver installation based on Windows system 3 2 3 1 1 Installation via USB connection 3 2 3 1 2 One key wireless network installation 3 2 3...

Страница 7: ...Speci cation 11 2 11 1 1 Speci cation Overview 11 2 11 1 2 Printing Speci cation 11 3 11 2 P2600 Series Speci cation 11 4 11 2 1 Speci cation Overview 11 4 11 2 2 Printing Speci cation 11 5 7 Print 7...

Страница 8: ...1 Chapter 1 1 Before Using the Printer 1 Before Using the Printer 2 1 1 Packing List 2 1 2 Components of the Printer 3 1 3 Laser Toner Cartridge 4...

Страница 9: ...e make sure that the following parts are included in the carton Quantity Printer 1 Laser Toner Cartridge 1 USB Interface Cable 1 Power Cord 1 CD ROM 1 Quick Setup Guide 1 Thomson Warranty 1 Note The T...

Страница 10: ...Automatic Feed Guide 6 Feeder Tray Paper Stop 7 Automatic Feeder Tray Manual Feeder Tray 8 Automatic Feeder Tray 9 Feeder Tray Rear View Serial No 1 Network Interface Network Interface 2 USB Interface...

Страница 11: ...based on ISO IEC 19752 standard Laser Toner Cartridge with High Capacity N A About 2300 Pages The above data is based on ISO IEC 19752 standard Note The model is subject to increase without notice Con...

Страница 12: ...Print Media 2 Paper and Print Media 2 2 2 2 Special Paper 3 2 3 Loading Paper 4 2 3 1 Loading into the Automatic Feeder Tray 4 2 3 2 Loading into the Manual Feeder Tray 5 2 4 Nonprinting Area 7 2 5 Gu...

Страница 13: ...t in this User Guide may result in poor print quality increased paper jam and excessive wear of the printer Properties such as weight composition texture and humidity are important factors affecting t...

Страница 14: ...or coated linings Use envelopes with self adhesive stickers or other synthetic materials Transparency Use only transparencies approved for use in laser printers Use transparent print media that is not...

Страница 15: ...eder tray b Slide the automatic feed guides to match both sides of the paper c Raise the output tray to avoid the paper from slipping and falling d Load the paper into the automatic feeder tray with t...

Страница 16: ...ing out and then adjust the 2 3 2 Loading into the Manual Feeder Tray up Before loading paper please unfold the stacked paper to avoid a paper jam or feed error and then load the paper into the tray p...

Страница 17: ...s to continue printing Note When loading paper into the manual feeder tray the printer will automatically enable the manual feed mode Load the paper into the manual feeder tray with the print side up...

Страница 18: ...Size Top and Bottom Margins A Left and Right Margins B Printing A4 5 mm 0 197 inch 5 mm 0 197 inch Letter 5 mm 0 197 inch 5 mm 0 197 inch 2 5 Guidelines for Paper Use Paper or manuscript with rough t...

Страница 19: ...ork installation 3 2 3 1 3 Installation via wired network connection 3 3 3 1 4 Installation by wireless network connection mode 3 4 3 1 5 Driver uninstallation 3 8 3 2 Driver installation based on Mac...

Страница 20: ...of computer and operate Autorun exe installation program 3 Read and agree to the licensing agreement select installation language and printer model select USB Connection and then click Install 4 The...

Страница 21: ...tion 1 Turn the power of printer and computer on 2 Connect the computer to wired network 3 Connect network cable to the network interface of printer to make sure the printer is connected to computer n...

Страница 22: ...nt the NetConf Pg and view IP Address and Host name 8 The system starts to install driver and it may take several minutes closed automatically in about 3s 3 1 4 Installation by wireless network connec...

Страница 23: ...te the printer s wireless network on the wireless setup window popped out and operate according to the prompts to set up the printer to wireless network please refer to Chapter 5 1 1 for setup method...

Страница 24: ...3 6 closed automatically in about 3s 3 1 4 2 Wi Fi hotspot mode installation Note...

Страница 25: ...h to search again If you want to install printer driver in the name of host please tick the Printer Name you need to connect and Install the printer from the list with a hostname If IP address or host...

Страница 26: ...iver installation based on Mac system printer If you are going to print in AirPrint mode there is no need to install a driver and you just need to add a printer directly When you are installing a driv...

Страница 27: ...censing agreement 6 Click Install 7 Input computer password and click Install Software 8 Click Continue Installation on the prompt window popping out If using a USB cable to connect a computer with a...

Страница 28: ...inter to computer with USB cable and then turn power on 2 Enter the System Preferences Printers Scanners of computer 3 Click button to select Add Printer or Scanner 4 Select printer and then select th...

Страница 29: ...3 11 11 out Note for connection method When using Wi Fi hotspot mode wireless client is directly connected with wireless network enabled printer Refer to Chapter 5 2 for how to make connection...

Страница 30: ...Wired Network Settings For wired network printer models 2 4 1 Set IP Address 2 4 2 Install the Printer to Network 3 4 3 Setting Network Products 4 4 3 1 View or Change Network Settings 4 4 3 2 Set or...

Страница 31: ...o open the embedded Web server 1 Click Settings in the navigation bar to open the Settings page 2 Select Network Settings IPV4 Settings 3 Set IP Address Assignment Mode Manual IP Address and Subnet Ma...

Страница 32: ...the installation Note When the installer prompts you to select a printer you can select the appropriate printer name from the Detected Printer If the printer name does not appear in the Detected Prin...

Страница 33: ...ick Settings tab to obtain network information Change the settings as needed 4 3 2 Set or Change Web Server Login Password Use the embedded Web server to set a network password or change the existing...

Страница 34: ...asic structure mode 5 2 5 1 1 Wireless network setup tools 5 2 5 1 2 Wi Fi Protected Setup WPS setup 5 7 5 1 3 How to disable the Wi Fi network connected 5 7 5 2 Wi Fi hotspot mode 5 8 5 2 1 Prelimina...

Страница 35: ...wireless computer is directly connected to the wireless device 5 1 Basic structure mode You can connect a computer to your printer via access point wireless router as the medium Access point wireless...

Страница 36: ...ol 2 Mac system click Go Applications Thomson Utilities Wireless Network Tool on the computer Finder menu bar used for installation in the following interface Click Next 2 1 The computer has been conn...

Страница 37: ...ey by using WEP Wired Equivalent Privacy WEP key is applicable to 64 digit and 128 digit encrypted network and can contain numbers and letters at the same time 3 WPA WPA2 it is the pre shared key PSK...

Страница 38: ...access point wireless router please click Print Wireless Network Information Page to view the SSID of the needed access point wireless router please install the drive again Please select wireless netw...

Страница 39: ...if the printer is successfully connected according to the status of Wi Fi indicator Note If the printer cannot be used normally after wireless network setup is finished please install the drive again...

Страница 40: ...2min and then release it 5 When the access point wireless router and printer start to connect the blue Wi Fi indicator of printer starts to blink The blue Wi Fi indicator of printer will be normally...

Страница 41: ...SSID cannot be found when network is connected please check the SSID of access point and try to connect again wireless network of printer again 3 Connection failure is correct is away from the printer...

Страница 42: ...e searched the communication might be off and then try to search the printer again Inspect if the I address assignment of printer is correct You can inspect IP address by printing the network setup in...

Страница 43: ...Mobile Print 6 Thomson Mobile Print 2 6 1 What s Thomson Mobile Print 2 6 2 Download Thomson Mobile Print 2 6 3 Supported Mobile Operating System 2 6 4 How to use mobile devices for the mobile printin...

Страница 44: ...e printer 2 Turn on the Wi Fi on your mobile device and connect to the Thomson printer Wi Fi hotspot for example it should read Thomson AP XXXXXX Note If several Thomson Wi Fi printers are avaiable at...

Страница 45: ...elect the Printer number of copies and the paper size and click Print and you are done Note Mobile printing App installation you have several options QR code Google Play Store Thomson website Scan the...

Страница 46: ...Print APP in Android mobile device and select Printer connection type in the following interface 5 Enter Printer connection type interface select QR code quick connection and scan the 6 Mobile device...

Страница 47: ...7 1 7 Chapter Print 7 Print 2 7 1 Print Function 2 7 2 Opening Help Document 3 7 3 Manual Duplex 4 7 4 Cancel Print Job 7...

Страница 48: ...llate 3 2 1 3 2 1 Reverse Print 1 1 2 2 3 3 N in 1 1 2 1 2 Poster Print for Windows system only A Zoom Print 1 Custom Size 1 The print function can be achieved through the settings of various properti...

Страница 49: ...nd click Help button to view the specific function explanation For information about how to open the help document see Section 7 2 7 2 Opening Help Document You can open the Printing Preferences and c...

Страница 50: ...ray If the manual duplex function causes a paper jam see Section 10 1 for handling it Note For loading paper see Section 2 2 For the type of media that can be printed with the automatic feeder tray se...

Страница 51: ...7 5 b Select Thomson printer Click Preferences to set up for printing c Check Manual Duplex in the Basic tab and click OK after completing the settings...

Страница 52: ...ex then the following prompt window will models Note It is recommended to raise the output tray to prevent the paper from sliding out of it If you choose not to raise the output tray we recommend that...

Страница 53: ...o on printing the other side g You can click Close button to close this prompt window and it will not appear until the next Manual Duplex job comes in 7 4 Cancel Print Job Press and hold the Cancel Co...

Страница 54: ...8 1 8 Chapter Control Panel 8 Control Panel 2 8 1 Control Panel Overview for TH 2500 Series 2 8 1 1 Functions of Buttons on the Control Panel 2 8 1 2 Function of LED Indicators on the Control Panel 3...

Страница 55: ...nection and meanwhile press the WPS button on the wireless router within 2 minutes stop WPS connection if Wi Fi connection cannot be established within 2 minutes If there is Wi Fi connection while no...

Страница 56: ...Fi connection no paper error sleep mode LED1 off 2 Searching Wi Fi no indication of paper error LED1 with green light flashing slowly N A 3 Connecting Wi Fi no indication of paper error LED1 with gre...

Страница 57: ...er LED2 with green light flashing slowly 2 The printer is ready LED2 with green light staying on 3 Sleep LED2 with green light on and flashing slowly 4 Printing Multi colored LED2 with green light fla...

Страница 58: ...ies communication error opened cover etc LED1 off LED2 with red light staying on 6 Paper jam a job is cancelled via the panel LED1 off LED2 with green light flashing quickly 7 Paper shortage in printi...

Страница 59: ...e 9 Routine Maintenance 2 9 1 Cleaning the Printer 2 9 2 Maintenance of Laser Toner Cartridge 4 9 2 1 Use and Maintenance of Laser Toner Cartridge 4 9 2 2 Service Life of Laser Toner Cartridge 4 9 2 3...

Страница 60: ...e clean the printer in accordance with the following steps 1 Turn off the main power switch and unplug the power cord and USB cable 2 Use a soft cloth to wipe the outside of the printer clean Note Ple...

Страница 61: ...nside of the printer by using a dry and lint free cloth to gently wipe the shaded Note When removing the laser toner cartridge put the cartridge in a protective bag or wrap it with thick paper to avoi...

Страница 62: ...refill the laser toner cartridge without authorization Otherwise the resulting damage is not included in the printer warranty Please store the laser toner cartridge under a cool and dry environment T...

Страница 63: ...pay attention to the following The laser toner cartridge surface may contain toner Please remove it carefully to avoid spilling Put the removed laser toner cartridge on a piece of paper to avoid the t...

Страница 64: ...inter along the guides 4 Close the upper cover tightly Note Check whether there is any seal on it before installing the laser toner cartridge into the printer if there is any please tear off the seal...

Страница 65: ...10 1 10 Chapter Troubleshooting 10 Troubleshooting 2 10 1 Clearing Jammed Paper 2 10 1 1 Paper Jam in the Feed Port 3 10 2 Common Troubleshooting 6 10 2 1 Common Trouble 6 10 2 2 Image Defects 8...

Страница 66: ...n the printer and the computer The correct printer driver is selected and installed properly 10 1 Clearing Jammed Paper Note Remove the jammed paper in accordance with the following steps close the up...

Страница 67: ...If the paper does not move while being pulled or there is no paper in this area please check the inside of the printer 1 Open the upper cover TH 2600 If the output bin is open please close it first G...

Страница 68: ...ease the pressure of compression spring 3 Pull the jammed paper out of the fuser unit If no jammed paper is found please go to the next step 4 Remove the laser toner cartridge along the guides TH 2500...

Страница 69: ...TH 2600 TH 2600 6 After removing the jammed paper insert the laser toner cartridge into the printer along the guides until you hear a click assuring you that the cartridge is fully inserted 7 Put the...

Страница 70: ...er pillar Problems in Handling Paper Paper feed failure The print media is loaded incorrectly The print media is beyond the The feed roller is dirty Please correctly load the print media If you use sp...

Страница 71: ...n abnormality in this case but still you can use newly unpacked paper to avoid generation of vapor Also keep your paper from the damp Power off the printer and unplug the power cord when there is a sm...

Страница 72: ...t media that does not the media is damp or too rough The feed channel is dirty The internal part of the laser toner cartridge is damaged inside the printer is dirty Please use the print media Clean th...

Страница 73: ...ervice to repair and replace the fuser component Skewed pages The print media is loaded incorrectly The feed channel of the printer is dirty Ensure correct loading of the print media Clean the feed ch...

Страница 74: ...per The print media that does not the media is damp or too rough The inside of the printer is dirty The laser toner cartridge is damaged The internal part of the printer is damaged Please use the prin...

Страница 75: ...TH 2500 TH 2600 11 1 11 Chapter 2 2 2 3 11 2 4 4 5...

Страница 76: ...plate on the back of the printer Please strictly use the power supply Networked standby power consumption 3 0W Communication interface Hi Speed USB 2 0 Wi Fi 802 11b g n Operation environment Best pri...

Страница 77: ...put Capacity Standard Tray 150 pieces 80g m Paper Output Capacity Print side down 100 pieces 80g m Print Media Media Type paper label paper envelope Media size A4 A5 JIS B5 IS0 B5 A6 Letter Legal Exec...

Страница 78: ...mmunication interface Hi Speed USB 2 0 Wi Fi 802 11b g n 100Base Tx Ethernet Operation environment Best print quality 10 32 C Humidity range for operation 20 80 RH Product Size W D H 380 261 236mm Wei...

Страница 79: ...Tray 150 pieces 80g m Multipurpose Tray 1 piece 60 163g m Paper Output Capacity Print side down 100 pieces 80g m Print Media Media Type paper label paper envelope Media size A4 A5 JIS B5 IS0 B5 A6 Le...

Страница 80: ...User Guide TH 2500 Laser Printer with wireless connectivity MONOCHROME...

Отзывы: