THOMSON DTH 6000 Скачать руководство пользователя страница 5

EN

EN

5

Set-up

O

ther devices

Decoder, camcorder, satellite receiver, another DVD
player, another video recorder, etc. (AV2 socket)

Connect another device to the 

AV2

socket of the DVD/VCR using the SCART cable

(supplied). The pictures from the other device go through the 

AV1

socket of the

DVD/VCR and then on to the TV set.

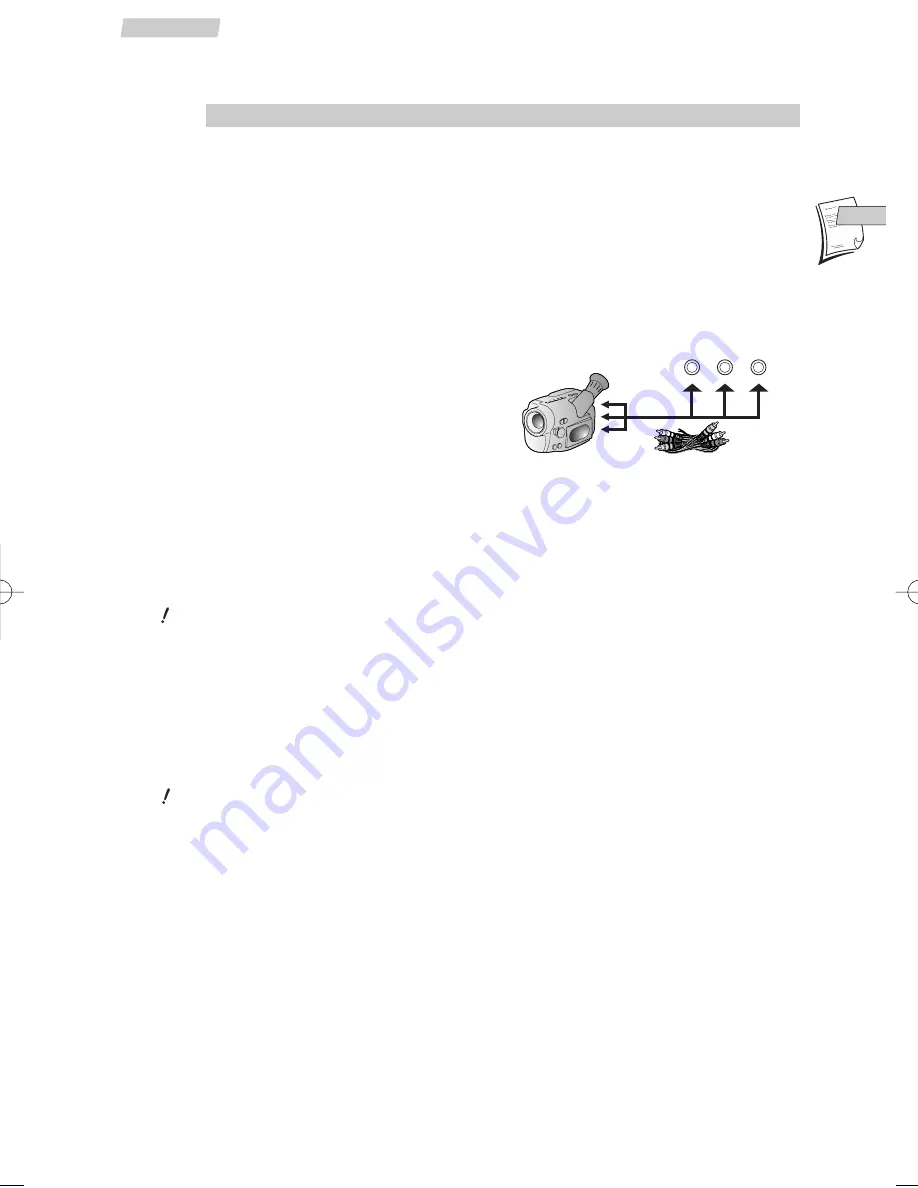
Camcorder (AV3 socket)

Connect your camcorder to the 

AUDIO L

(left), 

AUDIO R

(right) and 

VIDEO

sockets

located at the front of the DVD/VCR. Select
the 

AV3

input on the DVD/VCR by pressing

the 

AV

key.

Audio/video amplifier

Video connection

Connect your audio/video amplifier to the 

AV1

SCART socket of the DVD/VCR.

You can also connect it to the 

VIDEO OUT

socket of the DVD/VCR with a video

cable (not supplied).

You will get the best picture quality with the SCART socket.

Audio connection

For 6-channel multichannel sound, connect the amplifier to the 

DIGITAL AUDIO

OUT

coaxial socket of the DVD/VCR using a coaxial cable (not supplied), or to the

DIGITAL AUDIO OUT

optical socket of the DVD/VCR using an optical cable (not

supplied).
You can also connect your audio/video amplifier to the 

AUDIO OUT L

and 

R

sockets

of the DVD/VCR using an audio cable (not supplied).

You will get the best sound quality with a connection via the DIGITAL AUDIO OUT
socket.

Stereo HiFi system

Connect your HiFi system to the 

DIGITAL AUDIO OUT

socket of the DVD/VCR, or to the

DIGITAL AUDIO OUT

optical socket of the DVD/VCR, or to the 

AUDIO OUT L

and 

R

sockets of the DVD/VCR.

L

AUDIO

R

VIDEO

DTH6_UK  10/07/02  15:59  Page 5

Содержание DTH 6000

Страница 1: ...tions 21 Index search STATUS menu Tracking and stability in play mode Playing NTSC tapes DVD Mode Play 22 Simple play Accelerated play Still image Frame advance Variable slow motion Zoom function Play Modes 23 Standard play Random play Program play Edit program Autoplay IntroScan Lock 24 Lock Player Unlock Player Change Password Ratings limits System Test Display 25 TV Image On Screen Displays Sou...

Страница 2: ...t to look inside the appliance through the opening of the disk tray or any other opening You may be electrocuted or be exposed to laser radiation This unit is for domestic use only and must not be used for industrial purposes Total or partial copying of recordings protected by copyright legislation without the explicit permission of the holder of the rights contravenes current legislation Copying ...

Страница 3: ...oaxial cable 75 Ω 2 non rechargeable batteries type AA DVD VCR Remote control Set up and user manual Do not mix different types of batteries or new and old batteries Do not use rechargeable batteries In order to avoid any risk of explosion observe polarities indicated inside the battery compartment Replace only with the type of batteries specified above Do not throw them into fire do not recharge ...

Страница 4: ...tion If your TV set does not have a SCART socket connect the DVD VCR to your TV in one of the following two ways Video connection Connect the VIDEO OUT socket of the DVD VCR to the VIDEO IN socket of the TV set using a video cable not supplied Audio connection To obtain 6 channel multichannel sound connect the TV set to the DIGITAL AUDIO OUT coaxial socket of the DVD VCR using a coaxial cable not ...

Страница 5: ...connect it to the VIDEO OUT socket of the DVD VCR with a video cable not supplied You will get the best picture quality with the SCART socket Audio connection For 6 channel multichannel sound connect the amplifier to the DIGITAL AUDIO OUT coaxial socket of the DVD VCR using a coaxial cable not supplied or to the DIGITAL AUDIO OUT optical socket of the DVD VCR using an optical cable not supplied Yo...

Страница 6: ...rease the volume Mute and restore the sound Number entry Confirm a selection in a menu Start playing a disc or a tape Stop play accelerated search slow motion or recording Start fast reverse reverse accelerated play or reverse slow motion see pages 14 and 22 Start fast forward forward accelerated play or forward slow motion see pages 14 and 22 Freeze frame or frame advance see pages 14 and 22 PR ...

Страница 7: ...s pr chapter DVD or track CD Return directly to the main menu or hide the info menu Access the Zoom function see page 22 Move backward 10 seconds during disc playback Functions in VCR mode Exit a menu Access the STATUS menu see page 15 Access the OVERVIEW main menu Change channel on the video recorder Drop down the VIDEO Plus menu Set the counter to zero cancel a programme or return to the standar...

Страница 8: ...corder 6 Start playing a disc DVD mode or a tape VCR mode or go into pause 7 Stop playback of a disc DVD mode or a tape VCR mode 8 Fast reverse 9 Fast forward 0 Open and close the disc tray of the DVD player PAL NTSC PLAYBACK VIDEO AUDIO L R HIFI STEREO NICAM DVD VIDEO CD CD MP3 PLAYER VIDEO CASSETTE RECORDER DTH 6000 STOP PLAY PAUSE EJECT REV FFW OPEN CLOSE DVD VCR CHANNEL REC 2 4 3 5 6 7 89 0 1 ...

Страница 9: ... the sound is Dolby Digital Appears when the sound is in DTS Appears when an MP3 disc is loaded Indicates the type of disc loaded DVD CD Audio CD VCD Video CD Indicates the repeat playback of a chapter or a track Indicates the repeat playback of the entire disc Indicates the repeat playback of a sequence see page 28 Appears when the appliance is in DVD mode Appears when a disc is loaded The speed ...

Страница 10: ...ual to find the video channel of the video recorder the one you noted down above Once the television has found the video channel of the video recorder the following message will be displayed on the screen VCR C CH 52 B If the picture is poor snowy torn change the communication channel of the video recorder with the C B keys 8 Store the channel and its number on the television set From now on to wa...

Страница 11: ... channel numbers Should this be the case change these numbers by carrying out the instructions below For easy channel identification we suggest that you have a TV magazine at hand 1 Use the MENU key to call up the OVERVIEW menu 2 The Installation line is already selected press OK 3 Use the key to select the Organiser line and confirm with OK 4a If the proposed channel number matches the displayed ...

Страница 12: ...Press to select the Autosearch line 7 Press C or B several times to search for the channel of a programme you may also directly enter a number with 0 to 9 keys When a channel is found the pictures come up on the screen 8 When the picture is poor try the Fine tuning using and then C or B 9 If the channel is encoded and you have a decoder connected to socket AV2 set the cursor on Decoder using the k...

Страница 13: ... press the STOP key to access it Select a line or an option using the and keys Confirm a selection using the OK key Exit the menu by pressing the RETURN key The symbol indicates that the function selected or the key used is not available at this stage Disc content menus This menu is available only if the disc contains a number of titles To display this menu press the PLAY key to start playback and...

Страница 14: ...is automatically rewound until the beginning and play is resumed Press PLAY for 6 seconds Accelerated play Press REV or FWD repeatedly to change the speed and direction of accelerated play Still image Pause Press the PAUSE key repeatedly to wind forward image by image Variable slow motion 1 Press the PAUSE key 2 Press the REV or FWD key repeatedly to change the speed of slow motion Rewind or Fast ...

Страница 15: ...ear on the screen that is to say magnified 4 Select standard play SP or long play LP with the SP LP key LP doubles the length of your tape 240 minutes in SP become 480 minutes i e 8 hours in LP Simple recording Press the REC key The video recorder starts recording Interrupt recording using the PAUSE key resume recording using the PLAY key or end it using the STOP key Recording with automatic stop ...

Страница 16: ...esired programme number 4 Press the OK key 5 Leave the menu using the EXIT key 6 Put the video recorder in standby mode using the B key The symbol on the display of the VCR confirms that your programming was successful VIDEO Plus and PlusCode are registered trademarks of Gemstar Development Corporation The VIDEO Plus system is manufactured under licence from Gemstar Development Corporation Storage...

Страница 17: ... using the key start time of the programme end time of the programme and the date if the recording is not to take place on the same day You can also complete your programming by selecting the following options recording triggered by VPS or PDC signals frequency Once Mon Fri Weekly speed SP or LP Long Play recording enables you to record up to twice the length of the tape 6 Switch the video recorde...

Страница 18: ...nu using the MENU key select the Record timer line with the key and confirm with OK 2 Select the Timer review line and press OK 3 Select the programming you wish to delete using the and keys Press the 0000 key The programming is now deleted 4 Leave the menu using the EXIT key Recording programmed on a connected set The recording of a programme can be triggered by a satellite receiver or another de...

Страница 19: ... these sound effects DOLBY Prologic and the double D symbol are trademarks of DOLBY Laboratories Licensing Corporation Setting the type of sound to be recorded The broadcast sound types are different from channel to channel Your video recorder uses 3 tracks to record the sound two HiFi tracks for stereo or bilingual sound track 1 and 2 one normal track for mono sound or track 1 for a bilingual tel...

Страница 20: ...time is no longer displayed Auto clock Should the daily broadcast automatic clock setting feature not match the official time in the area where you live deactivate the function by pressing the OK key and set your video recorder clock manually see page 11 VIDEO PLus 10 minutes Select this option to add 10 minutes to the end time of your VIDEO Plus recordings Thus you will avoid defective recordings...

Страница 21: ...e the VCR will calculate automatically the duration of the cassette To reset the counter call up the STATUS menu with the INFO key and press the 0000 key re setting the counter requires a tape to be loaded Tracking and stability in play mode The pictures of some tapes hired or other may flicker show interference lines on the bottom of the screen or be altered by other undesirable effects With the ...

Страница 22: ... user interaction the player switches off automatically Accelerated play While the disc is playing press the REV or FWD key one or more times to vary the speed and direction of the accelerated play Still image Frame advance DVD and video CD Press PAUSE once for freeze frame After five minutes in PAUSE with no user interaction the player goes into screen saver mode Press PAUSE repeatedly to wind fo...

Страница 23: ...program the playback order Lists vary depending on the type of disc 1 Enter a title number and then a chapter number for a DVD or a track number for an audio CD using the and keys or the numeric keys or else a filename for an MP3 using the and keys 2 Select Add using B and then press OK If you select a chapter or track already in the list Add is replaced by Insert 3 Check that the title chapter fi...

Страница 24: ...tings limits The disc publisher is responsible for coding scenes according to the rating limits In Europe very few discs have coded scenes 1 Select Ratings limits and press OK to confirm 2 For the rating limit select Rated Titles and press OK to confirm Select the level using the and keys then press OK to confirm 3 To set up password only access to non indexed titles select Unrated Titles and pres...

Страница 25: ...screen or in 16x9 4x3 Standard reproduces a 4x3 picture without distortion 2 Press OK to confirm On Screen Displays You can use this menu to choose the information you want to see on the screen Select the On Screen Displays option and press OK to confirm Three items are available Info Displays to display time related information during play Angle indicator to display angle info when the disc offer...

Страница 26: ... Digital No selection DTS 1 DTS No sound DTS No sound PCM 2 PCM PCM PCM PCM Dolby Digital 3 PCM Dolby Digital Dolby Digital PCM CD PCM PCM PCM PCM MP3 PCM PCM PCM PCM 1 DTS is a digital sound compression technique developed by Digital Theater Sound Systems for digital multichannel audio signals DTS and DTS Digital Out are trademarks registered by Digital Theater Systems Inc 2 If the device connect...

Страница 27: ...e is not available the priority language is selected instead 2 To change the language during play display the audio icon by pressing the key on the remote control see page 29 Subtitles 1 To change the subtitle language choose the language using the and keys and press OK to confirm If the language chosen is available it is automatically selected when you display the subtitles see page 29 If not the...

Страница 28: ... To repeat a sequence between two points A and B choose the A B repeat mode option and then follow the instructions for entering the two points If during a fast forward or reverse the point B is reached the player continues playback at normal speed from the point A If during a fast search the point A is reached the player starts playback from the point A at normal speed 2 To stop the repeat playba...

Страница 29: ...ys Camera angles DVD Some discs offer different camera angles for specific scenes To change the camera angle select the camera angle icon with the C and B keys or press the key on the remote control and then choose the angle with the and keys Playback mode audio CD and MP3 Select the play mode icon using the C and B keys and then choose a mode standard random program with the and keys The Program ...

Страница 30: ...conventional file formats with no appreciable reduction in listening quality Playing an MP3 CD When you play an MP3 disc the MP3 menu is displayed instead of the DVD player menu The DVD player menu is not available when playing MP3 discs The MP3 contents are divided into album s and songs A disc may contain several albums and each album may contain several songs just like the titles and chapters o...

Страница 31: ...ce on the disc Use preferably 74 min 650 Mb CD Rs instead of 80 min 700 Mb CD Rs Use preferably CD Rs instead of CD RWs rewritable CDs as in certain cases CD RW playback may be faulty Use reliable good quality CD writing software Close all other applications on the computer to ensure reliable CD R disc recording Make sure that the recording is long enough to be played If the recording is too short...

Страница 32: ... AV input or the channel assigned to the video recorder on the TV 1 Check the connections 2 Adjust the tracking in playback or stability in pause Check the connections 1 The sound from TV channels or a tape transmitted by coaxial cable is monophonic To reproduce stereo sound on the TV connect it to the appliance using a SCART cable 2 Adjust the sound type 1 Make sure you have inserted a cassette c...

Страница 33: ...and tapes To avoid erasing one of your tapes by accident we recommend you protect them by breaking the security tab To reuse a protected tape just stick a piece of adhesive tape on this place Handling and care for discs Handle your discs with care Hold the disc with your fingers at the edges or through the hole Insert the disc with the label facing up for a single sided disc Place the disc properl...

Отзывы: