background image

Before you Begin

EN

2

Unpacking the system

Unpack your new mini audio system and locate all the
accessories. You should have:
• one main unit (with 2 speakers);
• one remote control;
• one AM loop antenna;
• one FM wire antenna;
• one guarantee card;
• one user’s guide.

For Thomson model, you should also have;
• one audio cable;
• Thomson Multimedia Pack including MusicMatch
Music Management software (CD-Rom) and a patch
cable to connect your PC. (Refer to the page
“Thomson Multimedia Pack” for details)

Check for Moisture

Just as moisture can form on the inside of windows
on a cold day, it can also form on the inside of your
audio system causing it to malfunction. 

If there is any moisture inside the system, the system
may not operate properly. In this case, you are sug-
gested to disconnect the power to the unit and wait
for about 30 minutes for the moisture to evaporate. 

Choosing System Location

It is recommanded to follow these guidelines when
setting up your system:

• Choose a solid, level surface. Don’t place on surfaces
like carpet or foam rubber. 
• Choose a location away from direct sunlight, radia-
tor, air ducts and sources of heat.
• Avoid locations subject to moisture, mechanical
vibration, shock or excessive dust. 
• Ensure that the lcoation is adequately ventilated, as
it is essential to protect the unit from internal heat
build-up.

Inserting Batteries into Remote
Control

Open the battery compartment door on the back of
the remote unit and insert correctly 2 AAA (LR03) bat-
teries with + or - signs matching with indications.

To use the remote control, point it directly at the unit.

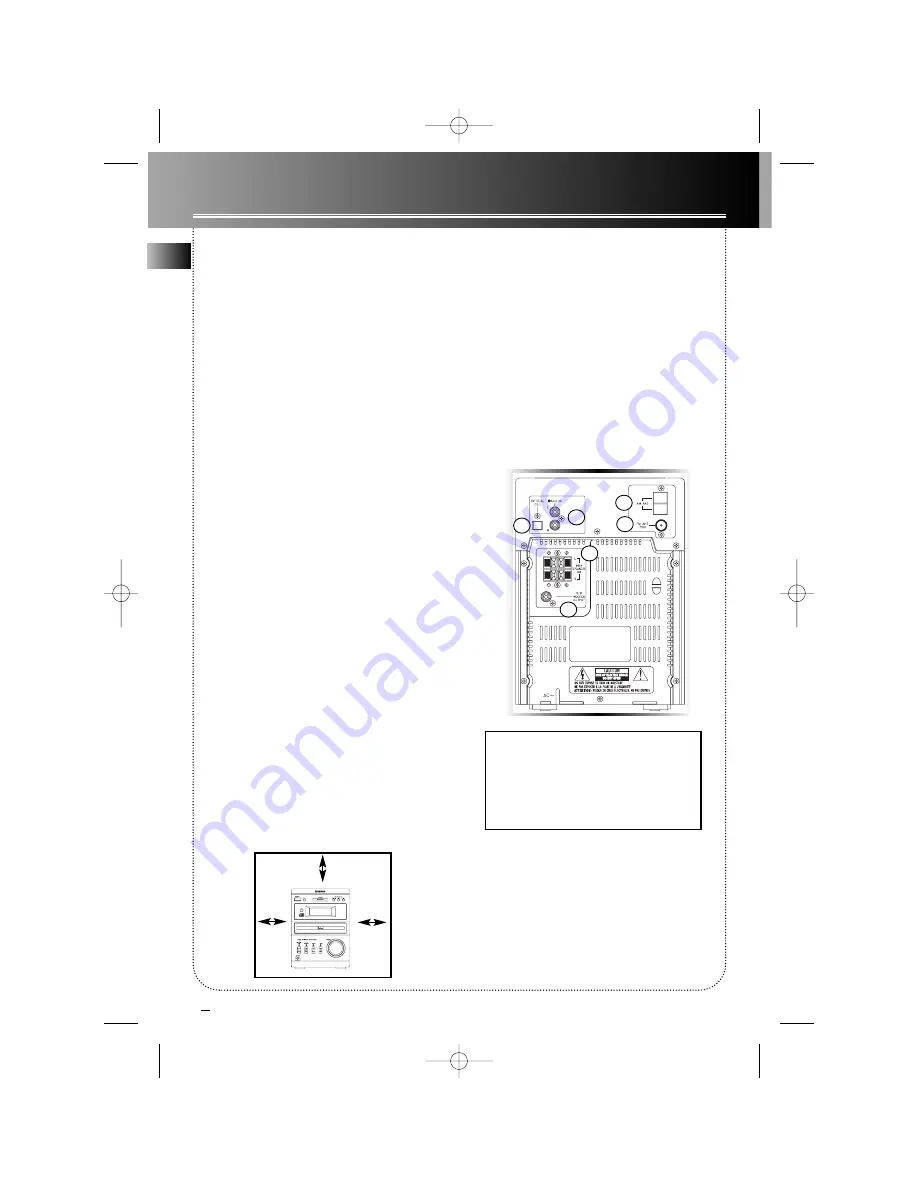
Cable Connections

Refer to the following for connections on the back
panel:

Power Connections

Plug the power supply cord into an AC power outlet. 

Note: 

For the sake of safety, complete all cable con-

nections before you plug for power. 

1. AM Loop Antenna Connector
2. FM Antenna Jack
3. Auxillary Input Jacks  
4. Subwoofer Speaker Jacks
5. Main Speaker Jacks
6. Optical Output     

10 cm

10 cm

10 cm

1

2

6

4

3

5

@

AM1550 IB EU ENG  11/30/00  10:04 AM  Page 6

Содержание AM1550

Страница 1: ...Jukebox is a true audio player installed on your PC It gives access to thousands of net radios today available on the web The connection cable allows you to listen and share the compressed music files...

Страница 2: ...THOMSON multimedia 46 47 quai A Le Gallo 92648 Boulogne Cedex FRANCE RCS nanterre B 322 019 464 55128510 www thomson multimedia com AM1550 IB EU ENG 11 30 00 10 04 AM Page 2...

Страница 3: ...u s e r m a n u a l AM1550 AM1550 IB EU ENG 11 30 00 10 04 AM Page 3...

Страница 4: ...TURE ET LORSQUE LA SECURITE EST NEUTRALISEE EXPOSITION DANGEREUSE AU FAISCEAU VARNING OSYNLIG LASERSTR LNING N R DENNA DEL R PPNAD OCH SP RRAN R URKOPPLADE BETRAKTA EJ STR LEN VARO AVATTAESSA JA OLET...

Страница 5: ...isc Playback 7 Repeat 7 Random Playback 8 Program 8 Editing Program 8 Clearing the Whole Program 8 Displaying Disc Details 8 Tuner Selecting Tuner 9 Tuning to a Station 9 Automatic Tuner Programming f...

Страница 6: ...low these guidelines when setting up your system Choose a solid level surface Don t place on surfaces like carpet or foam rubber Choose a location away from direct sunlight radia tor air ducts and sou...

Страница 7: ...r auto station search PLAY PAUSE plays or pauses CD playback STOP stops CD play back DISC DIRECT PLAY DISC 1 2 3 Starts disc playback directly on respective disc tray XBASS activates XBASS EQ selects...

Страница 8: ...time EQ selects among sound effects of classic pop rock jazz XBASS activates XBASS MUTE mutes sound PLAY PAUSE plays or pauses CD cassette playback STOP stops CD cassette playback SKIP BACKWARD SKIP...

Страница 9: ...cs X BASS Preset EQ CLASSIC POP ROCK JAZZ Track number Disc tray 1 2 3 tray icon flashes when selected RDS signal is detected Random playback Stereo signal is detected Radio band Showing elapsed remai...

Страница 10: ...Set the hour 3 Shift to minute digits 4 Repeat step 2 to set the minute 5 Shift to audio select 6 Select among CD Tuner or AUX if available 8 Select disc tray if CD is selected or preset station if T...

Страница 11: ...2 Open the desired disc tray 3 Load change discs with label side up 4 Close respective disc tray Tip While you are playing disc on a tray you can still load change disc on other trays simultaneously...

Страница 12: ...playback Editing Program 1 After you have created a pro gram press PROG SET repeatedly to review it Note ED means program is in edit mode 2 Press and hold to clear unwant ed track CLEAR shows on displ...

Страница 13: ...Automatic Tuner Programming for FM only Press and hold BAND TUNER button for 2 second to scan stations The sta tions will then be stored as preset channels AUTOMATIC TUNER PRO GRAMMING keeps scrollin...

Страница 14: ...ocial news RELIGION religious program PHONE IN phone in program TRAVEL travel l e i s u r e HOBBY hobby JAZZ Jazz music C O U N TRY country music NATIONAL national OLDIES o l d i e s FOLK M folk music...

Страница 15: ...r AUX 3 Start recording 1 Insert tape into cassette player 4 Start playing the recording source Note CD recording plays CD automatically when RECORD is pressed 5 Pause recording Press again to resume...

Страница 16: ...es Check the system is plugged in to power source Point the remote directly at the system s front panel Move closer to the system Remove any obstacles between the remote and the system Disconnect the...

Страница 17: ...r proper voltage Do not touch the pick up lens which is located inside the disc compartment Also to keep dust from collecting on the pick up lens and do not leave the compartment door open for an exte...

Отзывы: