720p WiFi Fixed ip Hd camera
en
12
F - uSiNg ThE prOduCT ON A COMpuTEr ViA ThE ThOMViEW SOFTWArE
You can only configure the camera and image
display as described in paragraph
D - 1 - ACCESS
TO CAMERA CONFIGURATION
if your computer
is on the same network as your camera.
The ThomView software on the CD provides an easy
way to connect to the camera over the internet and
avoids these limitations.
• Install the program on the computer you want
to use to connect to your camera.
• Run the software on your computer. The default
username and password
of the software
are
both 'admin'.
• Click on the 'Settings' icon
, then on 'Add
P2P Camera'.
• This brings up a window for you to enter the
name you want to give your camera, the 'user'
username
of your camera
(default = admin),
its password (default = none, leave blank) and
your camera UID. The UID is a unique code
assigned to your camera.
• Confirm by clicking on
'OK'
, then click on the
'Live view' icon.
• Your camera is displayed in the 'default' list in
the top left of your screen. Click on its name to
display the feed.
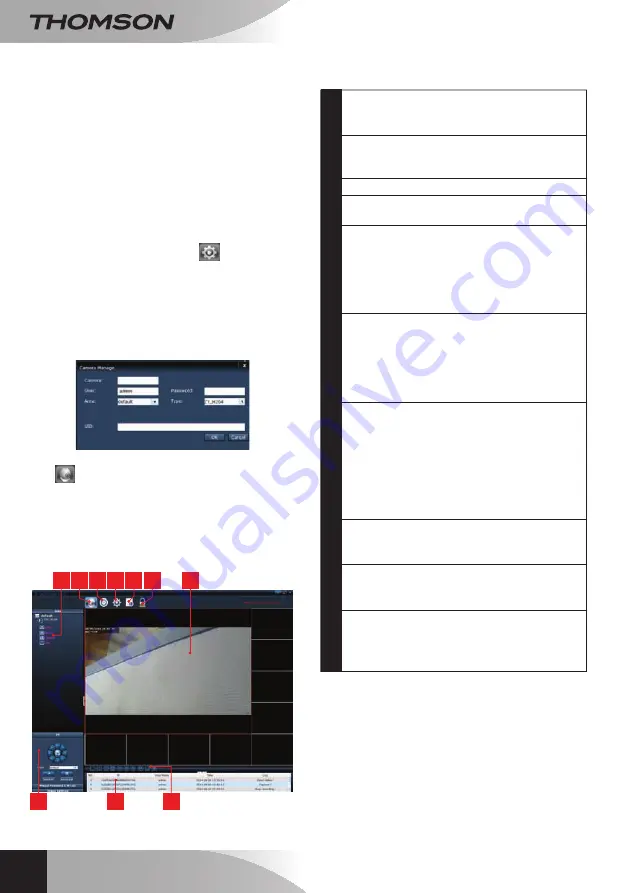
The ThomView software lets you manage several
cameras at once and gives you complete control
over each one and their respective settings:
1
Verrouillage du logiciel, [Lock software] to
continue broadcasting a video but disable
changing cameras and current settings
2
Historique de tous les évènements [Events
log] for all cameras registered to the
ThomView program
3
Access to live video
4
Access to videos and snapshots saved to
the computer by the cameras
5
Search, pairing and configuration menu for
each camera. Click on 'Search Cameras' to
find all the cameras on your computer's
network, click on 'System', then click on
any of the cameras in the list on the right
to display and change its configuration.
6
Click on the name of your camera to display
its feed. This brings up a list; click on any row
to enable that camera's mic (Audio), start
recording a video on the computer (Record),
take a snapshot (Capture) and/or activate
the camera's loudspeaker (Talk).
7
Image de votre caméra [Camera feed]. A red
border around the feed denotes that the
camera has been selected. If you have
several cameras, click on another area of the
screen to display the feed from a different
camera in one of the other areas of the
screen. You can drag and drop a camera
feed from one section to another if you want
to rearrange the screen.
8
Arranging the screen layout: click
to only display one camera feed at a time, 4
cameras at once, and so on.
9
Software activity log: shows all the events
logged by the software with respective dates
and times.
10
Camera controls: click on each heading to
open and display the list of controls: image
and quality settings, enable/disable night
vision, etc.
1
2
4
3
6
5
7
10
9
8
Содержание 512391
Страница 4: ......
Страница 20: ...en 720p WiFi fixed IP camera dSc 723W 70 9 73 73 07 www thomsonbox eu www thomsonsecurity eu V2 ref 512391 ...
Страница 23: ......
Страница 39: ...nl Vaste IP camera met wifi 720p Dsc 723W 70 9 73 73 07 www thomsonbox eu www thomsonsecurity eu V2 ref 512391 ...
Страница 42: ......
Страница 58: ...de Feste WLAN IP Kamera 720p DsC 723W 70 9 73 73 07 www thomsonbox eu www thomsonsecurity eu V2 ref 512391 ...
Страница 61: ......
Страница 77: ...es Cámara IP fija WiFi 720p DSC 723W 70 9 73 73 07 www thomsonbox eu www thomsonsecurity eu V2 ref 512391 ...
Страница 80: ......
Страница 96: ...pt Câmara IP fixa Wi Fi 720p DSC 723W 70 9 73 73 07 www thomsonbox eu www thomsonsecurity eu V2 ref 512391 ...
Страница 99: ......
Страница 115: ...it Telecamera IP fissa Wi Fi 720p Dsc 723W 70 9 73 73 07 www thomsonbox eu www thomsonsecurity eu V2 cod 512391 ...
Страница 118: ......


