Thomasville Oliver SPCA-OL48D-TV Скачать руководство пользователя страница 13


13


Assembly Instructions
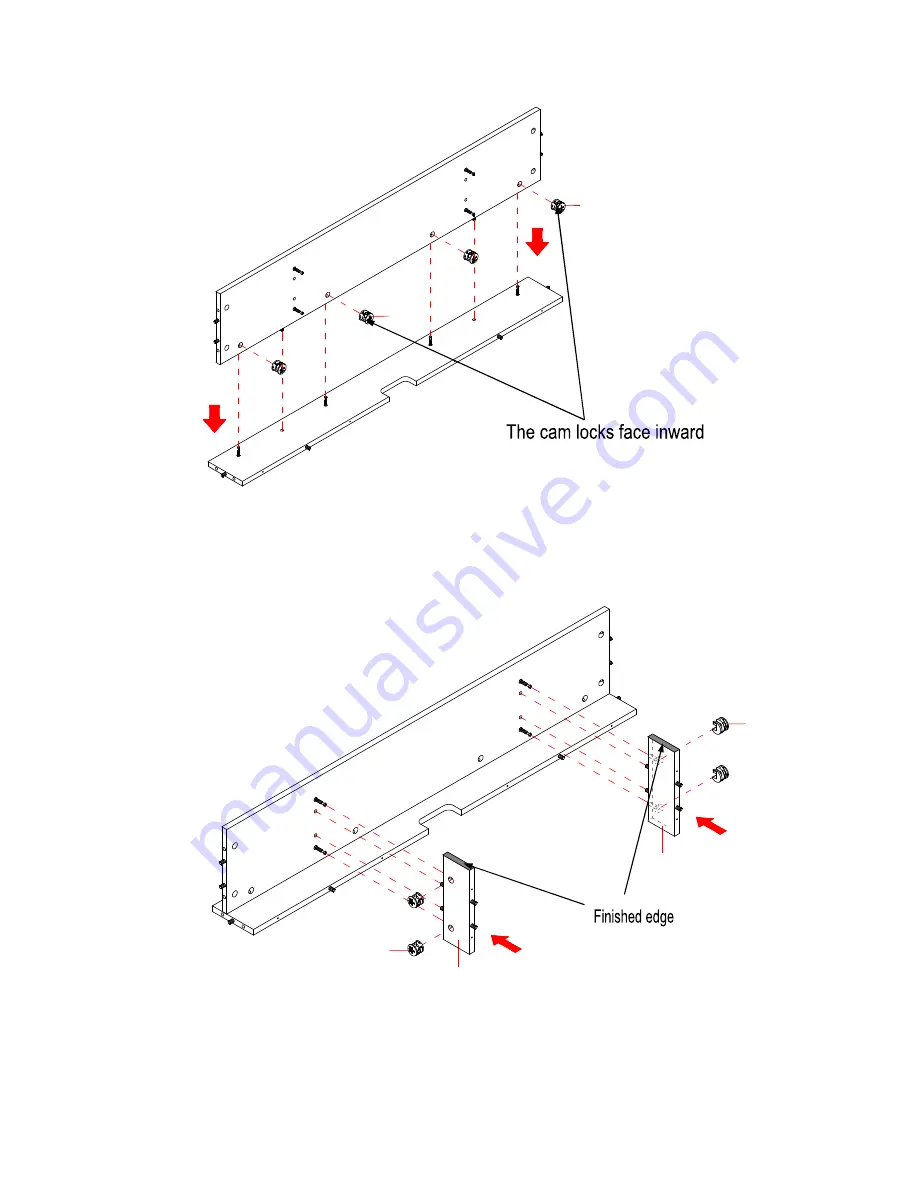


19.


Align and attach the Monitor Shelf (A) to the Monitor Stand Back Panel (B) with four Large Cam Locks 

(1). 


20.


Orient and attach the Monitor Stand Supports (E and F) to the Monitor Shelf (A) by engaging four Large 

Cam Locks (1). 


A

B

1

1

A

B

E

F

1

1

Содержание Oliver SPCA-OL48D-TV

Страница 1: ...EIVED If you have any questions regarding assembly or if parts are missing DO NOT return this item to the store where it was purchased Please call our toll free customer service number and have your i...

Страница 2: ...ts from carton and separate into groups as indicated on part list Please ensure all parts are included prior to assembly Use of power tools to complete assembly is not recommended MAXI MUM RECO MMENDE...

Страница 3: ...with a rubber mallet IF NECESSARY CAM LOCK SYSTEM OPERATION HOW THE KNOCK DOWN KD ASSEMBLY SYSTEM WORKS 1 Screw the Cam Bolt into the threaded inserts on the panel Connect both panels together making...

Страница 4: ...Shelf B Monitor Stand Back Panel C Left Baffle Qty 1 Qty 1 Qty 1 D Right Baffle E Monitor Stand Left Support F Monitor Stand Right Support Qty 1 Qty 1 Qty 1 G Desk Top H Side Apron I Back Apron Qty 1...

Страница 5: ...ront Left Back Leg R Large Drawer Front Qty 2 Qty 2 Qty 1 S Large Drawer Back Panel T Large Drawer Left Side U Large Drawer Right Side Qty 1 Qty 1 Qty 1 V Drawer Bottom Support W Large Drawer Bottom P...

Страница 6: ...x 55 mm Bolt 5 Lock Washer 6 Flat Washer Qty 8 1 extra Qty 8 1 extra Qty 8 1 extra 7 Small Cam Lock 8 Small Cam Bolt 9 M4 x 32 mm Screw Qty 14 1 extra Qty 14 1 extra Qty 30 1 extra 10 M4 x 45 mm Screw...

Страница 7: ...uired parts Assemble the unit on a carpeted floor or the empty carton to avoid any scratch 2 Securely screw the Small Cam Bolts 8 into the designated small holes on both Large and Small Drawer Fronts...

Страница 8: ...awer Bottom Support V to the Large Drawer Front R by engaging 2 Small Cam Lock 7 as shown 5 Slide the Large Drawer Bottom Panel W into the grooves between the Drawer Side Panels T and U util fully ins...

Страница 9: ...ith six 32 mm Screws 9 Make sure that Drawer Bottom Panel W fits securely into the groove of the Drawer Back Panel S 7 Turn the assembled drawer upright 8 Attach one Knob 13 to the front side of the d...

Страница 10: ...by engaging 4 Small Cam Locks 7 Refer to page 3 on Cam Lock system operation supplement 11 Slide one Small Drawer Bottom Panel BB into the grooves between the Drawer Side Panels Z and AA until fully i...

Страница 11: ...into the groove of the Drawer Back Panel Y 13 Turn the assembled drawer upright 14 Attach one Knob 13 to the front side of the drawer kit with one Knob Bolt 12 15 Cover the screws head and cam locks...

Страница 12: ...d Right Baffles C and D using a Phillips screwdriver DO NOT over tighten the cam bolts 18 Glue the Wood Dowels 3 into the designated holes on the Panels A B C D E and F as shown NOTE It is very import...

Страница 13: ...ign and attach the Monitor Shelf A to the Monitor Stand Back Panel B with four Large Cam Locks 1 20 Orient and attach the Monitor Stand Supports E and F to the Monitor Shelf A by engaging four Large C...

Страница 14: ...Locks 1 22 Carefully turn the assembled Monitor Stand onto its top edges Place two support blocks between the mounting surface and side Baffles WARNING Exercise caution to avoid any break 23 Fasten th...

Страница 15: ...e inserted Wood Dowels 3 on the assembled Monitor Stand Attach the Desk Top G into place with the 45 mm Screws 10 25 Securely screw the Large Cam Bolts 2 into the designated small holes on the Desk To...

Страница 16: ...esignated small holes on the Desk Aprons J K and I and Slide Track Supports L and M using a Phillips screwdriver DO NOT over tighten the cam bolts 27 Glue the Wood Dowels 3 into the inner holes on fou...

Страница 17: ...32 mm Screws 9 29 Complete this step two times to assemble four Corner Blocks O 30 Using the wood dowels as guide glue and firmly press the Left Front Apron J to one assembled Corner Block O Fasten t...

Страница 18: ...between the Slide Track Supports L and M by engaging four Large Cam Locks 1 33 Align and attach the assembled Left Front Apron J to the Left Slide Track Support L by engaging two Large Cam Locks 1 34...

Страница 19: ...ue and attach the Back Apron I to the previous assembly by engaging four Large Cam Locks 1 36 Insert four 32 mm Screws 9 through the Corner Blocks O and securely screw into the Back Apron I Tighten th...

Страница 20: ...revious assembly around and glue the Wood Dowels 3 into the designated holes as shown 38 Using the wood dowels as a guide align and attach the previous assembly to the Desk Top G by engaging twenty La...

Страница 21: ...ar the final location 41 Stick the White Paper Covers 15 onto the visible cam locks to conceal the cams 42 Attach 2 Cable Wheels CC to the Back Apron I with four 12 mm Bolts 11 NOTE You can use the Ca...

Страница 22: ...rawer please pull the drawer all the way out then simultaneously push the plastic release lever of the ball bearing slides up on one side and down on the other side and then pull it completely out 44...

Страница 23: ...ate controlled environment Extreme temperature and humidity changes can cause fading warping shrinking and splitting of wood It is advised to keep furniture away from direct sunlight as sun may damage...

Страница 24: ......

Страница 25: ...r le montage ou en cas de pi ce manquante NE PAS retourner cet article au point de vente Communiquer avec notre num ro sans frais du service la client le en ayant en main les instructions et la liste...

Страница 26: ...en groupes tel qu indiqu sur la liste des pi ces Assurez vous que toutes les pi ces ont t incluses avant de commencer le montage L utilisation d outils lectriques n est pas recommand e pour le montage...

Страница 27: ...s au moins la moiti en les frappant l g rement avec un maillet en caoutchouc AU BESOIN FONCTIONNEMENT DU SYST ME CAME DISSIMUL E FONCTIONNEMENT DU SYST ME DE BLOCAGE 1 Visser un boulon came dans la do...

Страница 28: ...B Panneau arri re du support de moniteur C Paroi gauche Qt 1 Qt 1 Qt 1 D Paroi droit E Support gauche du moniteur F Support droit du moniteur Qt 1 Qt 1 Qt 1 G Dessus de bureau H Tablier lat ral I Tabl...

Страница 29: ...re gauche R Fa ade du grand tiroir Qt 2 Qt 2 Qt 1 S Panneau arri re du grand tiroir T C t gauche du grand tiroir U C t droit du grand tiroir Qt 1 Qt 1 Qt 1 V Support inf rieur du tiroir W Panneau inf...

Страница 30: ...x 55 mm 5 Rondelle de verrou 6 Rondelle plate Qt 8 1 extra Qt 8 1 extra Qt 8 1 extra 7 Petit verrou came 8 Petit boulon came 9 Vis M4 x 32 mm Qt 14 1 extra Qt 14 1 extra Qt 30 1 extra 10 Vis M4 x 45 m...

Страница 31: ...i ces requises Assemblez l unit sur un tapis ou une bo te vide pour viter de l gratigner 2 Vissez fermement les petits boulons came 8 dans les petits trous pr vus cet effet sur les fa ades des grands...

Страница 32: ...tiroir R en engageant 2 petits verrous came 7 comme indiqu 5 Faites glisser le panneau inf rieur du grand tiroir W dans les rainures situ es entre les panneaux lat raux du tiroir T et U jusqu ce qu il...

Страница 33: ...Assurez vous que le panneau inf rieur du tiroir W s ins re bien dans la rainure du panneau arri re du tiroir S 7 Tourner le tiroir assembl vers le haut 8 Attachez un bouton 13 l avant du tiroir avec...

Страница 34: ...3 sur le suppl ment de fonctionnement du syst me de verrouillage came 11 Faites glisser le panneau inf rieur du petit tiroir BB dans les rainures situ es entre les panneaux lat raux du tiroir Z et AA...

Страница 35: ...dans la rainure du panneau arri re du tiroir Y 13 Tourner le tiroir assembl vers le haut 14 Attachez un bouton 13 l avant du tiroir avec un boulon t te bouton 12 15 Recouvrez les t tes de vis et les...

Страница 36: ...et droit C et D l aide d un tournevis cruciforme NE PAS trop serrer les boulons came 18 Collez les chevilles en bois 3 dans les trous pr vus cet effet sur les panneaux A B C D E et F comme indiqu NOTE...

Страница 37: ...z l tag re du moniteur A au panneau arri re du support du moniteur B l aide de quatre grands verrous came 1 20 Orientez et fixez les supports du moniteur E et F l tag re du moniteur A en engageant qua...

Страница 38: ...ion le support de moniteur assembl sur ses bords sup rieurs Placez deux blocs de support entre la surface de montage et les parois lat raux AVERTISSEMENT Faites preuve de prudence pour viter toute rup...

Страница 39: ...lles en bois ins r es 3 sur le support de moniteur assembl Fixez le dessus de bureau G en place avec les vis de 45 mm 10 25 Vissez fermement les grands boulons came 2 dans les petits trous pr vus au d...

Страница 40: ...effet sur les tabliers de bureau J K et I et les supports de glissi re L et M l aide d un tournevis cruciforme NE PAS trop serrer les boulons came 27 Collez les chevilles en bois 3 dans les trous int...

Страница 41: ...ffectuez cette tape deux fois pour assembler quatre blocs d angle O 30 En utilisant les chevilles en bois comme guide collez et appuyez fermement le tablier avant gauche J sur un bloc d angle assembl...

Страница 42: ...tre les supports de glissi re L et M en engageant quatre grands verrous came 1 33 Alignez et fixez le tablier avant gauche assembl J sur le support de glissi re gauche L en engageant deux grands verro...

Страница 43: ...utilisant les chevilles en bois comme guide collez et fixez le tablier arri re I l assemblage pr c dent en engageant quatre grands verrous came 1 36 Ins rez quatre vis de 32 mm 9 dans les blocs d ang...

Страница 44: ...pr c dent et collez les chevilles en bois 3 dans les trous pr vus cet effet comme indiqu 38 En utilisant les chevilles en bois comme guide alignez et fixez l assemblage pr c dent au bureau G en engage...

Страница 45: ...ollez les couvertures en papier blanc 15 sur les verrous came visibles pour dissimuler les cames 42 Fixez 2 roulettes de c ble CC au tablier arri re I avec quatre boulons de 12 mm 11 NOTE Vous pouvez...

Страница 46: ...tement puis poussez simultan ment le levier de d verrouillage en plastique des glissi res de roulement billes vers le haut d un c t et vers le bas de l autre c t puis retirez le compl tement 44 Si n c...

Страница 47: ...r mes de temp rature et d humidit pourraient d colorer tordre r tr cir et fendre le bois Il est conseill de garder le meuble loign du soleil direct car il pourrait en endommager le fini Des soins et u...

Страница 48: ......

Отзывы: