SAFE
TY PREC
A
UTION
INITIAL USE
S
TA
R
T CALIBR
TION
GET
PA
TTERN KIT
P
ODUCT P
OFILE
49
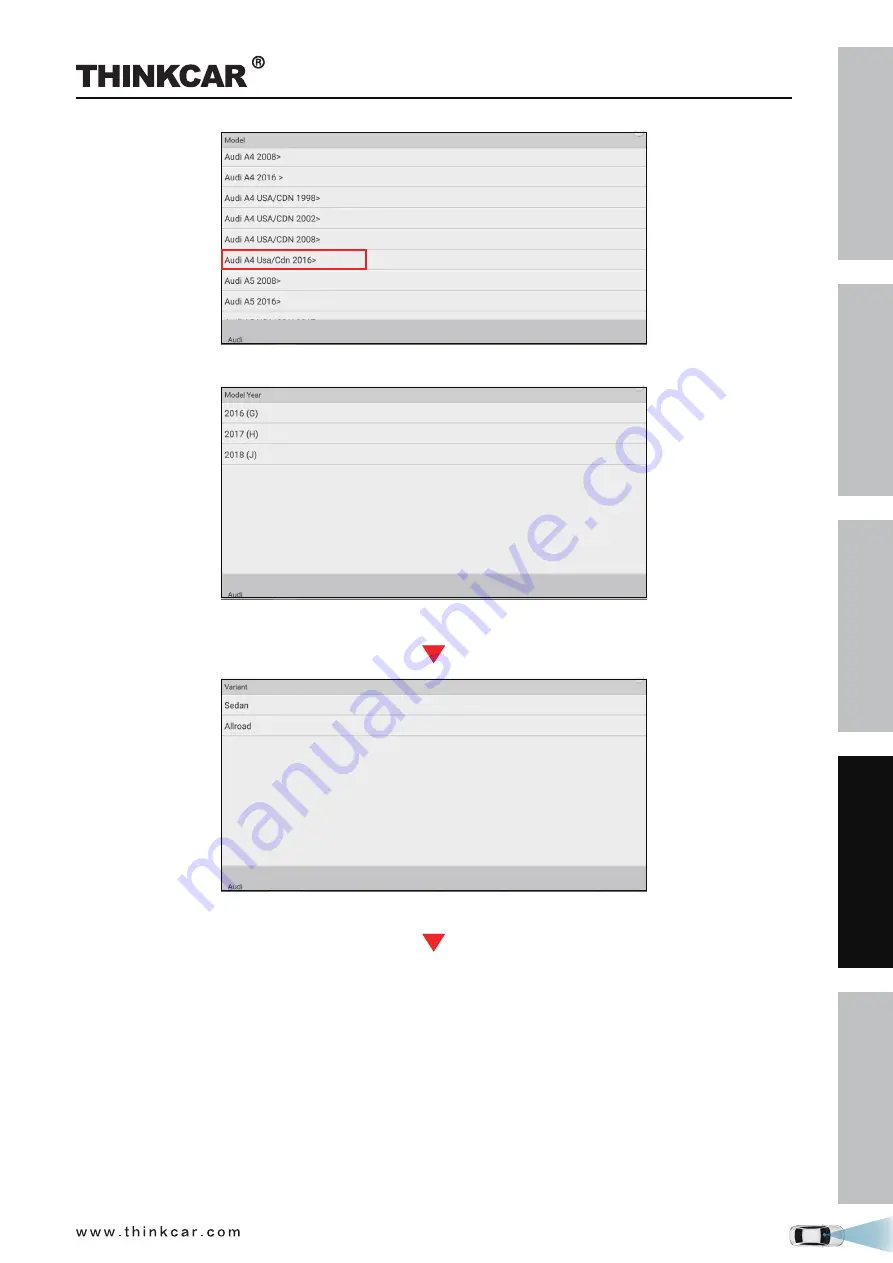
3. Select Audi A4 Usa/Cdn 2016>.
(Select 2018 (J))
(Select Sedan)
THINKCAR ADAS Calibration Tool
Страница 1: ...r a little from the descriptions in the manual in physical appearance color and configuration We have tried our best to make the descriptions and illustrations in the manual as accurate as possible and defects are inevitable if you have any question please contact local dealer or after sale service center we shall not bear any responsibility arising from misunderstandings ...
Страница 2: ... is no reflected spot on the calibration panel In the field of view of the camera there should be no direct light source into the camera otherwise the camera will reduce the exposure so that the captured calibration pattern becomes darker adversely affecting the calibration The light source should ensure uniform illumination distribution in the calibration workstation Do a regular check and servic...
Страница 3: ... flammable liquids gases or dust Sparks from the tool can cause ignition Do not use solvents to clean the laser unit Do not drop the unit Remove the batteries if the laser laser range finder will not be in use for a long period Do not allow children to use the laser device as a toy While installing a laser module please make sure it is firmly and securely attached The included goggles are intended...
Страница 4: ...inder 18 2 Initial Use 20 2 1 Place the calibration frame 20 2 2 Activate ADAS function 22 2 3 General Calibration Operations for LDW System 23 2 3 1 Precondition for the Use of the THINKCAR ADAS 23 2 3 1 1 Workstation size 23 2 3 1 2 Workstation ground 24 2 3 1 3 Workstation lighting 25 2 3 2 Calibration Operation 25 2 3 2 1 Determine the center line of the vehicle 25 2 3 2 2 Determine the placem...
Страница 5: ...AUTION INITIAL USE START CALIBRATION TARGET PATTERN KIT PRODUCT PROFILE VIII 3 2 2 Operation Notes 46 3 2 3 Start calibration 48 4 Target Pattern Kit Optional 54 5 Care Maintenance 56 THINKCAR ADAS CalibrationTool ...
Страница 6: ...1 2 About THINKCAR ADAS 1 2 1 Product Introduction As a flexible and portable ADAS calibration tool the THINKCAR ADAS enables you to effectively and accurately calibrate a wide range of camera based driving assistance systems e g the front camera for the lane departure warning system Repair and service shops do not require a fully equipped wheel alignment station or a leveled workshop ground or pl...
Страница 7: ...RGET PATTERN KIT PRODUCT PROFILE 2 Diagnostic Tool sold separately The calibration tool is exclusively operated in conjunction with a specific diagnostic tool Diagnostic tools from other manufacturers will not be supported THINKCAR ADAS CalibrationTool ...
Страница 8: ... may vary For details please consult from the local dealers or check the included packing list While unloading please note The heavy tool may drop down and cause injuries remember to always unload the tool with the aid of a second person or use suitable aid as necessary Items Picture Quantity Calibration frame 1 Five line laser device LAM09 01 1 Cross laser module LAM09 02 1 Laser reflector LAM09 ...
Страница 9: ...ON TARGET PATTERN KIT PRODUCT PROFILE 4 Plumb line LAM09 06 1 Target storage bracket LAM09 07 1 Target extension rod for Toyota LAM09 08 1 Target extension rod for Honda LAM09 09 1 Laser range finder 1 Cross sticker 1 THINKCAR ADAS CalibrationTool ...
Страница 10: ...configuration packages Target boards and patterns for Lane Departure Warning System are included with this tool Other boards and patterns for other ADAS systems need to be purchased separately For detailed packages refer to Chapter Target Pattern Kit LAM01 01 Benz LDW 1 LAM01 02 VW LDW 1 LAM01 04 L Honda LDW 1 LAM01 04 R Honda LDW 1 LAM01 06 1 Toyota LDW 1 THINKCAR ADAS CalibrationTool ...
Страница 11: ...RN KIT PRODUCT PROFILE 6 LAM01 06 2 Toyota LDW 1 LAM01 06 3 Toyota LDW 1 LAM01 07 L Nissan LDW 1 LAM01 07 R Nissan LDW 1 LAM01 09 Hyundai Kia LDW 1 LAM01 10 Mazda LDW 1 LAM01 12 L Nissan Renault LDW 1 LAM01 12 R Nissan Renault LDW 1 THINKCAR ADAS CalibrationTool ...
Страница 12: ...CALIBRATION TARGET PATTERN KIT PRODUCT PROFILE 7 LAC01 13 Hyundai LDW 1 LAM01 15 Subaru LDW 1 LAM01 16 L Mazda LDW 1 LAM01 16 R Mazda LDW 1 LAM01 17 Honda LDW 1 LAM01 18 L Suzuki LDW 1 LAM01 18 R Suzuki LDW 1 THINKCAR ADAS CalibrationTool ...
Страница 13: ...CALIBRATION TARGET PATTERN KIT PRODUCT PROFILE 8 LAM01 19 L Mitsubishi LDW 1 LAM01 19 R Mitsubishi LDW 1 LAM01 20 Honda LDW 1 LAM05 02 ACC Reflector 1 LAC05 03 CORNER REFLECTOR 1 LAC05 04 Doppler Simulator 1 THINKCAR ADAS CalibrationTool ...
Страница 14: ...g components A Right crossbar Loaded with a scale ruler a positioning plate for securing the target boards B Positioning bracket for pattern boards Loaded with a level gauge two safety snap hooks for locking the crossbars and a fix holder for cross laser module C Lifter D Gear box and hand crank For adjusting the height of the lifter E Laser range finder F Left crossbar same as Right crossbar G Ba...
Страница 15: ...ding rail for positioning plate 7 Positioning plate For securing the target boards target board extension rod There are two BIG holes and two SMALL holes available on the positioning plate Before shipment each BIG hole is pre installed with one magnet for attaching the metal plate on the target board and each SMALL hole is preset with one hanging nail for securing the target board or the target bo...
Страница 16: ... Adjustment screw Rotate it until the bubbles of the level gauge 16 on calibration frame are centered 12 Parking safety mechanism Step it down to lock the rolling caster 13 to prevent it from moving 13 Universal rolling caster 14 Push pull lever Controls the folding unfolding of the base holder All items marked with are same as those on the left crossbar Rear View 15 Marked red lines The upper lin...
Страница 17: ...put window 2 Vertical laser output window 3 Keypad 4 Surface level 5 Fine adjustment knob 6 Adjustable support legs 7 Battery cover 8 Battery compartment 9 Charging port 10 Graduated scale 11 5 8 Tripod threaded adaptor 12 Pendulum safety lock Keypad 1 Horizontal line button 2 Vertical lines button 3 Manual mode button 4 Pulse mode button 5 Manual mode red LED indicator 6 Pulse mode green LED indi...
Страница 18: ...can be charged outside or inside the laser battery compartment 6 Charge the battery pack at least 2 hours before using the laser tool for the first time Lithium battery Charging cable Charger Warning Do not use a damaged battery charger The built in Lithium battery is factory replaceable only Incorrect replacement or tampering with the battery pack may cause a explosion Installation of the 4 AA Ba...
Страница 19: ...ical parameters Laser beams output pattern Horizontal and forward vertical cross beams Horizontal forward and backward vertical beams Horizontal and 4 orthogonal vertical beams Plumb down dot appears while vertical beam is ON Horizontal beam Laser range Indoor 30m 100ft Outdoor with detector 60m 200ft Accuracy Accuracy plumb Dot 0 2mm m 0 0002in in 1mm 1 2m Fan angle 120 5 Self leveling Range 2 5 ...
Страница 20: ...ate 8 of the calibration frame 1 Battery cover 2 Switch 3 Laser gap Installation of the 2 AAA Batteries 1 Open battery cover 2 Insert 2 new AAA batteries of the same brand according to the polarity diagram indicated on the inside of the battery compartment 3 Reclose the battery cover 1 3 4 Laser reflector LAM09 03 The laser reflector is used to position the center line by confirming front and rear...
Страница 21: ...ear center points of the vehicle which helps to correctly position the five line laser device and the laser reflector 1 3 8Target board storage bracket LAM09 07 The storage bracket is designed to store small target boards and larger pattern boards while not in use It is composed of two storage brackets and two connecting bearings Before using it please make sure to fasten the connecting bearings b...
Страница 22: ...ibration on some Toyota vehicles It needs to be secured onto the positioning plate 7 and then the target board attaches onto it 1 3 10Target extension rod for Honda LAM09 09 Generally the width of the calibration frame is specially designed to meet the calibration requirement of most vehicles but for some vehicles with wider calibration distance the target extension rod is required The target exte...
Страница 23: ...uring the height just follow the onscreen prompt height value to perform the calibration It is a Class 2 laser product in accordance with IEC 60825 1 2014 The product and batteries must not be disposed of with household waste 1 Laser Warning Do not stare into the laser beam or direct it towards other people 2 Battery power indicator 3 Display screen 4 Measured result 5 Measurement unit To switch b...
Страница 24: ...TION TARGET PATTERN KIT PRODUCT PROFILE 19 Laser class 2 Laser type 635 650mm power 1mW Battery 2 AAA batteries or Lithium battery Dimensions 4 x 1 4 x 0 7 inch 100 x 35 x 18mm Operating Temperature 14 F 104 F 10 40 THINKCAR ADAS CalibrationTool ...
Страница 25: ...ld the tool with the aid of a second person 1 Take out the calibration frame and place it on a flat ground 2 Push the lever 14 upwards as indicated in the following figure and then pull the rolling caster 13 down on the ground 3 Repeat step 2 for other two rolling casters 4 Hold the handle 19 and raise the lifter up slightly off the ground these rolling casters will be fully unfolded and firmly si...
Страница 26: ...RODUCT PROFILE 21 5 Pull the right crossbar 1 up until it fully attaches to the positioning bracket B then use the safety snap hook 5 to fix it Beware of pinching hands while performing this step 6 Repeat step 5 to unfold the left crossbar THINKCAR ADAS CalibrationTool ...
Страница 27: ...ld separately first Follow the steps below to activate it Different diagnostic tools have different accesses to the ADAS function For details please refer to the user manual of individual scanner 1 Press the POWER button on the diagnostic tool to turn it on 2 Tap ADAS to enter the following screen 4 Tap ADAS Calibration to enter the ADAS activation screen 5 Scratch or scrap the designated area on ...
Страница 28: ...djusted To calibrate accurately please make sure the following workstation requirements are met See Chapter 2 4 1 1 Chapter 2 4 1 3 2 3 1 1 Workstation size A For front cameras Distance A the width of the cross member Distance B about 1m 39 4inch from the cross member to the wall Distance C at least 0 5m 19 7inch from the edge of the cross member to other obstacles Distance D varies from vehicle t...
Страница 29: ...ION INITIAL USE START CALIBRATION TARGET PATTERN KIT PRODUCT PROFILE 24 2 3 1 2 Workstation ground Make sure the vehicle is parked with all wheels on an even floor surface Correct Wrong THINKCAR ADAS CalibrationTool ...
Страница 30: ... instructions on the diagnostic tool For some vehicle models calibration pattern and calibration tool are not mandatory But for some camera based ADAS the calibration cannot be done without the help of calibration tool and calibration pattern In this case for the positioning of the calibration tool and vehicle it is necessary for the user to manually finish it The following steps are needed when w...
Страница 31: ... string is perpendicular to the ground 4 Place the laser reflector LAM09 03 parallel to the vehicle and ensure that the reflective stripe is aligned with point B 5 Place the auxiliary mirror LAM09 04 in front of the vehicle 6 Ensure that five line laser instrument LAM09 01 is level turn on the laser beams of the five line laser instrument LAM09 01 If the vehicle chassis is too low the five line la...
Страница 32: ...point A and point C is the value specified in the on screen app instructions B Measuring target pattern board to front hub center 1 Place L shaped positioning bracket LAM09 05 in the front hub center 2 Mark point D in front of the L shaped positioning bracket making sure that the distance L between point D and L shaped positioning bracket is the value specified in the on screen app instructions 3 ...
Страница 33: ...ame with the beam output aiming at the vehicle front and it will be automatically attached onto the plate 2 Turn the cross laser instrument LAM09 02 on and then place the THINKCAR ADAS to make the laser cross point of cross laser instrument LAM09 02 overlap point C 3 Observe the level gauge bubbles on the crossbar If the bubbles are not centered turn the adjustment screws to adjust until the bubbl...
Страница 34: ...ng 2 3 2 5 Select the desired target pattern board 1 According to the vehicle being serviced choose the corresponding target pattern board 2 For pattern board larger follow the steps below to install it 1 Pull the center positioning plate outwards and rotate it until it vertically stands on the calibration frame 2 Locate the mounting holes on the calibration pattern board Please note that there ar...
Страница 35: ...E START CALIBRATION TARGET PATTERN KIT PRODUCT PROFILE 30 3 Place the mounting holes on the pattern board holder 4 Slide the positioning plates at both ends until they firmly secure the pattern board THINKCAR ADAS CalibrationTool ...
Страница 36: ... ADAS calibration instructions on the diagnostic tool If the target board e g LAM01 06 2 is installed on the left or right positioning plate slide the positioning plate along the crossbar to the desired position a red scale indicator 4 on the top of the bracket points at the scale ruler 2 on the crossbar If the target board mats e g LAM01 04 L LAM01 04 R are installed slide the positioning plate a...
Страница 37: ...sion rod on the positioning plate and then install the target board on the extension rod For LAM09 08 horizontal extension rod you are recommended to use the included lock cover to lock the extension rod to prevent it from being displaced due to the installed heavy target board Hold it and cover it on the extension rod See the following figure If the target board e g LAM01 01 is installed on the c...
Страница 38: ...played on the laser range finder matches the value specified in the on screen instructions Since the laser range finder is not on the same level as the target board pattern board a precise tolerance value is adjusted for the calibration height of each vehicle on the diagnostic tool and no more settings and calculations are required by users THINKCAR ADAS CalibrationTool ...
Страница 39: ...hanged adjusted One of the vehicle level sensors of the wheel damping electronics or the level control has been replaced 3 1 2 Operation Notes Make sure the following conditions are met On vehicle diagnostic tool Use the AUDI diagnostic software version 28 50 or above to perform the calibration Only the calibration related fault trouble codes are found on the vehicle all other fault memory records...
Страница 40: ...DI A3 USA CANADA 2013 2014 2018 AUDI Q3 2012 2012 2018 AUDI A4 2016 2016 2018 AUDI Q3 USA CANADA 2012 2014 2018 AUDI A4 USA CANADA 2016 2016 2018 AUDI Q5 2017 2017 2018 AUDI A5 2017 2017 2018 AUDI Q5 USA CANADA 2017 2017 2018 AUDI A6 2011 2011 2018 AUDI Q7 2016 2016 2018 AUDI A6 USA CANADA 2011 2011 2018 AUDI Q7 USA CANADA 2016 2015 2018 AUDI A7 2011 2011 2018 AUDI A7 USA CANADA 2011 2011 2018 AUD...
Страница 41: ...calibration Follow the steps below to proceed 1 Tap Toolbox ADAS on the diagnostic tool 2 The diagnostic tool starts communicating with the VCI and reading VIN After the VIN is successfully decoded a screen similar to the following appears 3 Select Audi Q5 Usa Cdn 2017 THINKCAR ADAS CalibrationTool ...
Страница 42: ...TIAL USE START CALIBRATION TARGET PATTERN KIT PRODUCT PROFILE 37 Select 2018 J Select SUV Select Engine Dfva 2 0l Tdi 140kw 4 Double check your selections and tap Confirm to go to the next step THINKCAR ADAS CalibrationTool ...
Страница 43: ...T PATTERN KIT PRODUCT PROFILE 38 5 Select the system to be calibrated Select A5 Front Sensors Driver Assistance System Select A5 Front Camera Select A5 Calibrate Control Module 6 Select A5 Calibrate Control Module to continue THINKCAR ADAS CalibrationTool ...
Страница 44: ...onditions and tips and double check all pre calibration preparations are well made or not If yes tap Complete Continue 8 Check if the following steps have been done or not 1 Determine the center line of the vehicle being tested Tap Next Step Tap Next Step 2 Determine the placement location of the THINKCAR ADAS THINKCAR ADAS CalibrationTool ...
Страница 45: ...SE START CALIBRATION TARGET PATTERN KIT PRODUCT PROFILE 40 Tap Next Step 3 Place the THINKCAR ADAS Tap Next Step 4 Adjust the THINKCAR ADAS in parallel with the vehicle Tap Next Step 5 Set the height THINKCAR ADAS CalibrationTool ...
Страница 46: ...ap Next Step 6 Select the LAM01 02 pattern board Tap Next Step 9 The following dialog box displays on the screen Before calibrating make sure that all DTCs that are not related to the calibration have been erased If yes tap Yes to go to the next step Tap Yes THINKCAR ADAS CalibrationTool ...
Страница 47: ...e has level control system and should be set to normal level automatically Set the drive select function of the vehicle to COMFORT to set the suspension system to normal level and lock it 12 Tap Complete Continue follow the on screen instruction to finish the startup evaluate chassis status and level control system and enter the wheel housing edge values please enter the values in THINKCAR ADAS Ca...
Страница 48: ...stance systems 14 Tap Complete Continue to set the calibration mode start calibration and read calibration values 15 Tap Complete Continue to inquire the level control system and select the type of chassis control of the vehicle 16 Select 74 Suspension Control to reset the level control system to normal control mode and activate the level control system of the suspension system THINKCAR ADAS Calib...
Страница 49: ...agnostic tool will clear the previously existed diagnostic trouble codes 18 Tap Complete Continue to wait the diagnostic tool to automatically erase the DTCs related to the calibration 19 Tap Complete Continue to confirm whether the DTCs have been erased or not 20 Tap Complete Continue to confirm and end the whole calibration session THINKCAR ADAS CalibrationTool ...
Страница 50: ...ollowing diagnostic trouble code is found on the vehicle B201000 Rear view system has not been calibrated 2 The following repairs and replacements are made on the vehicle The backup camera R189 has been removed and installed The backup camera system control unit J772 has been replaced After the accident repair has been done on the rear body or the trunk lid After four wheel alignment After repair ...
Страница 51: ... 2 2 Operation Notes Make sure the following conditions are met WorkStation Size For calibrating the rear AVM camera the whole workstation size depends on the vehicle size and the calibration reference pattern The following illustration describes the maximum workstation size for reference only American vehicles European vehicles Asian vehicles Distance A the width of the whole workstation about 7 ...
Страница 52: ...lecting on the calibration pattern Reflecting light affects the image recognition of the camera and calibration failure becomes possible Make sure that the VCI device has been plugged into the vehicle s DLC Turn on the ignition The backup camera has been activated Backup camera image can be seen The vehicle is in good condition and no one is allowed to sit in the vehicle Fuel tank is full Maintain...
Страница 53: ...PROFILE 48 3 2 3 Start calibration Follow the steps below to proceed 1 Choose AUDI on the diagnostic software selection screen 2 Tap OK to enter the following diagnostic menu screen 3 Choose Guided Functions to enter vehicle model selection screen THINKCAR ADAS CalibrationTool ...
Страница 54: ...SAFETY PRECAUTION INITIAL USE START CALIBRATION TARGET PATTERN KIT PRODUCT PROFILE 49 3 Select Audi A4 Usa Cdn 2016 Select 2018 J Select Sedan THINKCAR ADAS CalibrationTool ...
Страница 55: ... TARGET PATTERN KIT PRODUCT PROFILE 50 Select Engine Dfva 2 0l 140kw 4 Double check your selections and tap Confirm to go to the next step 5 Select System Selection from the Guided functions list Select System Selection THINKCAR ADAS CalibrationTool ...
Страница 56: ...OFILE 51 Select 6C Camera System Rear View Select 6c Rear View Camera System Select 6c Calibration 6 Swipe the screen from the bottom to scroll and carefully read all instructions and notes on calibration operation Tap Complete Continue to continue THINKCAR ADAS CalibrationTool ...
Страница 57: ...ter for example 80mm and tap OK to confirm 8 Input the measured distance of the calibration pattern to the rear axle in millimeter for example 1300mm and tap OK to confirm 9 Double check whether it is a A4 long version or not If yes tap Yes 10 Enter the measured ground clearance of the camera lens perpendicular to the ground in millimeter for THINKCAR ADAS CalibrationTool ...
Страница 58: ...BRATION TARGET PATTERN KIT PRODUCT PROFILE 53 example 865mm and tap OK to confirm 11 The rear view camera system starts calibrating Follow the on screen instructions until the calibration is successfully finished THINKCAR ADAS CalibrationTool ...
Страница 59: ...mediately regarding potential damage or missing parts For different destinations the accessories may vary Various calibration panel packages and kits are available individually or as a package to meet different workshop requirements For details please consult from the local dealers or check the included packing list 1 RCW AVM TARGET KIT AMERICAN RCW AVM TARGET KIT EUROPEAN HONDA AVM LAC04 01 LAC04...
Страница 60: ...ALIBRATION TARGET PATTERN KIT PRODUCT PROFILE 55 MERCEDES RC LAC02 02 VW RC LAC02 03 MERCEDES RFK LAC04 08 01 LAC04 08 02 RENAULT AVM LAC04 10 01 LAC04 10 02 VW AVM LAC04 04 VW AVM LAC04 14 Romeo LDW LAM01 11 THINKCAR ADAS CalibrationTool ...
Страница 61: ...nd operate within normal operating temperatures Do not store the calibration tool in humid or dirty areas Regularly lubricate moving parts with acid free and resin free grease or oil Clean the ADAS calibration tool with non aggressive cleaning agents on a regular basis Use commercial household cleaning detergents and a moistened soft cleaning cloth Always use original spare parts to replace damage...