Installation Manual 5
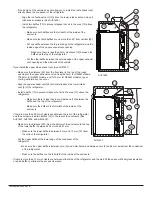
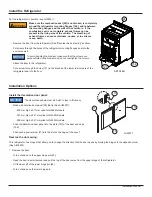
2. Install the lower intake vent (See Art01608):
The lower intake vent is also the service access opening for the
components on the rear of the refrigerator.
Make sure the bottom of the opening of the lower intake
vent is even with or immediately below the floor level.
This allows any leaking LP gas to escape to the outside
and not to collect at floor level.
- Make sure the bottom of the opening of lower intake vent is even with or
immediately below the floor level.
- Align the lower intake vent [9] vertically below the coils [10] and the
condenser [11] of the refrigerator.
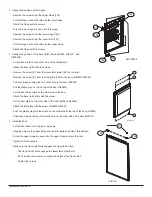
3. Install the upper exhaust vent:
- If you install the roof exhaust vent (see Art01638):
Make sure that no sawdust, insulation, or other
construction debris is on the refrigerator or in the
enclosure. Debris can cause a combustion hazard and
prevent the refrigerator from operating correctly.
Tighten the screws of the upper roof exhaust cap to 11.5 kgf/cm max.
Also make sure that the air flow around the upper roof exhaust cap is
not blocked or decreased by other roof mounted features such as a
luggage carrier, an air conditioner, a solar panel, etc.
- If the design of the vehicle allows, install the roof exhaust vent [12] directly
above the condenser [11] of the refrigerator.
- Install a baffle [13] to prevent stagnant hot air in the area [14] above the
refrigerator.
- Make sure there is less than 6 mm clearance [15] between the baffle
and the top of the refrigerator.
- Make sure the baffle is the full width of the inside of the enclosure.
12
14
11
13
16
9
15
Art01638
10
11
10
9
Art01608
CAUTION
!
WARNING
!
NOTICE
NOTICE


