background image

461271108  •  15

3

5

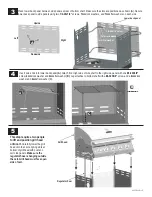
This step requires two people 

to lift and position grill head 

onto cart.

 Carefully lower the grill 

head onto the cart, aligning slots at 
bottom of grill head with posts on 
cart side panels. 

Make sure the 

regulator hose is hanging outside 

the cart. Grill head must face open 

side of cart.

Lower back panel

Regulator hose

Grill head

A

Upside

Downside

Left

Right

Place lower back panel between side panels at rear of bottom shelf. Make sure the slots are positioned as shown (

A

). Secure 

lower back panel to side panels using two 

1/4-20x1/2”

 screws, 

7mm

 lock washers, and

 7mm

 flat washers on each side.

1/4-20x1/2” screw

7mm lock washer

7mm flat washer

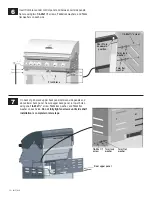
4

Insert wire ends into lower back panel 

(A)

. Attach front right side of wire shelf to the right side panel with one 

#8-32X3/8"


screw, 

4mm

 lock washer and 

4mm

 flat washer 

(B)

. Leg attaches to bottom shelf with a 

#8-32X3/8"

 screw and a 

4mm

 lock 

washer and 

4mm

 flat washer (

C

).

A

B

C

Содержание 461271108

Страница 1: ...llow all safety statements assembly instructions and use and care directions before attempting to assemble and cook INSTALLER ASSEMBLER Leave this manual with consumer CONSUMER Keep this manual for future reference WARNING Failure to follow all manufacturer s instructions could result in serious personal injury and or property damage CAUTION Some parts may contain sharp edges especially as noted i...

Страница 2: ...afety hazard DANGER Safety Symbols The symbols and boxes shown below explain what each heading means Read and follow all of the messages found throughout the manual DANGER Indicates an imminently hazardous situation which if not avoided will result in death or serious injury WARNING WARNING Indicates an potentially hazardous situation which if not avoided could result in death or serious injury CA...

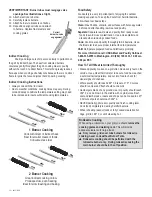
Страница 3: ...4 26 Limited Warranty 28 Registration Card 30 461271108 3 WARNING Do not attempt to repair or alter the hose valve regulator for any assumed defect Any modification to this assembly will void your warranty and create the risk of a gas leak and fire Use only authorized replacement parts supplied by manufacturer To insure your satisfaction and for follow up service register your grill online at www ...

Страница 4: ...inders must be constructed and marked in accordance with specifications for LP cylinders of the U S Department of Transportation DOT or for Canada CAN CSA B339 cylinders spheres and tubes for transportation of dangerous goods Transport Canada TC See LP cylinder collar for marking LP cylinder valve must have Type 1 outlet compatible with regulator or grill Safety relief valve UL listed Overfill Pro...

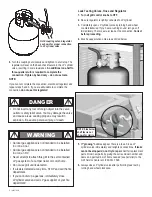
Страница 5: ...ion fill test and certify their cylinders Exchange your cylinder only for an OPD safety feature equipped cylinder as described in the LP Cylinder section of this manual Always keep new and exchanged LP cylinders in upright position during use transit or storage Leak test new and exchanged LP cylinders BEFORE connecting to grill LP Cylinder Leak Test For your safety Leak test must be repeated each ...

Страница 6: ...wheel counterclockwise If you hear a rushing sound turn gas off immediately There is a major leak at the connection Correct before proceeding 4 Brush soapy solution onto areas circled below 6 461271108 NOTE Sideburner shelf fascia not shown for clarity Outdoor gas appliance is not intended to be installed in or on a boat Outdoor gas appliance is not intended to be installed in or on an RV Never at...

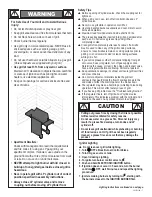
Страница 7: ...ION BURNER first Safety Tips s Before opening LP cylinder valve check the coupling nut for tightness s When grill is not in use turn off all control knobs and LP cylinder valve s Never move grill while in operation or still hot s Use long handled barbecue utensils and oven mitts to avoid burns and splatters s Maximum load for sideburner and side shelf is 10 lbs s The grease tray must be inserted i...

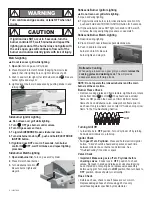
Страница 8: ...ly low flame is seen refer to Sudden drop or low flame in the Troubleshooting Section HIGH LOW Rotisserie Burner Ignitor Lighting s Do not lean over grill while lighting 1 Open lid during lighting 2 To ignite rotisserie burner turn rotisserie burner knob to ON push and hold ELECTRONIC IGNITIOR button for 5 seconds 3 If rotisserie burner does NOT light turn knob to OFF wait 5 minutes then repeat li...

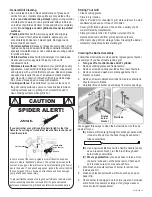
Страница 9: ...ing pad Use only in direction of brushed finish to avoid damage Do not use abrasive pad on areas with graphics Cooking surfaces If a bristle brush is used to clean any of the grill cooking surfaces ensure no loose bristles remain on cooking surfaces prior to grilling It is not recommended to clean cooking surfaces while grill is hot General Grill Cleaning Cleaning the Burner Assembly Follow these ...

Страница 10: ...cooked meats like hot dogs grill to 165 F or until steaming hot Rotisserie Cooking When using a rotisserie on your grill you should remove the cooking grates and warming rack This will provide adequate clearance for large foods s Only remove grids over tube burners for rotisserie cooking never cook without Burner Tents s Rotisserie cooking should be performed with the rotisserie burner only During...

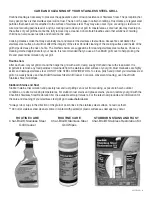
Страница 11: ...ong the life and prevent discoloration of your grill Routine Care After each use let your grill cool and then wipe the grill with a soft damp soapy cloth and rinse with clean water It is important to remove any food particles or marinade from the stainless steel surface of your grill Most marinades are highly acidic and damage stainless steel DO NOT USE STEEL OR WIRE WOOL To clean polish and prote...

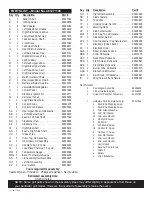
Страница 12: ...04295 NN 2 Lid Assembly Hardware Pack 80010445 OO 1 Left Door Assembly 80010446 PP 2 Door Handle 80010447 12 461271108 Key Qty Description Part QQ 1 Right Door Assembly 80010448 RR 5 Flame Tamers 80016301 SS 1 Tank Wire 80010427 TT 1 Cooking Grate Set of 3 80010436 UU 1 Warming Rack 80016908 VV 1 Side burner Grate 80006640 WW 2 End Cap Top Lid Handle 80008752 XX 1 Sideburner Burner 80013400 XX1 1 ...

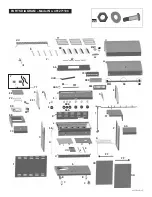
Страница 13: ...IAGRAM Model No 461271108 UU MM LL RR N R TT S M D EE DD BB CC V V Z W XX XX 1 V T X U Y AA PP OO O J K H P PP F G C A B SS QQ Q I GG HH E KK FF II JJ L MM 1 I 1 C B NN HHH AAA BBB CCC DDD EEE GGG FFF ZZ XX V YY III WW WW ...

Страница 14: ... side of bottom shelf 7mm lock washer 7mm flat washer Left side panel with large hole Right side panel Attach the two locking casters at the rear of the bottom shelf and the two fixed casters at the front Use the provided caster wrench to fully tighten casters Make sure side panels are pushed as far to the rear of bottom shelf as possible before fully tightening screws Locking caster Bottom shelf ...

Страница 15: ...e Left Right Place lower back panel between side panels at rear of bottom shelf Make sure the slots are positioned as shown A Secure lower back panel to side panels using two 1 4 20x1 2 screws 7mm lock washers and 7mm flat washers on each side 1 4 20x1 2 screw 7mm lock washer 7mm flat washer 4 Insert wire ends into lower back panel A Attach front right side of wire shelf to the right side panel wi...

Страница 16: ...Do not fully tighten screws until side shelf installation is complete in later steps 16 461271108 6 1 4 20x1 screw 7mm lock washer 7mm flat washer 1 4 20x1 screw 7mm lock washer 7mm flat washer Front brace Rear upper panel Door Pin in downward position Insert front brace under control panel and between cart side panels Secure using two 1 4 20x1 screws 7mm lock washers and 7mm flat washers on each ...

Страница 17: ...n left sideburner shelf assembly into rectangular slots in side of firebox Attach rear of shelf using one 1 4 20x1 2 screw 7mm lock washer and 7mm flat washer in upper hole Use one 1 4 20x1 screw 7mm lock washer and 7mm flat washer in lower hole Attach front of shelf and fascia using three 1 4 20x1 2 screws 7mm lock washers and 7mm flat washers Now you may fully tighten lower screws on upper back ...

Страница 18: ...Press sideburner control knob onto valve stem Control knob Control knob bezel Insert sideburner burner into left shelf making sure burner tube engages sideburner valve A Center stud on bottom of burner fits into center hole in burner bracket on shelf See illustration C for proper burner to valve engagement Secure burner to bracket using two 10 24x3 8 screws 5mm lock washers and 5mm silicone washer...

Страница 19: ...upper and lower back panels Attach left and center front shield tabs under front brace with 8x3 8 self tapping screws Insert left and right grease tray rails into slots beneath grease tray opening in upper back panel Attach left rail to brace with a 8x3 8 self tapping screw Attach right rail and right front shield extension tab together under front brace with a 8x3 8 self tapping screw Some compon...

Страница 20: ...15 Left door Right door Hinge pin on bottom of door Top of door PRESS Insert hinge pin on bottom of doors into hole in bottom shelf Press upper hinge pin in front brace align hinge hole on top of door and release hinge pin into door NOTE Once doors are installed adjust Door Brace up or down to adjust for proper door clearance then tighten screws to Door Brace from step 5 ...

Страница 21: ... opposite end on pins in back of firebox Back of firebox Front of firebox Flame tamer 17 Place cooking grates onto the firebox as shown Insert the three wire ends at rear of warming rack into holes in back of firebox Front wires of warming rack rest on sides of firebox Assembled warming rack Warming rack Cooking grate ...

Страница 22: ...the Burner Flame Check and for important safety instructions before using Always keep LP cylinders in upright position during use transport and storage Cylinder screw at rear of cart CAUTION Cylinder valve must face to front of cart once tank is attached Failure to install cylinder correctly may allow gas hose to be damaged in operation resulting in the risk of fire Regulator LP Cylinder not inclu...

Страница 23: ...461271108 23 20 Unscrew electronic ignition button on front of control panel Insert AA battery into ignitor negative end first Replace button AA Battery Electronic Ignition Button ...

Страница 24: ...e made Replace LP cylinder Turn off LP cylinder valve Return LP cylinder to gas supplier Turn off LP cylinder valve Remove regulator from cylinder and visually inspect rubber seal for damage See LP Cylinder Leak Test and Connecting Regulator to the LP Cylinder Turn off control knobs and LP cylinder valve Leave lid open to allow flames to die down After fire is out and grill is cold remove burner a...

Страница 25: ...n end s of carryover tube s Prevention Solution See Section I of Electronic Ignition System See Section II of Electronic Ignition System See Section III of Electronic Ignition System Replace ignitor Replace knob Inspect wire insulation and proper connection Replace wires if insulation is broken Use long stem match fireplace match See Match Lighting section of Use and Care Check for gas in LP cylin...

Страница 26: ...towel to remove moisture Replace cracked or broken electrodes Certified Grill Parts And Accessories Char Broil and Design Char Broil Gas Grill Briquettes Char Diamonds Cooking Zone and Design Diamond Flame Executive Chef Faststart Flare Fighter FlavorMaster Gas Grill Silouette and Design H2O Smoker Lava Flame MasterFlame MasterFlame Precision Cooking System PowerSpark Quantum VIP PrecisionFlame an...

Страница 27: ...Page Blank Intentionally 461271108 27 ...

Страница 28: ...side the United States or Canada 6 Pickup and delivery of your product 7 Repairs to parts or systems resulting from unauthorized modifications made to the product 8 The removal and or reinstallation of your product 9 Shipping cost standard or expedited for warranty and replacement parts DISCLAIMER OF IMPLIED WARRANTIES LIMITATION OF REMEDIES Repair or replacement of defect parts is your exclusive ...

Страница 29: ...Page Blank Intentionally 461271108 29 ...

Страница 30: ...úmero telefónico Numéro de téléphone 3 Example your name your host com Ejemplo su nombre su host com Exemple votre nom votre hôte com 2 E mail Address Dirección de correo electrónico Adresse électronique If you voluntarily provide us with your email address you give us permission to use your email address to send you offers that may interest you Si nos informa voluntariamente su dirección de corre...

Страница 31: ...Page Blank Intentionally 461271108 31 ...

Страница 32: ... knobs are in OFF position and regulator is attached to tank BEFORE opening tank valve to avoid low flames Perform leak test regularly Thank You for Your Purchase Char Broil LLC Printed in China Columbus GA 31902 STOP Should you encounter a problem with our product CALL US FIRST Do not return this product to the store WE CAN HELP GRILL SERVICE CENTER 1 800 241 7548 HOURS 8AM 6PM EST Mon Fri Please...

Отзывы: