background image

2

 Installation

Configuring the RI Detector in ChromQuest

22

Surveyor RI Plus Detector Hardware Manual

Thermo Scientific

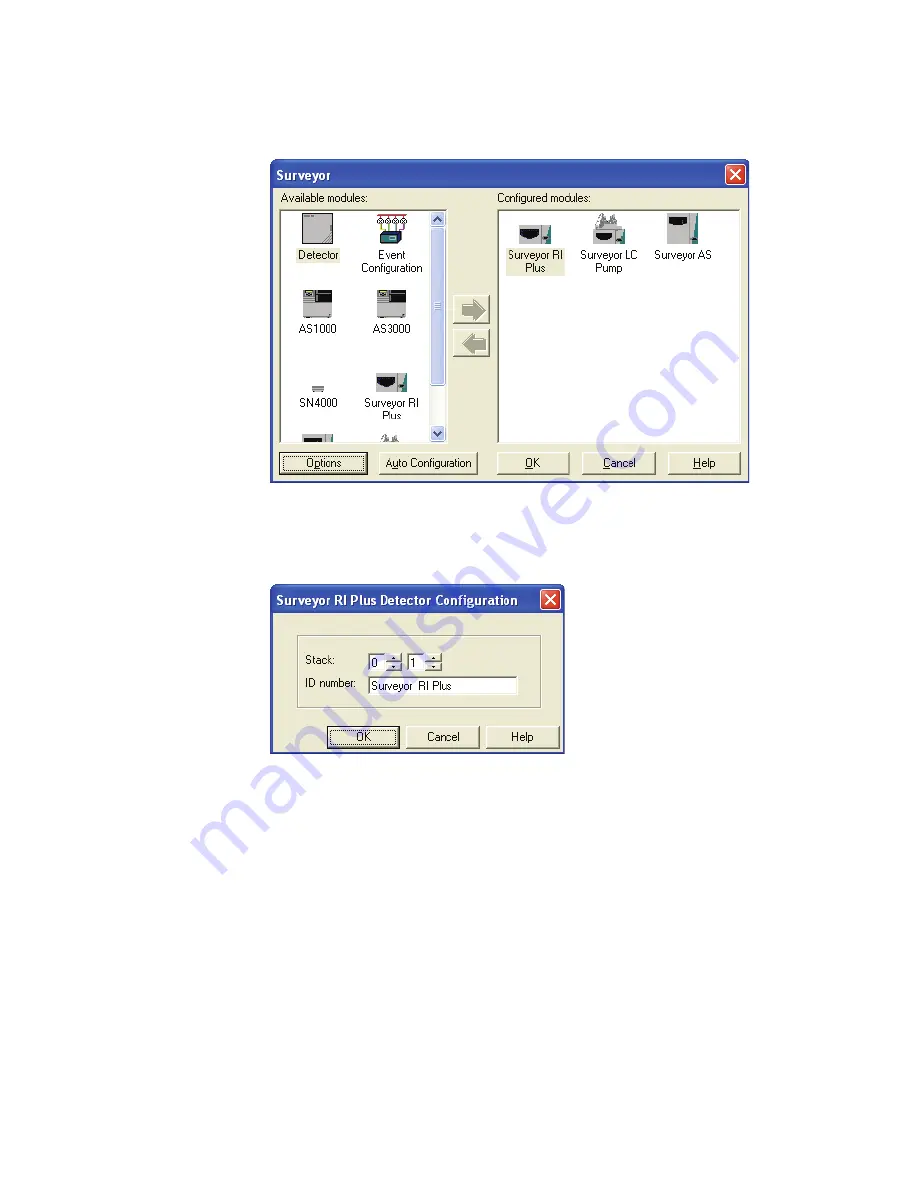
Figure 17. 

Surveyor dialog box

5. In the Configured modules pane, double-click the icon for the Surveyor RI Plus Detector.

The Surveyor RI Plus Detector Configuration dialog box appears as shown in 

Figure 18

.

Figure 18. 

Surveyor RI Plus Detector Configuration dialog box

6. Unless you are controlling more than one Surveyor RI Plus Detector from the same 

computer, leave the Stack setting at its default of 1.

7. Optional. In the ID number box, type an identification number for the RI detector.

8. Click 

OK

 to exit the Surveyor RI Plus Detector Configuration dialog box.

9. Depending on the data system, do one of the following:

• In ChromQuest, click 

OK

 to exit the Surveyor dialog box and return to the Main 

Menu window.

• In ChromQuest SI, click 

OK

 to exit the Surveyor dialog box and return to the 

ChromQuest SI Configuration dialog box. Click 

Close

 to accept the configuration 

settings and return to the Windows desktop.

Содержание Surveyor RI Plus

Страница 1: ...Surveyor RI Plus Detector Hardware Manual 60253 97000 Revision C January 2009...

Страница 2: ...ede all previous information received by the purchaser Thermo Fisher Scientific Inc makes no representations that this document is complete accurate or error free and assumes no responsibility and wil...

Страница 3: ...eplacement parts and additional components options and peripherals must be ordered from Thermo Fisher Scientific or one of its authorized representatives Surveyor RI Plus Detector EMC Directive 89 336...

Страница 4: ...by the instrument Notice on the Susceptibility to Electromagnetic Transmissions Your instrument is designed to work in a controlled electromagnetic environment Do not use radio frequency transmitters...

Страница 5: ...Directives and the recyclers in your country WEEE Konformit t Dieses Produkt muss die EU Waste Electrical Electronic Equipment WEEE Richtlinie 2002 96 EC erf llen Das Produkt ist durch folgendes Symb...

Страница 6: ...ieurs compagnies de recyclage dans chaque tat membre de l union europ enne et ce produit devrait tre collect ou recycl par celles ci Davantage d informations sur la conformit de Thermo Fisher Scientif...

Страница 7: ...si raffreddino prima di effetturare l intervento di manutenzione Fire Use care when operating the system in the presence of flammable gases Feuer Beachten Sie die einschl gigen VorsichtsmaBnahmen wen...

Страница 8: ...and proper procedures to dispose waste oil Heat Before servicing the instrument allow any heated components to cool Fire Use care when operating the system in the presence of flammable gases Eye Haza...

Страница 9: ...ing the Transport Screws 13 Integrating the Detector into the LC System 14 Making the Initial Back Panel Connections 15 Connecting the Ethernet Cable 15 Connecting the System Interconnect Cable 16 Con...

Страница 10: ...33 Recommendations for Routine Maintenance 34 Preventive Maintenance 34 Cleaning Detector External Surfaces 35 Flushing the Flowcell 35 Replacing the Fuses 36 Chapter 5 Troubleshooting 37 Detector Re...

Страница 11: ...us Getting Connected Guide Safety and Special Notices Make sure you follow the precautionary statements presented in this guide The safety and other special notices appear in boxes Safety and special...

Страница 12: ...Go to mssupport thermo com and click Customer Manuals in the left margin of the window Y To suggest changes to documentation or to Help Complete a brief survey about this document by clicking the lin...

Страница 13: ...etector see Figure 1 is a member of the Surveyor Plus family of LC instruments This chapter provides an introduction to the Surveyor RI Plus Detector Figure 1 Surveyor RI Plus Detector Contents Featur...

Страница 14: ...s run and temperature status A dynamic operating range of 1 00 to 1 75 RIU which makes the detector suitable for a variety of applications Integrated instrument control from the ChromQuest data system...

Страница 15: ...External Signal in AutoZero 7 GN Ground terminal 8 PURGE External Signal In purge On 9 RECORDER Recorder out 10 RECORDER Recorder out ENET 1 2 3 4 5 6 7 8 9 10 11 12 13 14 15 16 PURGE GND ZERO READY R...

Страница 16: ...tector Sheet 2 of 2 Terminal No Label Description Table 2 States of the status LEDs LED Status Meaning Power Green The detector is on and receiving power Comm Amber There is no communication with the...

Страница 17: ...e Main Menu window the first screen that appears when you launch ChromQuest from the desktop Right clicking the icon for an instrument opens a shortcut menu with access to the Configuration dialog box...

Страница 18: ...ected This deflection is proportional to the difference in the refractive indices of the reference and sample solvents The detector converts the deflection detected by a photodiode into an output sign...

Страница 19: ...ondensing lens item 2 and slit no 1 item 3 form an image of the tungsten filament item 1 This image passes through the collimator lens item 4 and slit no 2 item 5 which project the image of slit no 2...

Страница 20: ...ifference between the two signal outputs Flowcell The flowcell consists of a reference compartment and a sample compartment During normal operation the reference compartment is shut off from the solve...

Страница 21: ...rence compartment Sample compartment Flowcell Heat exchanger Heat exchanger Joint block 3 way solenoid valve 316 stainless tubing 316 stainless tubing closed Teflon tubing Connection by female nut Con...

Страница 22: ...to 500 mV same with Integrator output sensitivity Resolution of offset 10 mV same with Integrator output sensitivity Integrator output 0 to 1V FS Sensitivity 512 10 6 RIU FS Recorder output 0 to 10 m...

Страница 23: ...ion Make a copy of the checklist and fill it out when the installation is complete Include the completed checklist in your maintenance records Note Perform the installation in the sequence presented o...

Страница 24: ...ector Software CD Surveyor Plus documentation CD Accessory kit The accessory kit contains the items listed in Table 5 Carefully check the kit to make sure you received all the items listed on the pack...

Страница 25: ...ble Be careful to support the detector during this procedure to prevent it from falling 3 Using a 5 mm hexagonal wrench loosen the two transport screws Do not remove the screws 4 Move the detector bac...

Страница 26: ...the Surveyor Plus Autosampler as shown in Figure 9 Be sure to place the HPLC system in a draft free location away from an open window air conditioner vents or other circulating air source A stable roo...

Страница 27: ...hernet Cable Connecting the System Interconnect Cable Connecting the Ethernet Cable Y To connect the Ethernet cable 1 Connect one end of the Ethernet cable supplied in the accessory kit for the RI det...

Страница 28: ...nectors The detector connector is identified by the DET tag on its adjacent cable as shown in Figure 11 The newer version has seven combicon connectors with three connectors labeled DETECTOR as shown...

Страница 29: ...sampler 3 Connect the combicon connector labeled LC PUMP 5 connector cable or one of the two connectors labeled PUMP 7 connector cable to the left 8 pin receptacle located on the back panel of the pum...

Страница 30: ...is the only detector in the system connect the other end of the inlet tubing to the outlet of the LC column If the RI detector is the second detector in the system connect the other end of the inlet t...

Страница 31: ...urveyor RI Plus Detector Hardware Manual 19 Figure 14 Solvent line connections OUT DRAIN C L O S E O P E N A B C D THERMO A B C D E Wash A B C D In Out In port connection to LC column Out port connect...

Страница 32: ...or Hardware Manual Thermo Scientific Figure 15 Connecting the inlet and outlet tubing to the RI detector OUT DRAIN C L O S E O P E N A B C D THERMO A B C D E Wash A B C D In Out PDA detector Autosampl...

Страница 33: ...For ChromQuest SI from the computer desktop choose Start All Programs Chromatography ChromQuest SI Config In the ChromQuest SI Configuration dialog box click Instrument Configuration Then go to step 3...

Страница 34: ...ing more than one Surveyor RI Plus Detector from the same computer leave the Stack setting at its default of 1 7 Optional In the ID number box type an identification number for the RI detector 8 Click...

Страница 35: ...nel of the detector and connect it to the power source 4 Turn on the power to the detector When the instrument is powered on it performs its Start up diagnostics After a few seconds the Power LED on t...

Страница 36: ......

Страница 37: ...odules of the Surveyor Plus LC system and to the data system computer as described in Chapter 2 Installation of this manual and in the Surveyor Plus Getting Connected Guide In addition the modules of...

Страница 38: ...lvent such as acetone or ethanol Turn off the detector immediately if a leak occurs and then contact your local Thermo Fisher Scientific representative Avoid using any chemical substances that can cor...

Страница 39: ...information on validating the RI detector refer to Surveyor Plus Getting Started with ChromQuest Guide 7 Create and save an instrument method that contains the chromatographic parameters for your appl...

Страница 40: ...est SI 3 Open the RI Status page a Choose Control Instrument Status The Instrument Status window appears b Click the Surveyor RI Plus tab c Click the RI Diagnostic tab 4 In the Purge Control area clic...

Страница 41: ...procedures should be performed by a Thermo Fisher Scientific Service Engineer after the tungsten lamp is replaced Use the Recorder Output Adjustment and Integrator Output Adjustment procedures to adju...

Страница 42: ...the RI Diagnostic tab 5 In the Calibration list select Recorder Output Adjustment See Figure 20 6 Click Go 7 Adjust the recorder settings by clicking Up or Down as shown in Figure 20 Use Up or Down to...

Страница 43: ...ve connector of the multimeter to the positive pin of the adapter Ensure that you connect the negative connector of the multimeter to the negative pin of the adapter 3 Set the multimeter to mV 4 Click...

Страница 44: ...ed leaching of prior samples or solvents decomposition of the solvent or by changing the amount of dissolved gas in the solvent Binary and ternary solvents must be thoroughly mixed and remain mixed to...

Страница 45: ...tem Service of the Surveyor RI Plus Detector should be performed only by qualified personnel such as a Thermo Fisher Scientific service representative specifically trained in the repair of this type o...

Страница 46: ...e flowcell Avoid particulate contamination and fluid path blockage by maximum use of filtration Avoid leaving buffers standing in the cell for long periods Plan use to minimize standing time between r...

Страница 47: ...p plumbing to the flowcell or the flowcell itself prior to initiating an acid flush A 20 nitric acid solution will not damage a Thermo Fisher Scientific analytical pump Y To flush the flowcell 1 Conne...

Страница 48: ...from the back panel of the detector 3 Squeeze the lever located just below the fuse holder cover until you hear a clicking sound and then pull the fuse holder out of the power module 4 Remove the old...

Страница 49: ...ages are included to aid in troubleshooting errors Detector Related Problems Table 7 lists detector related problems along with suggestions for corrective action Contents Detector Related Problems Err...

Страница 50: ...Leaking flowcell d Replace the flowcell e Insufficient lamp warm up e Allow a 30 minute warm up for normal operation and 1 5 hours for maximum sensitivity f Lamp aging or defective f Replace the lamp...

Страница 51: ...g from column c Clean or replace the column d Leaks in system or flowcell d Check all of the fittings for leaks Call a Thermo Fisher Scientific Service Representative to replace the flowcell e Tiny bu...

Страница 52: ...s a Rise time is too large too slow a Lower the rise time selection b Poor connection at flowcell inlet b Check the end of the inlet tubing for a clean flat surface free of obstructions 6 Detector wil...

Страница 53: ...connections and restart the software Check the module configuration in the software 10 LED3 Run a Flashing Green run in progress a No action is required b Solid Green ready b No action is required c B...

Страница 54: ...Restart the run Start Run failed Shutdown and restart the instruments Abort Run failed Restart the run Table 9 Error messages that appear in the RI Status page and their solutions Error message Remed...

Страница 55: ...30 V operation 00006 02 00011 Inlet tubing 1 16 in OD stainless steel 00950 01 00133 Outlet tubing 0 060 in ID 1 16 in OD Teflon 00950 01 00134 Fitting Luer 10 32 1 16 in PEEK syringe adapter 00109 02...

Страница 56: ......

Страница 57: ...LEDs 2 Configuring detector 21 Connecting cables 15 Connections back panel 3 flowcell 2 tubing 18 Contamination from samples 26 D Data system ChromQuest 2 Detector cleaning 34 35 Detector configuratio...

Страница 58: ...cking 13 P Parts replaceable 43 Peak problems 40 Photodiode movement of image on 8 Ports connecting in and out 18 Ethernet 15 Positioning the detector 14 Power on detector 23 Purging flowcell 28 R Rec...

Отзывы: