


5
Aerosol-tight Applications
Basic Principles
5-2
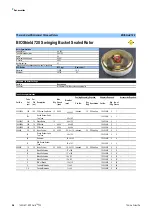
75003621 BIOShield
TM
720
Thermo Scientific
Basic Principles
•
Check that the sample containers are well suited for the desired centrifugation process.
Placing O-ring
The
O
-ring
fulfills
its purpose best, when it is neither stressed nor bulked. Meaning the
O
-ring
shou
ld
be equally placed in the groove of the lid.
Place the
O
-ring as follows:
1.
Place the
O
-ring above the groove.
2.
Push the
O
-ring on two opposite places into the groove. Make sure the rest of the
O
-ring is
equally
distributed.
3.
Push the centers of the loose parts into the groove.
4.
Push the remaining
O
-ring into place.
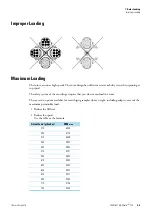
Fill Level
The tubes are only to be filled to a level which ensures that the sample is unable to reach the top of
the tube during centrifugation. Therefore
,
fill the tube only 2/3 of the rated level.
Checking the Aerosol-Tightness
The aerosol tightness testing of the rotors and buckets depend on the microbiological test process in
accordance with the EN 61010-2-020 Appendix AA.
Whether or not a rotor is aerosol-tight
,
depends primarily on proper handling.
Check as needed to make sure your rotor is aerosol-tight.
The careful inspection of the seals and seal surfaces for signs of wear and damage such as cracks,
scratches and embrittlement
are
extremely important.
Aerosol-tight applications are not possible if the lids are open.
CAUTION
When centrifuging hazardous samples, do not open aerosol-tight rotors or
buckets unless placed in a safety cabinet.
Always bear in mind the maximum permitted fill levels.
Be sure to check all seals before starting any aeorsol-tight applications.
Note
If the
O
-ring seems to be too long or too short, take it off the lid and repeat the process.