


f. Setting Low CO
2
Alarm Limit (tracking alarm)
The low CO
2
alarm limit is the deviation from the CO
2
set-
point, which will cause a low CO
2
alarm. The setpoint is vari-
able from 0.5 % CO
2
below setpoint to 5.0 % CO
2
below set-
point. The factory setting is 1.0 % CO
2
below setpoint. A
minus in the display indicates that the alarm setting is below
the setpoint.
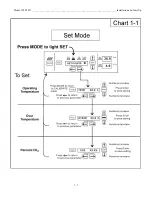
1. Press the Mode key until the Config indicator lights.
2. Press the right arrow until CO2 LO -X.X is displayed in
the message center.
3. Press up/down arrow to change the low CO2 alarm
limit.
4. Press Enter to save the low CO2 alarm limit.
5. Press the Mode key to return to Run mode or right/left
to go to next/previous parameter.
g. Setting High CO
2
Alarm Limit (tracking alarm)
The high CO
2
alarm limit is the deviation from the CO
2
set-
point, which will cause a high CO
2
alarm. The setpoint is vari-
able from 0.5 % CO
2
above setpoint to 5.0 % CO
2
above set-
point. The factory setting is 1.0 % CO
2
above setpoint.
1. Press the Mode key until the Config indicator lights.
2. Press the right arrow until CO2 HI X.X is displayed in
the message center.
3. Press up/down arrow to change the high CO
2
alarm
limit.
4. Press Enter to save the high CO
2
alarm limit.
5. Press the Mode key to return to run mode or right/left to
go to next/previous parameter.
h. Enabling CO
2
Alarms to Trip Relay Contacts
High and Low CO
2
alarms can be programmed to trip the
remote alarm contacts. A setting of ON will cause this, a set-
ting of OFF will not allow CO
2
alarms to trip the contacts. The
factory setting is ON.
1. Press the Mode key until the Config indicator lights.
2. Press the right arrow until CO2 RLY XXX is displayed
in the message center.
3. Press up/down arrow to toggle the setting ON/OFF.
4. Press Enter to save the setting.
5. Press the Mode key to return to Run Mode or right/left
to go to next/previous parameter.
i. Setting New Zero Number for New CO
2
Sensors
If a new CO
2
sensor is being installed, the two numbers on
the factory installed sticker on the cell must be entered to cali-
brate the CO
2
in the unit.
Note:
For the technician’s convenience, a label containing the
two numbers on the cell is affixed inside the electronics drawer.
1. Press the Mode key until the Config indicator lights.
2. Press the right arrow until Z# XXXX is displayed in the
message center.
3. Press up/down arrow to change the zero number to
match the sticker.
4. Press Enter to save the setting.
5. Press the Mode key to return to Run mode or right/left
to go to next/previous parameter.
j. Setting New Span Number for CO
2
Sensors
If a new CO
2
sensor is being installed, the two numbers on
the factory installed sticker on the cell must be entered to cali-
brate the CO
2
in the unit.
Note:
For the technician’s convenience, a label containing the
two numbers on the cell is affixed inside the electronics drawer.
1. Press the Mode key until the Config indicator lights.
2. Press the right arrow until S# XXXX is displayed in the
message center.
3. Press up/down arrow to change the span number to
match the sticker.
4. Press Enter to save the setting.
5. Press the Mode key to return to Run mode or right/left
to go to next/previous parameter.
k. Enabling the High Humidity Feature
In normal operation, the incubator will maintain the humid-
ity level above 80%. If a higher RH level is required, the RH
HIGH feature may be turned ON. This allows the heater
attached to the humidity reservoir to be enabled, resulting in
RH levels above 90%. The factory default for the RH HIGH
feature is OFF.
1. Press the Mode key until the Config indicator lights.
2. Press the right arrow until RH HIGH XXX is displayed
in the message center.
3. Press up/down arrow to toggle RH HIGH ON or OFF.
4. Press Enter to save the setting.
5. Press the Mode key to return to Run mode or right/left
to go to next/previous parameter.
Note:
Verify that the ADD WATER alarm is set to ON after
enabling the RH HIGH feature.
Model 3950/3951 _____________________________________________________________________________Configuration
3 - 2
Содержание 3950
Страница 14: ...Model 3950 3951 _____________________________________________________________________________Calibration 2 2 ...
Страница 18: ...Model 3950 3951 _____________________________________________________________________________Configuration 3 4 ...
Страница 19: ...Model 3950 3951 _____________________________________________________________________________Configuration 3 5 ...
Страница 30: ...Model 3950 3951 ______________________________________________________________________________Spare Parts 8 2 ...
Страница 31: ...Model 3950 3951 ______________________________________________________________________________Spare Parts 8 3 ...
Страница 32: ...Model 3950 3951 ______________________________________________________________________________Spare Parts 8 4 ...
Страница 33: ...Model 3950 3951 ______________________________________________________________________________Spare Parts 8 5 ...
Страница 34: ...Model 3950 3951 ______________________________________________________________________________Spare Parts 8 6 ...
Страница 35: ...Model 3950 3951 ______________________________________________________________________________Spare Parts 8 7 ...
Страница 36: ...Model 3950 3951 ______________________________________________________________________________Spare Parts 8 8 ...
Страница 37: ...Model 3950 3951 ______________________________________________________________________________Spare Parts 8 9 ...
Страница 38: ...Model 3950 3951 ______________________________________________________________________________Spare Parts 8 10 ...


