background image

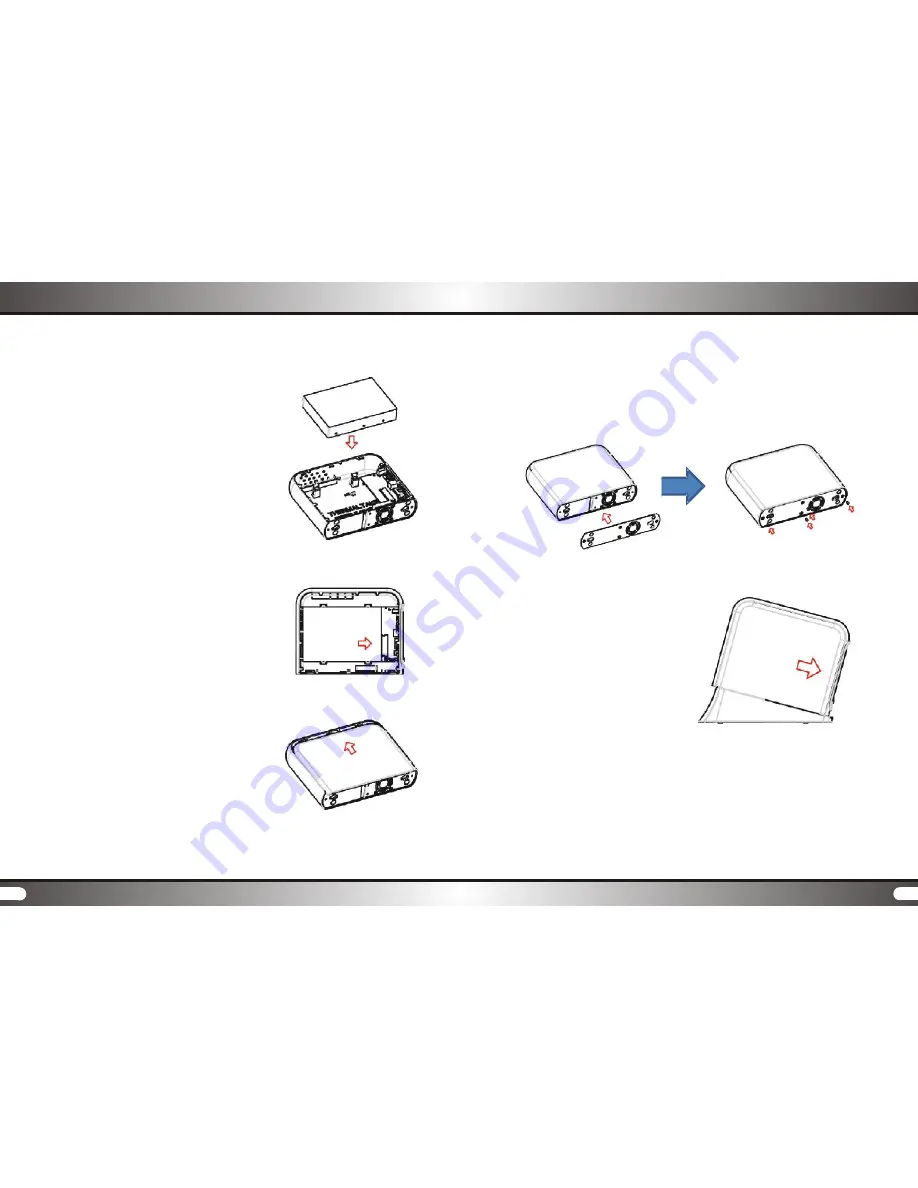
5. Place hard drive into the body.  

    There are no tools required as 

    hard drive will sit on top of the 

    hard drive suspension system.

6. Push hard drive towards the 

    SATA PCB board to connect.  

    *Note: Make sure the hard 

    drive is connected securely 

    to the SATA connector.  Top 

    panel may not close correctly 

    if hard drive is not connected 

    securely.

7. Place side panel over the 

    body and push upward to 

    secure.

8. Place metal security plate back onto the bottom of the main unit.  

    And secure 4 screws.

9. Place assembled main unit 

    onto the base unit and push 

    towards the back to secure.

Optional: 

Package also includes 4 additional rubber feet to ensure proper 

air exhaust should the unit is to be used without the base unit.

Instruction

Instruction

5

6

Содержание Vi-ON ST0008U

Страница 1: ...3 5 External HDD Enclosure Transform any 3 5 internal hard drive into a high speed and mobile storage device User s Manual User s Manual P N ST0008U ST0010U ...

Страница 2: ... 1 Overview P1 2 1 SATA Hard Drive Installation P4 2 2 Connecting VI ON P7 2 3 Troubleshooting P7 Part I Introduction Part II Installation 1 2 Component Check P1 1 3 Features P2 1 4 Technical Specification P2 1 5 System Requirement P3 ...

Страница 3: ...ure 1 2 Component Check Before you start make sure the following parts are included within the package Should there be missing part s please return the product to where the product was purchased a VI ON Main Base Unit b Rubber Feet for Main Unit x 4 c USB Cable d eSATA Cable e AC Power Adapter f Cleaning Clothe 1 3 Features Active SMART Cooling System incorporates an auto temperature sensing fan t...

Страница 4: ...orted by VI ON 3 5 includes Windows XP Windows Vista Mac OS 9 04 1 5 System Requirement 2 1 SATA Hard Drive Installation 1 Push the main unit towards the front to release lock 2 Place the unit on its side with VI ON logo facing up Remove four screws underneath the unit 3 Remove the metal securing plate 4 Push side panel towards bottom of the unit to release Introduction Instruction 3 4 2 Instructi...

Страница 5: ...panel may not close correctly if hard drive is not connected securely 7 Place side panel over the body and push upward to secure 8 Place metal security plate back onto the bottom of the main unit And secure 4 screws 9 Place assembled main unit onto the base unit and push towards the back to secure Optional Package also includes 4 additional rubber feet to ensure proper air exhaust should the unit ...

Страница 6: ...ore it can be recognized by the computer Please refer to your hard drive Manufacturer s instructions on how to format and partition the hard drive Q I can not heat the sound of fan when the enclosure is connected to computer is that normal A That is perfectly normal With the Active SMART Cooling System embedded VI ON series enclosure is able to dynamically change fan speed according to a real time...

Отзывы: