background image

5

800.533.7533 | Santa-Fe-Products.com

Santa Fe Compact70 Installation & Operation Instructions

Items Included in Box:

• Santa Fe Compact70 Dehumidifier

• Santa Fe Compact70 Installation & Operation Instructions

• Santa Fe Compact70 Leveling Feet

• 8' Drain Hose

• Drain Adapter

• Merv-13 Filter

• 2 Compressor Shipping Strap Plugs – Not used for the Compact70

Important Precautions

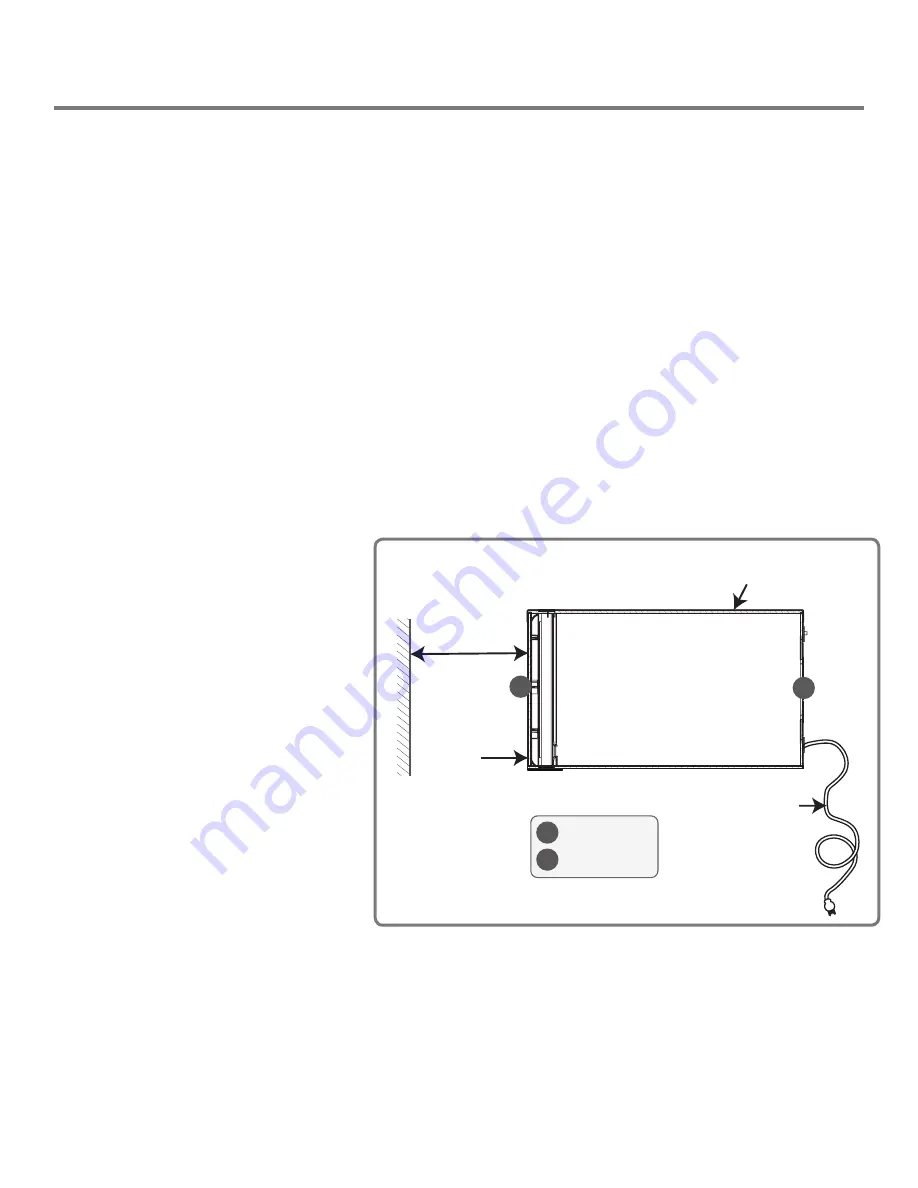
•  Do not install the Santa Fe Compact70 with the intake or exhaust of the unit within 1' of a wall or other obstruction. Avoid 

directing the discharge air at people. The dehumidifier should be used in the upright position.

•  Do not place the unit where curtains or debris can be drawn into the intake and restrict airflow. 
•  The device is designed to be installed indoors in a space that is protected from rain and flooding. 
•  Do not operate in standing water or place the unit near open water. If used near a water source; be certain there is no 

chance the unit could fall into the water or get splashed and that it is plugged into a dedicated circuit and Ground Fault 

Circuit Interrupter (GFCI) protected outlet. 

•  Install the unit with enough space to access all sides for maintenance and service. The entire shell needs to be removed 

in order to do repairs. 

• DO NOT use the dehumidifier as a bench or table. 
•   DO NOT place the dehumidifier directly on structural building members without vibration absorbers or unwanted noise 

may result. Place the Santa Fe Compact70 on supports to raise the base of the unit.

Location Considerations

•  Locate the dehumidifier near a suitable drain 

(8' drain hose included). Allow for proper 

drainage and routing of needed drain pipes. 

•  Locate the dehumidifier in an area where the 

cord’s length (9') easily reaches a 115 VAC 

electrical outlet with a minimum of a 15 Amp 

circuit capacity.

•  The unit is designed to operate while level. If 

the unit is placed on an unlevel surface, refer 

to section below (Installing Leveling Feet). 

Failure to level the unit may result in leakage 

or improper drainage.

•  The unit should be suspended with a hang kit 

from the floor joists if there is any possibility 

of flooding. A flooded unit is not covered by 

warranty. Feet will be installed as a securing 

measure after the hang kit is put on the  

dehumidifier. DO NOT hang the Santa Fe  

Compact70 from its’ cabinet.

•  Allow sufficient clearance to handle the unit’s 

overall dimensions as well as any optional 

return and supply ductwork to the unit. 

•  Allow sufficient clearance for filter removal 

and to prevent airflow obstruction.

•  Electrical service access will require the removal of the outside shell. Allow sufficient clearance around the unit.

Installing Leveling Feet


• Lay down a protective pad (pillow, blanket, etc.).
• Carefully turn unit onto side.
• Install leveling feet and adjust to the desired position to ensure unit is level for proper drainage.
• Carefully bring unit to upright position.
•  Wait a minimum of 10 minutes before operating.

Dehumidifier Set Up

ELECTRICAL SERVICE

ACCESS THIS SIDE

9' POWER CORD

TOP VIEW

MINIMUM

CLEARANCE

FOR FILTER

REMOVAL 

AND PROPER 

AIR FLOW

11" 

B

RETURN AIR
SUPPLY AIR

A

B

A

DRAIN

ACCESS

Содержание 4033600

Страница 1: ...mpact70 is designed for superior basement and crawl space dehumidification Tight spaces are no problem for the Santa Fe Compact70 dehumidifier Its compact size works perfect in low crawl spaces and small basements without sacrificing power and performance Designed to fit in a variety of small spaces the Compact70 provides multiple installation options for greater flexibility MADISON WI ...

Страница 2: ... Precautions 5 Location Considerations 5 Installing Leveling Feet 5 Ducting to Finished Areas Optional 6 Attaching Duct Collars 6 Recommended Installations 7 Drain Installation 8 Operation 9 Humidity Control Adjustment 9 Defrost Cycle 9 Fan Operation 9 Air Filtration 10 Changing The Filter 10 MERV Rating Chart 11 Electrical Requirements 12 Service 13 Replacement Parts 13 Refrigerant Charging 13 Co...

Страница 3: ... unit unattended ensure children do not have access to the equipment Do not allow children to play with or near the unit or in its air flow The unit is designed to be installed indoors only No user serviceable components Contact installer or call 1 800 533 7533 for all repair or warranty needs Intended Application s The Santa Fe Compact70 is intended for use in crawl spaces or basements however th...

Страница 4: ...ower Cord 9 115 VAC Ground Drain Connection 3 4 Threaded Female NPT Drain Hose 8 Direct Gravity Drain Hose 5 8 ID x 7 8 OD Refrigerant Type R410A Refer to manufacturers label for more information Refrigerant Amount 15 oz Dimensions Unit Shipping Width 12 18 Height 12 18 Length 21 27 Weight 55 lbs 64 lbs Width 12 12 15 5 8 WITH C OLLARS W OUT C OLLARS 21 12 FRONT 12 12 9 11 21 12 12 FRONT 12 12 9 1...

Страница 5: ...raise the base of the unit Location Considerations Locate the dehumidifier near a suitable drain 8 drain hose included Allow for proper drainage and routing of needed drain pipes Locate the dehumidifier in an area where the cord s length 9 easily reaches a 115 VAC electrical outlet with a minimum of a 15 Amp circuit capacity The unit is designed to operate while level If the unit is placed on an u...

Страница 6: ...cal Flow Through Remove the exhaust panel Rotate the panel so the exhaust collar is located on the top of the unit Align screw holes and snap the panel onto the base Secure the exhaust panel to the base by replacing the six screws Front View Horizontal Flow Through End Discharge Rear View Vertical Flow Through Top Discharge 8 Return Air Inlet 8 Supply Air Outlet A B A A B A 8 Return Air Inlet 8 Su...

Страница 7: ...or with an optional pump kit Using the supply and return duct kit supply the dry air from the dehumidifier into a large open area of the fin ished basement Use the return duct kit to draw air back through the dehumidifier Be sure the return and supply are at least 10 feet away from each other for proper air flow throughout the basement Add a passive grill between the finished and unfinished areas ...

Страница 8: ...This prevents air from back flowing through the hose and into the dehumidifier essentially causing the unit to backflow water out of the corners of the machine Position the trap in the hose approximately 8 10 from the dehumidifier and make sure the highest point of the trap is still at least 2 below the black drain port adapter on the dehumidifier If the highest point of the trap is above the drai...

Страница 9: ...he humidity dial clockwise to the recommended NORMAL position and set fan control to FAN AUTO To turn the unit off turn the humidity dial counter clockwise to the OFF position and set fan control to FAN AUTO Defrost Cycle This product includes a defrost thermostat This feature prevents internal damage caused by excessive frost forming within the unit When the unit is experiencing excessive frost t...

Страница 10: ...he 1 4 pre filter by gently pulling on the bottom of the filter frame Remove the MERV 13 filter by gently pulling on the bottom of the filter frame Step 2 Installing the Filters Angle the top of the MERV 13 filter and gently slide the filter into the filter slot Do not force If resistance is felt check alignment for obstructions or debris inside the filter housing Be sure the arrows on the filter ...

Страница 11: ...l Bag Filter Nonsupported Legionella microfine fiberglass or 11 60 65 95 Humidifier Dust Better Commercial Buildings synthetic media 12 36 in deep 6 12 pockets Lead Dust 10 50 55 95 Milled Flour Box Filter Rigid Style Cartridge Filters 6 to 12 deep may use lofted or paper media Auto Emissions Hospital Laboratories 9 40 45 90 Welding Fumes 8 30 35 90 3 0 10 0 pm Particle Size Commercial Buildings P...

Страница 12: ...ounded 115VAC outlet The device draws 5 1 Amps at 80 F and 60 RH Locate the dehumidifier in an area where the cord s length 9 easily reaches a 115 VAC electrical outlet with a minimum of 15 Amp circuit capacity If used in an area that may become wet a GFCI protected circuit is recommended The unit should not be used in areas prone to flooding Consult local electrical codes for any further informat...

Страница 13: ...ANTA FE COMPACT70 WITH ITS HIGH PRESSURE REFRIGERANT SYSTEM AND HIGH VOLTAGE CIRCUITRY PRESENTS A HEALTH HAZARD WHICH COULD RESULT IN DEATH SERIOUS BODILY INJURY AND OR PROPERTY DAMAGE ONLY QUALIFIED SERVICE PEOPLE SHOULD SERVICE THIS UNIT Troubleshooting CAUTION TROUBLESHOOTING SHOULD BE PERFORMED BY A QUALIFIED HVAC TECHNICIAN Symptom Possible Reason Neither fan nor compressor running Dehumidifi...

Страница 14: ... temp Rh you should see some water production out of the hose within 30 minutes or so Note If the room temperature is 55 degrees or below and or in area of low relative humidity the dehumidifier will produce little to no water 7 Collecting the water removed in a 24 hour period will give a measurement of performance WARNING ELECTRICAL SHOCK HAZARD ELECTRICAL POWER MUST BE PRESENT TO PER FORM SOME T...

Страница 15: ...r any costs related to changes to a Product or Component that may be required by any codes laws or regulations that may become effective after initial purchase of the Product by Customer Customer Responsibilities As a further condition to obtaining warranty coverage hereunder the Customer must send a valid warranty claim to Therma Stor such that Therma Stor receives such claim prior to the end of ...

Страница 16: ...Santa Fe Products com 800 533 7533 DEHUMIDIFIERS ...

Отзывы: