background image

QUICK START GUIDE - SB25 MOUNT ADAPTER

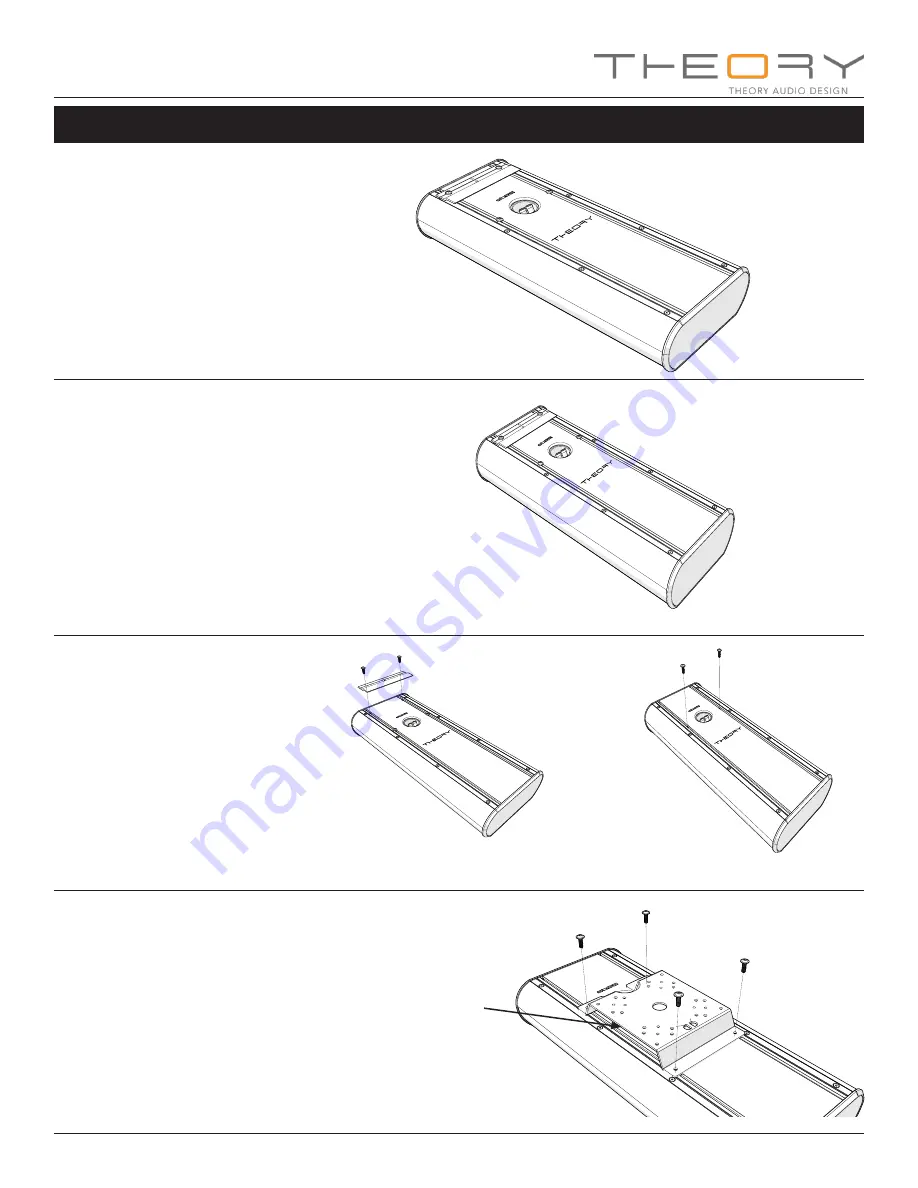
1 - LAY SB25 FACE DOWN

Find a safe, large, flat location free of protrusions or debris 
and carefully lay your sb25 loudspeaker face down.

Figure 1.

FIGURE 1. Lay sb25 face down.

GET HELP

Your Theory sb25 loudspeaker is compact, but it is heavy 
for its size. You will need at least one other person to lift and 
hold the speaker in position during installation.

DO NOT TRY TO LIFT AND MOUNT YOUR THEORY
LOUDSPEAKER BY YOURSELF.

3 - ATTACH ADAPTER - LOOSELY

One at a time, align an M5 screw and adapter mount hole 
with a nut inside the T-slot making sure that you honor the 
ADAPTER orientation shown.  The nuts can be moved 
within the T-slot using a small screwdriver or the hex key. 
Engage the screw into the nut just enough to retain the nut 
on the screw, but leave as loose as possible as you will need 
to move the adapter/screw around to align with the other 
nuts in the T-slots as you go.  

Figure 3

.

2 - REMOVE Z-CLIP

Using supplied 3mm hex wrench, remove the M5 machine 
screws holding the Z-clip mounting bracket in place. 
Remove the Z-CIip and store for future use. Retain the 
M5 machine screws to mount the UNIVERSAL MOUNT 
ADAPTER.  

Figure 2a.

In similar fashion, remove the secondary M5 machine 
screws installed in T-slots and retain to mount the UNIVER-
SAL MOUNT ADAPTER. 

Figure 2b.

This will leave 4 nuts in the T-SLOT tracks.  We will use 
these nuts to attach the UNIVERSAL MOUNT ADAPT-
ER.  Do not attempt to remove the nuts.

FIGURE 2a. Remove Z-Clip, retain screws.

FIGURE 3. Loosely attach ADAPTER to loud-
speaker using t-slot nuts, and machines screws 
just removed.

PAGE 3

FIGURE 2b. Remove and retain secondary
screws.

Observe adapter orientation!

HEAVY!

ATTACHING ADAPTER 

(If mounting to rigid conduit, attach adapter to conduit first, see page 4)

Содержание SB25

Страница 1: ...SB25 UNIVERSAL MOUNT ADAPTER Theory sb25 Universal Mount Adapter QUICK START INSTALLATION GUIDE Rev A 210302 ...

Страница 2: ... Customer may have rights which vary from state to state In the event that this product was manufactured for export and sale outside of the United States or its territories then this limited warranty does not apply Removal of the serial number on this product or purchase of this product from an unauthorized dealer will void this limited warranty EXCLUSIONS To the extent permitted by law the warran...

Страница 3: ...uce heat 13 Use only attachments accessories compatible with products from THEORY AUDIO DESIGN LLC 14 Use only with hardware brackets stands and components sold with the apparatus or supplied by THEORY AUDIO DESIGN LLC 15 Refer all servicing to qualified service personnel Servicing is required when the apparatus is damaged in any way 1 4 20 NYLON LOCK NUT ADAPTER 5mm LOCK WASHER 1 4 LOCK WASHER M5...

Страница 4: ...M5Threaded Mount Holes 4 3 VESA 100mm M5 Threaded Mount Holes 4 4 2 00 x 4 25 1 4 20 Threaded Mount Holes Horizontal Pattern 4 5 2 00 x 4 25 1 4 20 Threaded Mount Holes Vertical Pattern 4 6 2 75 x 5 00 1 4 20 Threaded Mount Holes Horizontal Pattern 4 7 2 75 x 5 00 1 4 20 Threaded Mount Holes Vertical Pattern 4 8 Mount hole for 1 2 Rigid Conduit Hub not included for 1 2 Threaded Conduit Pipe not in...

Страница 5: ...but leave as loose as possible as you will need to move the adapter screw around to align with the other nuts in the T slots as you go Figure 3 2 REMOVE Z CLIP Using supplied 3mm hex wrench remove the M5 machine screws holding the Z clip mounting bracket in place Remove the Z CIip and store for future use Retain the M5 machine screws to mount the UNIVERSAL MOUNT ADAPTER Figure 2a In similar fashio...

Страница 6: ... bracket mount plate using the supplied 1 4 20 or M5 for VESA mounts hex socket cap screws and lock washers as shown Your speaker mounting bracket mount plate may look different Figure 7a For extra security install the nylon lock nuts or jam nuts onto the screws on the back side of the adapter Figure 7b Once the third party mount plate is attached attach speaker to speaker mount according to mount...

Страница 7: ...r desired speaker orientation and tighten conduit hub nut securely Figure 9b FIGURE 8a You will need to acquire a thread rigid conduit hub not included FIGURE 9a Apply thread locking compoud and loosely attach adapter to conduit hub PAGE 5 FIGURE 8b Using thread locking compound tightly screw hub body to conduit FIGURE 9b Orient adapter for desired speaker orien tation and tighten conduit hub nut ...

Отзывы: