


P.3
1
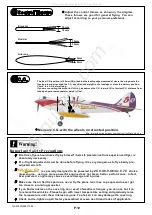
Aileron
Bottom View
Aileron Servo Lead
Aileron Servo
2
Bottom View
1.8x115mm
Ø
Pushrod
Fuel Tube
Ø
6x5mm
straper
1.5mm
PB2x25mm
Clevis
Tri-horn
M3x14mm
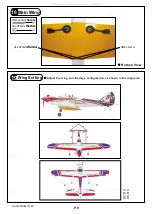
Main
Wing
3
Wing Jioner
5x29x108mm
PB 2 x 25mm
Screw
6
Ø
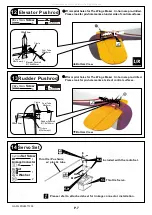
Please look for pin-hole marks at under side of control surfaces.
1mm pilot holes for
The
Wings
Maker
tri-horn are pre-drilled.
Apply
instant
type
CA
glue
to
both
sides
of
each
hinge
.
Please dry fit wing joiner into left and right wing to make sure they fit with
the proper dihedral angle, mark the wing joiner if necessary. Apply epoxy
glue to both sides of all surfaces in contact. Use a stick to apply the glue
to inner side of wing joiner sleeve, and apply the glue to wing joiner before
putting them together. Wing joiner not glued properly will lead to wing failure
and plane crash.
TWM
PL8210010
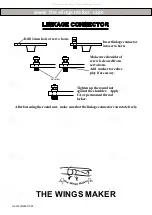
CLEVIS
WRENCH
GA014PO28971303
All manuals and user guides at all-guides.com


