The Singing Machine SML650 Скачать руководство пользователя страница 13

— E12 —

Operation

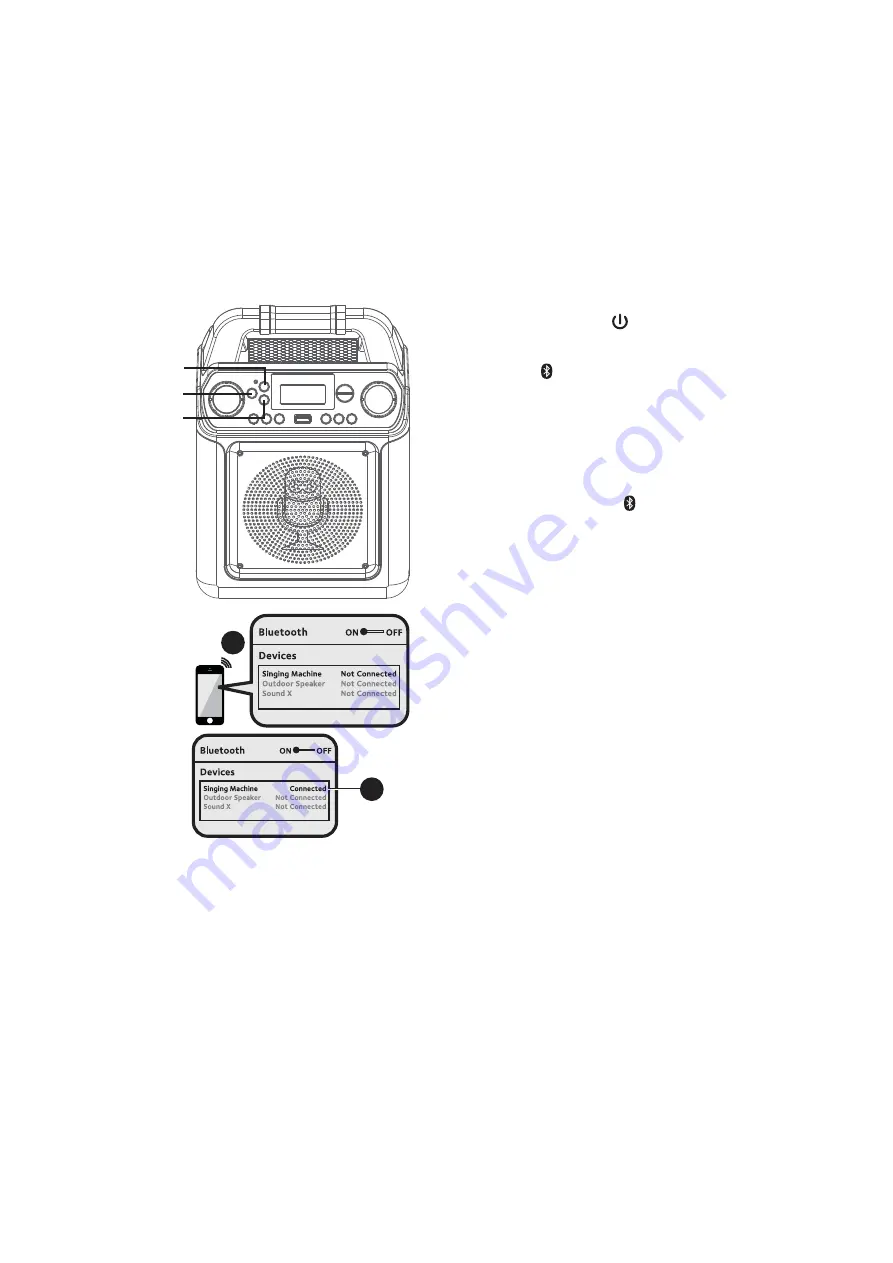
Using a Bluetooth Device

1

Connect the unit as described 
previously. Press the 


ON/STANDBY


button to turn the unit on.

2

Press the   button or repeatedly 
press the 

MODE

 button to select the 

Bluetooth; “bt” will appear in the display. 
The unit automatically searches for 
and pairs a previously paired Bluetooth 
device (if previously paired). If no 
previously paired devices are present, 
connect as shown in the next step.

Note:

 You can also press the 


button to 

disconnect any paired devices in order to pair 
another device. 

3

Turn on your device’s Bluetooth option 
in settings to search for a discoverable 
device with a Bluetooth signal. Select 

Singing Machine

” from the device 

results on the Bluetooth menu. 

Note:

  Also refer to the user manual of your 

Bluetooth device for detailed instructions. 

4

The Bluetooth indicator will light solid 
and a chime will sound.

Notes:


•  If your Bluetooth prompts you for a

passcode during the pairing process, please


enter “0000” to connect.

• On some Bluetooth devices, once pairing is

complete, select your Bluetooth device as


“Use as Audio Device” or similar.

•  If connection is lost after successful pairing,

check to make sure the distance between


speaker and Bluetooth


enabled device does


not exceed 30 feet/10 meters. 

3

4

u
v

v

Содержание SML650

Страница 1: ...ng Machine Co Inc The Singing Machine es marca registrada de The Singing Machine Co Inc The Singing Machine est une marque d pos e par The Singing Machine Co Inc The Singing Machine ist eine eingetrag...

Страница 2: ...rom power the mains plug should be completely removed from the AC outlet socket 17 CAUTION To reduce the risk of fire or explosion do not expose batteries to excessive heat such as sunshine fire or ot...

Страница 3: ...E2 Included Please make sure the following items are included Wired Microphone Main Unit AC Adapter Audio Video Cables Manual...

Страница 4: ...MIC VOLUME Control 7 MODE Button 8 PLAY PAUSE Button 9 Skip Button 10 Skip Button 11 USB Port 12 Speaker 13 Handle 14 Display 15 Play Pause indicator 16 VOICE EFFECTS UP DOWN Button 17 MASTER VOLUME...

Страница 5: ...E4 Location of Controls Rear 1 MIC 1 Jack 2 MIC 2 Jack 3 Extendable MIC holders 4 VIDEO OUT Jack 5 AUDIO OUT Jack R 6 AUDIO OUT Jack L 7 AUX IN Jack 8 DC IN Jack u V W v y w w U x...

Страница 6: ...yrics and audio to your TV perform the following steps Connect the RCA video cable Yellow to the VIDEO OUT jack and the audio cables White and Red to the AUDIO OUT jacks located on the back of the Sin...

Страница 7: ...installing the batteries as indicated in the battery compartment Reversed batteries may cause damage to the device 3 Do not mix different types of batteries together e g Alkaline and Carbon Zinc or o...

Страница 8: ...AUX IN Jack Cradle Connect an external device by using an appropriate cable 3 5mm audio cable not included as shown Note See page E14 to select and use the Aux In function AUX IN To External Unit AUD...

Страница 9: ...ent vocal effects Display will show EF0 NONE EF1 ECHO EF2 FEMALE EF3 MALE EF4 CHIPMUNK EF5 ROBOT or EF6 RADIO u Speaker Lights Bluetooth Mode Press the LIGHT button to switch on the lighting effect pr...

Страница 10: ...when searching the drive and then the total number of files will appear Notes The USB mode cannot be accessed until a flash drive is inserted It is highly recommended to have it connected to a TV for...

Страница 11: ...ly play the selected folder the Repeat indicator will blink slowly Press a third time to repeatedly play the USB the Repeat indicator will light solid Press it again to cancel Repeat function the indi...

Страница 12: ...the VOICE EFFECTS or buttons to select from ECHO FEMALE MALE CHIPMUNK ROBOT or RADIO vocal effects Select NONE to sing without any voice effect 12PAUSE During playback if you wish to pause momentaril...

Страница 13: ...3 Turn on your device s Bluetooth option in settings to search for a discoverable device with a Bluetooth signal Select Singing Machine from the device results on the Bluetooth menu Note Also refer to...

Страница 14: ...lume on your Bluetooth device 7 Connect microphone s and slide the ON OFF switch on the microphone to the ON position 8 Adjust the MIC VOLUME control as desired Increasing this control will increase t...

Страница 15: ...ine Notes It is highly recommended to set the volume on the auxiliary unit to 1 3 or lower to avoid distortion Skipping files tracks is not possible on this unit when using an external device 3 Repeat...

Страница 16: ...o sing without any voice effect 8 Press the ON STANDBY button to turn the unit off U W V Operation Energy Saving Auto Power System APS The unit will automatically enter the Standby mode after 15 minut...

Страница 17: ...Where can I get additional help with the file formats Visit http singingmachine com smc music to get additional resources about the right type of FILE FORMAT for your system Helpful Hints The mp3 and...

Страница 18: ...e microphone is firmly connected to the MIC 1 or MIC 2 jack Make sure the ON OFF switch on the microphone is set to the ON position Make sure the MIC VOLUME control is not set too low MASTER VOLUME is...

Страница 19: ...dance with 6 3 mm Dynamic Microphone POWER SECTION DC 9V 1A DC 9V 6 x C batteries Batteries not included DIMENSIONS HxWxD 11 2 x 8 3 x 5 4 inches 28 4 x 21 x 13 8 cm WEIGHT 3 19 lbs 1 45 kgs Specifica...

Страница 20: ...do cuando mueva el carro y artefacto junto a para evitar lesiones producidas por la ca da del producto 13 Desenchufe este artefacto durante las tormentas el ctricas o cuando no se lo utilice durante p...

Отзывы: