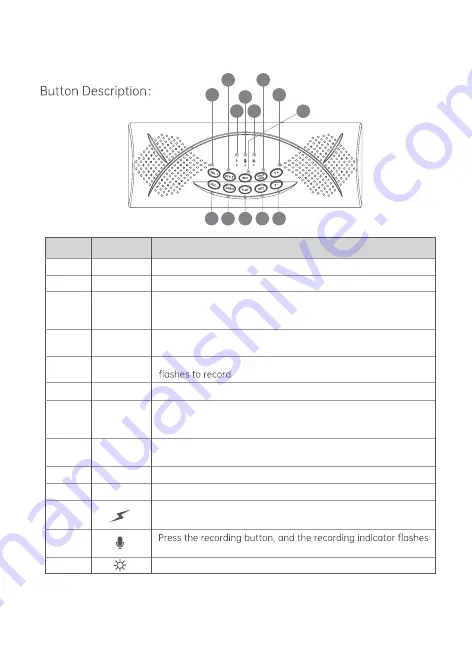
THE-ONE TRD1 Скачать руководство пользователя страница 4

Introduction

Number

6
7

8

9

10

11

12

13

14
15

16

17

18

VOL+

VOL

-

STYLE

DEMO

REC

PLAY

RHY

T-

T+

START/STOP

Play recording

Tempo-: Tempo control for Demo Songs and rhythm

Volume-
Short press: Drum kit 

Press and hold for 1 second: Beep sounds "da" to enter lobby 

reverberation mode

Short press: Play the accompaniment 

Press  and  hold  for  1  second:  Beep  "click"  to  enter  square  

reverb mode
Short press: Start/stop accompaniment, recording, demo song  

Press and hold for 1 second: Beep "click" to exit reverb mode

to record
Power indicator: turn on the power, the indicator is always on

Short press: Demo songs 

Press and hold for 1 second: Beep "click" to enter room reverb mode
Recording:  Press  the  REC  button  and  the  recording  light  

Charging indicator light: when the battery is fully charged, 

the light will turn off automatically, and lights up when charging

Item

Function Description

7 9 11 12 14

17

18

16

6

8

13

15

10

Note: This product has a sleep function. If there is no operation within 30 minutes, the 

drum  machine  will  automatically  enter  the  sleep  state,  and  the  Bluetooth  will  be 

disconnected. If  you use it again, you can hit any drum surface to activate the drum. 

Содержание TRD1

Страница 1: ...Roll Up Drum TRD1 www theonemusic com TheONE ...

Страница 2: ...Packing List Roll Up Drum Pedals USB Cable Lithium Battery User Guide Drumsticks 3 5mm Audio Cable Power Adaptor User Guide ...

Страница 3: ...1 2 3 4 5 ON OFF USB DC5V Mp3 Power Switch USB power interface available with power adapter and mobile power supply Audio format input connect to mobile phone iPad computer and other electronic equipment Pedal Interface Kick Hi Hat Connect headphones or speakers Item Function Description ...

Страница 4: ...d for 1 second Beep click to exit reverb mode to record Power indicator turn on the power the indicator is always on Short press Demo songs Press and hold for 1 second Beep click to enter room reverb mode Recording Press the REC button and the recording light Charging indicator light when the battery is fully charged the light will turn off automatically and lights up when charging Item Function D...

Страница 5: ...adapter to supply power directly or use the power adapter to charge the lithium battery 1 Connect the USB end of the power cable to the 5V DC plug 2 Connect the 5V DC plug to the 220V power socket 3 Connect the Type C end of the power cable to the power socket of the Module 1 Open the back cover of the battery compartment 2 Install the battery according to the positive and negative poles 3 Close t...

Страница 6: ...ence Connecting headphones When headphones are plugged into the jack the speakers will be cut off automatically and the drums can only be heard from the headphones Note When the pedal is not connected the hi hat pad defaults to a closed cymbal sound After the pedal is connected the hi hat drum pad defaults to an open cymbal sound Press the pedal and strike the hi hat drum pad to produce a closed c...

Страница 7: ... 4 cymbals 10 6 10 Supported Bluetooth cable Supported 2 2 lbs Item Turn on Bluetooth in the phone settings Open the app InstaDrum Bluetooth MIDI Switch Users Account Settings Feedback My Drum Cable Click the icon in the upper left corner to log in or register an account After logging in click Settings Click My Drum Click Bluetooth MIDI select The ONE TRD MIDI Scan and download InstaDrum to experi...

Страница 8: ... sound volume Abnormal sound Replace the battery Please charge the drum External power supply not plugged in Please check if the power supply is connected correctly Trouble Cause of issue Solution Notice Troubleshooting device to input audio sources Please do not place the electronic drum in overheated or dusty places to work Please keep a distance from strong electromagnetic devices such as radio...

Страница 9: ...nt This device complies with part 15 of the FCC Rules Operation is subject to the following two conditions 1 This device may not cause harmful interference and 2 this device must accept any interfer ence received including interference that may cause undesired operation This Transmitter must not be co located or operating in conjunc tion with any other antenna or transmitter This equipment complie...

Страница 10: ... ence will not occur in a particular installation If this equipment does cause harmful interference to radio or television reception which can be determined by turning the equipment off and on the user is encouraged to try to correct the interference by one or more of the following measures Reorient or relocate the receiving antenna Increase the separation between the equipment and receiver Connec...

Страница 11: ...s product will be constantly updated and optimized The manual may not be synchronized with the product update in time Please understand Tel 833 970 2670 US E mail Support theonemusic com Web www theonemusic com ...

Страница 12: ...NO 2209015 ...

Отзывы: