


15
Variante 2:
(1) Markieren der gewünschten Druckdatei
(2) Öffnen der Datei
A ... Hier wird der Name der geöffneten Datei angezeigt.
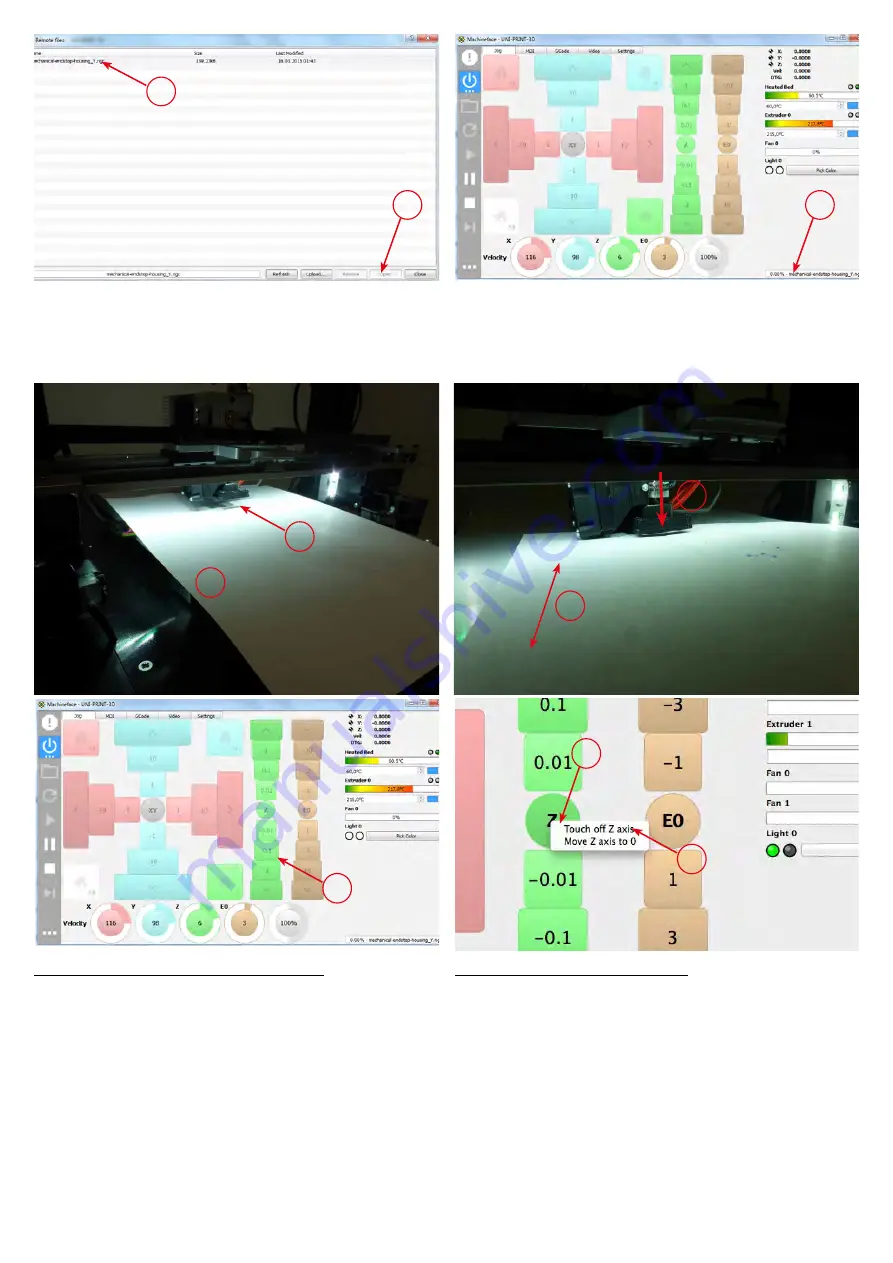
Variant 2:
(1) Select your print-file
(2) Open file
C ... The name of the loaded file is shown here.
1
2
A
Werkstücknullpunkt setzen (Z-Achse):
(1) Entfernen von ausgetretenem Filament (Pinzette)
Wichtig: Druckplatte u. Extruder müssen aufgeheizt sein!
A ... A4 Papierblatt (80 gr)
(2) Blatt hin und herbewegen, dabei mit der Z-Achse
in Richtung beheizte Druckplatte verfahren. Wenn die
Seite leicht klemmt (sich noch bewegen lässt) ist die
richtige Position erreicht.
Wenn die Nozzle nahe am Papier ist, nur noch mit -0,1
und -0,01 [mm] Schritten annähern.
(3) Auf „Z“ klicken, ein Untermenü öffnet sich
(4) Auf „Touch off Z axis“ klicken -> Nullpunkt ist bestätigt!
Set workpiece zero-point (Z-axis)
(1) Remove extruded filament (tweezer)
Note: Heated printing plate and extruder have to be heated up!
A ... use Paper A4 (80gr)
(2) move paper sheet sidewards and Z-Axis in direction of
the heated printing plate. As soon as you feel that the sheet
gets stuck the correct position has been reached.
With the nozzle close to the heated printing plate only use
-0.1mm and 0.01mm steps!
(3) Click on Z and sub-menu will open
(4) Click on „Touch off Z axis“ - Workpiece Zero-point is
confirmed
A
1
2
2
2
4
3
Содержание Uni-Print-3D
Страница 1: ...Anleitung Manual VS UniPrint3D Ref 03 01 2019...
Страница 2: ......
Страница 26: ...26...
Страница 27: ...27...
Страница 28: ...est 1982 F a b r i k s g a s s e 1 5 2 3 4 0 M o e d l i n g AU S T R I A w w w t h e c o o l t o o l c o m...


