Thames & Kosmos 620380 Скачать руководство пользователя страница 14

Programming the Robots
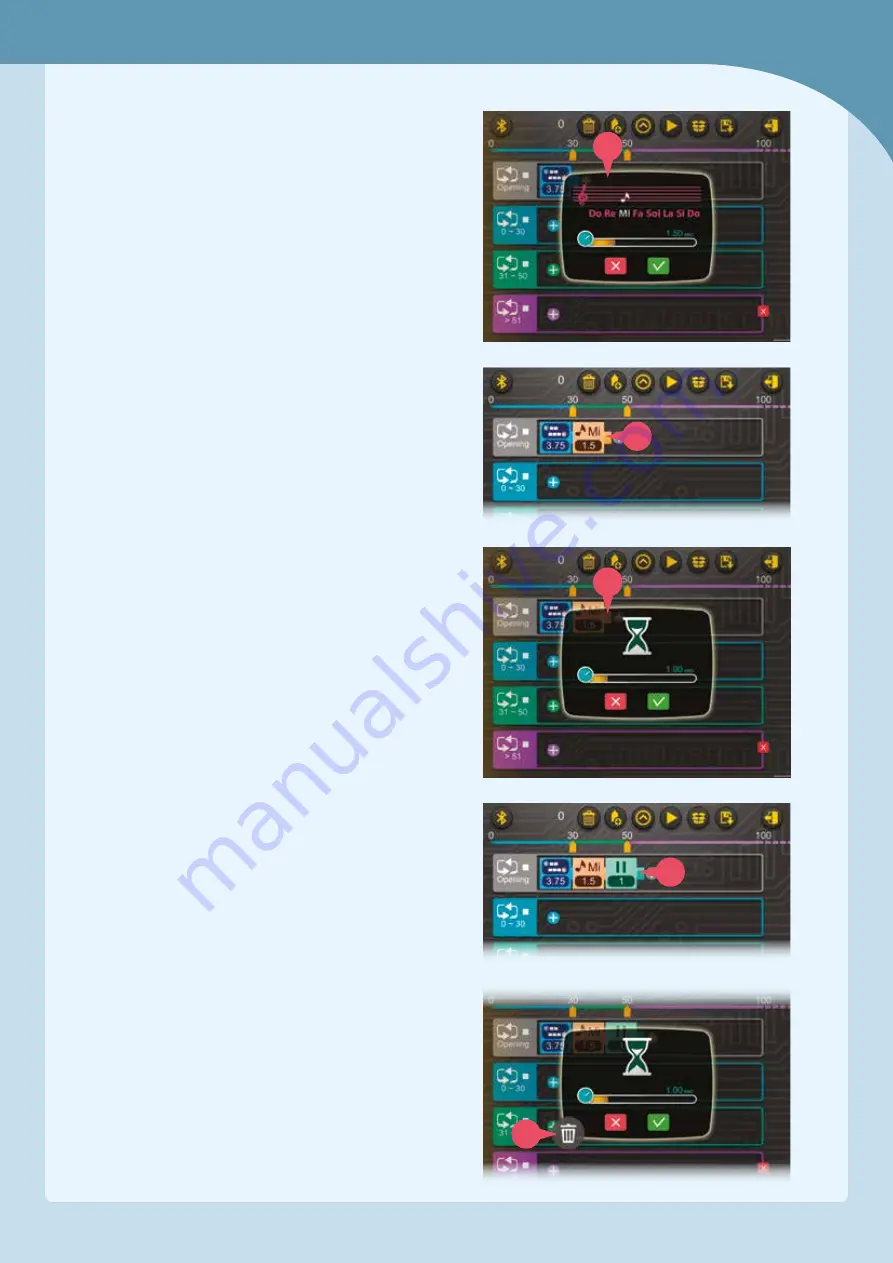
PROGRAMMING SOUNDS

1.  Press the notes command icon and the sound 

programming window appears (J). 

2.  In the sound programming window, you can 

create a command to make sounds. You can 
choose the pitch (Do, Re, Mi, Fa, Sol, La, Si, and 
Do) and the duration (0.5 to 5 seconds) for each 
note command. 

3.  Press the green check mark button and the note 

block (K) appears in the program segment. 
 
In this way, you can program a simple melody 
with multiple note blocks that will play when the 
program segment runs.

PROGRAMMING PAUSES

1.  The last command option is to add a pause, or 

rest, to the program. Press the rest command icon 
and the rest programming window appears (L). 
You can choose the duration (0.5 to 5 seconds) of 
the pause in the program. Press the green check 
mark button and the rest block (M) is added to the 
program segment.

WRITING A COMPLETE PROGRAM

Following the previous instructions for adding 
commands, you can now go and write programs for 
all of the segments. You can think of the different 
actions you want your robot to perform when the 
ultrasonic sensor reads objects at different 
distances in front of it.

Don’t be afraid to try a lot of different ideas and 
play around with different combinations of 
command blocks in different distance range 
segments.

DELETING COMMANDS

To delete a command block, press the block you 
want to delete to open its programming window. 
Then press the trash button (N) in the bottom corner. 
 

J

L

K

M

N

11

Содержание 620380

Страница 1: ...rstr 5 7 70184 Stuttgart Germany 49 0 711 2191 0 www kosmos de Thames Kosmos 301 Friendship St Providence RI 02903 USA 1 800 587 2872 www thamesandkosmos com Thames Kosmos UK LP 20 Stone Street Cranbrook Kent TN17 3HE UK 01580 713000 www thamesandkosmos co uk ...

Страница 2: ...e sake of the environment do not throw them into the household trash at the end of their lifespan They must be delivered to a collection location for electronic waste as indicated by the following symbol Please contact your local authorities for the appropriate disposal location Dear Parents Before starting the experiments read through the instruction manual together with your child and discuss th...

Страница 3: ...that all material in this work is free from copyright or other protection Technical product development Genius Toy Taiwan Co Ltd Taichung Taiwan R O C Text and Editing Ted McGuire Camille Duhamel Layout Ashley Greenleaf Additional Graphics and Packaging Dan Freitas Manual design concept Atelier Bea Klenk Berlin Manual illustrations Genius Toy Taiwan Co Ltd Taichung Taiwan R O C and Thames Kosmos M...

Страница 4: ...ual frame 2 7406 W10 A1S 25 Motor shaft 27 mm axle 6 7026 W10 L1S1 26 35 mm axle 2 7413 W10 O1D 27 70 mm axle 5 7061 W10 Q1D 28 100 mm axle 1 7413 W10 L2D 29 Small gear red 7 7026 W10 D2R 30 Medium gear gray 10 7346 W10 C1S 31 Worm gear 1 7344 W10 A1S1 32 Wheel red 4 7392 W10 H1R 33 Tire hard plastic 2 7392 W10 G1D 34 Tire rubbery plastic 2 7413 W10 D1S 35 Washer 4 R12 3620 36 Ball roller 1 1247 W...

Страница 5: ...l In the box you will find a little yellow tool called the anchor pin lever End A of the part separator tool makes it easy to remove anchor pins from the frames C Gear wheels The models will often have several gear wheels installed in a row In order for the models to work well these gears will have to mesh well Otherwise the force from one gear wheel won t be properly transferred to the next D Ins...

Страница 6: ... Desert Explorer 23 Programming the Desert Explorer 29 Dancing Bot 30 Programming the Dancing Bot 37 Scout Rover 38 Programming the Scout Rover 44 Helicopter 45 Programming the Helicopter 52 Dozer Bot 53 Programming the Dozer Bot 59 Scorpion Robot 60 Programming the Scorpion Robot 64 Publisher s information Inside back cover TIP Above each set of assembly instructions you will find a red bar It sh...

Страница 7: ...m floors deliver packages map terrain climb mountains entertain people cook dinner the list goes on and on With this kit you can build robots that use an ultrasonic sensor to sense their environment With the app you can program the robots motors to behave in different ways depending on the data coming from the ultrasonic sensor In this way you can create different robots that perform different tas...

Страница 8: ...four elements in combination with all the mechanical parts rods gears axles frames and so on allow you to build and program mechanical robots that can sense their surrounding using sound waves First follow the assembly instructions starting on page 13 to build one of the models Make sure you have inserted the batteries correctly according to the battery information on page 2 Shake the model until ...

Страница 9: ...t They can also navigate and find their way around without normal eyesight ACTIVE SONAR Humans have developed a technology to replicate echolocation which is called sonar Sonar is an acronym for SOund Navigation And Ranging Sonar is used for navigation in submarines ships and airplanes A similar technology using electromagnetic radio waves instead of sound waves is called radar RAdio Detection And...

Страница 10: ... the remote control screen will appear REMOTE CONTROL MODE 1 Connect the app to your model by pressing the Bluetooth button in the upper left corner A 2 When the connection has been made the Bluetooth symbol will change color B and if a motor is connected the motor will drive for a second to indicate the connection has been made 3 The ultrasonic functionality will now be available if the ultrasoni...

Страница 11: ...top button 4 The sensor distance indicator line H has adjustable ranges Different program segments can run in each of these ranges By default there are three ranges The first range marker I is set at 30 and the second marker J at 50 This means there are four program segments by default The Opening program segment K runs once at the beginning when the Go button is pressed When an object is detected...

Страница 12: ...The commands menu C pops up You can select between three types of commands Choose Motors to add motor commands Choose Notes to add sound commands Choose Rest to add a pause command Or press the red X button to exit the commands menu Continued on next page A TROUBLESHOOTING THE SENSOR CONNECTION If the sensor connection isn t working Disconnect and then reestablish the Bluetooth connection Make sur...

Страница 13: ...e gearing will change the direction 3 With the time slider E you can also set the duration for which the motor s will turn from 0 5 to 5 0 seconds 4 When you are satisfied with your selections press the green check mark button and the motor block F appears in the program segment The blocks show which motor s G the command will turn and at what speed and in what direction H each motor will turn Bel...

Страница 14: ...on and the rest programming window appears L You can choose the duration 0 5 to 5 seconds of the pause in the program Press the green check mark button and the rest block M is added to the program segment WRITING A COMPLETE PROGRAM Following the previous instructions for adding commands you can now go and write programs for all of the segments You can think of the different actions you want your r...

Страница 15: ...t to move to a different program click the storage box button Q and select which program you want to open SAVING PROGRAMS When you want to save a program you have written press the disk button R The program script will immediately be saved inside the program 1 6 you are currently in A confirmation screen will appear REVERT TO SAVED To revert to the last saved version of the program and erase all u...

Страница 16: ...Motor A Motor B Motor A 5 6 7 8 9 10 9x 1 2 4x 4 2x 6 4x 8 2x 9 2x 10 2x 11 4x 12 4x 13 1x 16 4x 20 1x 22 1x 25 2x 27 2x 30 2x 29 4x 32 2x 34 2x 35 2x 36 1x 37 1x 38 1x 41 1x 43 1x 42 2x 44 1x x2 x2 1 2 3 4 13 Turtle Robot ...

Страница 17: ...TURTLE ROBOT Sensor Motor A Motor B Sensor 11 12 13 14 15 16 17 18 x2 x2 Done 14 ...

Страница 18: ... until it detects an object with the ultrasonic sensor The turtle robot will back away turn and then move forward in a new direction This program is preloaded in the app under Program 9 Test it out and write down how the robot behaves for each program segment below PROGRAMMING NOTES DEMO PROGRAM Program 9 OPENING SEGMENT SEGMENT 0 30 SEGMENT 31 PROGRAMMING Programming the Turtle Robot 15 ...

Страница 19: ... 4 1 26x 2 25x 3 8x 10 4 x 11 2x 12 7x 13 4x 14 3x 16 6x 17 5x 18 3x 19 1x 20 3x 21 2x 22 2x 24 2x 25 4x 27 4x 29 4x 30 8x 32 4x 33 2x 34 2x 35 4x 40 2x 41 1x 42 2x 43 1x 44 1x 45 1x 46 1x x2 x2 x2 x2 x2 x2 x2 6 7 8 16 ...

Страница 20: ...Rover Bot x2 x2 x2 9 10 11 12 13 15 14 Note the angle Connect to the third hole in the top of the short frame 17 ...

Страница 21: ...ROVER BOT Motor A Motor B x2 16 18 19 20 17 18 ...

Страница 22: ...x2 21 23 25 26 27 22 24 19 Rover Bot ...

Страница 23: ...Sensor 28 30 31 29 ROVER BOT Note the angle Connect to the third hole in the top of the short frame 20 ...

Страница 24: ...Motor A Motor B Sensor Done 34 32 33 21 Rover Bot ...

Страница 25: ... will move the ultrasonic sensor left and right searching for you You may have to move closer for the rover bot to detect you but once it has it will move towards you and follow you around This program is preloaded in the app under Program 10 Test it out and write down how the robot behaves for each program segment below PROGRAMMING NOTES DEMO PROGRAM Program 10 OPENING SEGMENT SEGMENT 0 20 SEGMEN...

Страница 26: ...x 5 2x 6 4x 11 1x 12 6x 13 3x 14 3x 15 1x 16 6x 17 2x 19 2x 18 3x 20 7x 21 2x 22 2x 23 2x 24 2x 25 4x 26 2x 27 3x 29 4x 30 6x 32 4x 33 2x 34 2x 35 4x 37 1x 38 1x 39 1x 41 1x 40 2x 43 1x 44 1x 45 1x 46 1x 42 2x 1 2 3 4 5 6 7 8 23 Desert Explorer ...

Страница 27: ...x2 9 12 13 14 15 16 17 10 11 24 DESERT EXPLORER ...

Страница 28: ...Motor A x2 x2 18 21 23 24 25 22 20 19 25 Desert Explorer ...

Страница 29: ...Side view Hole B 26 28 29 30 31 32 27 26 DESERT EXPLORER ...

Страница 30: ...Side view Hole B Motor B 33 35 37 36 34 27 Desert Explorer ...

Страница 31: ...DESERT EXPLORER Motor A Motor B Sensor Done 40 38 39 28 ...

Страница 32: ...uickly But once it has detected an object with the ultrasonic sensor it will walk slowly towards the object This program is preloaded in the app under Program 11 Test it out and write down how the robot behaves for each program segment below PROGRAMMING NOTES DEMO PROGRAM Program 11 OPENING SEGMENT SEGMENT 0 30 SEGMENT 31 90 SEGMENT 91 PROGRAMMING Programming the Desert Explorer 29 ...

Страница 33: ... 3 10x 4 4x 5 2x 6 4x 8 2x 9 2x 10 6x 11 4x 12 7x 13 4x 14 2x 15 3x 7x 17 7x 18 3x 19 3x 20 7x 21 1x 22 2x 23 1x 24 2x 25 6x 26 2x 27 3x 29 7x 30 10x 31 1x 32 4x 33 2x 34 2x 35 4x 36 1x 37 1x 38 1x 39 1x 40 2x 41 1x 43 1x 44 1x 45 1x 46 1x 42 2x x2 1 30 ...

Страница 34: ...Dancing Robot 10 13 16 17 14 15 11 12 Note the gear s orientation Note the gear s orientation 31 ...

Страница 35: ...DANCING ROBOT Motor A Motor B 18 21 22 23 24 25 19 20 x2 x2 32 ...

Страница 36: ...Black Black Gray Gray 26 27 28 29 30 33 Dancing Robot ...

Страница 37: ...DANCING ROBOT 31 32 33 34 37 37 35 36 Hole B 35 mm 35 mm x2 x2 x2 34 ...

Страница 38: ...Dancing Robot 39 41 43 44 42 40 Top view Top view Hole B 35 ...

Страница 39: ...DANCING ROBOT 45 47 48 46 Motor A Motor B Sensor Done 49 36 ...

Страница 40: ...at the dancing bot moves to the beat when you play a song This program is preloaded in the app under Program 12 Test it out and write down how the robot behaves for each program segment below PROGRAMMING NOTES DEMO PROGRAM Program 12 OPENING SEGMENT SEGMENT 0 10 SEGMENT 11 50 SEGMENT 51 PROGRAMMING Programming the Dancing Robot 37 ...

Страница 41: ...1x 41 1x 39 1x 38 1x 37 1x 40 2x 42 2x 1 41x 2 27x 4 4x 5 4x 6 4x 7 2x 8 2x 9 2x 11 4x 12 7x 13 4x 14 3x 16 7x 17 7x 18 3x 19 2x 21 2x 20 6x 24 2x 25 1x 26 2x 27 5x 29 4x 30 10x 33 2x 32 4x 34 2x 35 4x x2 x2 x2 Motor A Motor B 5 6 7 8 9 10 38 ...

Страница 42: ...Connect to B holes Connect to B holes 11 13 14 15 16 17 12 39 Scout Rover ...

Страница 43: ...x2 Sensor 18 20 22 23 21 19 40 SCOUT ROVER ...

Страница 44: ...24 25 26 27 41 Scout Rover ...

Страница 45: ...28 29 30 SCOUT ROVER 42 ...

Страница 46: ...31 32 Done 33 x2 Sensor Motor A Motor B Scout Rover 43 ...

Страница 47: ...by If no objects are detected the scout rover will move forward When an object is within range of the scout rover it will back away and turn its wheels Then the scout rover will continue to move forward again in a new direction until it detects another object This program is preloaded in the app under Program 13 Test it out and write down how the robot behaves for each program segment below PROGRA...

Страница 48: ... 3 6x 4 5x 5 8x 6 4x 9 2x 13 2x 10 4x 11 3x 12 6x 14 2x 15 1x 16 7x 17 5x 19 2x 20 4x 21 2x 22 2x 23 2x 24 2x 25 3x 27 3x 28 1x 29 6x 30 8x 31 1x 32 2x 33 2 x 35 2 x 37 1x 42 2 x 44 1x 45 1x 46 1x 43 1x 41 1x 40 1x 38 1x 39 1x Helicopter 45 ...

Страница 49: ...9 10 11 12 13 Motor B x3 Connect to Hole B Connect to Hole B Side view HELICOPTER 46 ...

Страница 50: ...14 Motor A 15 16 17 19 20 18 Helicopter 47 ...

Страница 51: ...Sensor 21 23 22 HELICOPTER 48 ...

Страница 52: ...24 25 26 27 Helicopter 49 ...

Страница 53: ...28 30 31 32 33 34 29 HELICOPTER 50 ...

Страница 54: ...Motor A Motor B Sensor 35 36 37 38 Top view Done 39 51 Helicopter ...

Страница 55: ...ram then tells motor A to retract the landing gear Now you can pretend the model is flying around When it s time to land slowly bring the helicopter close to the tabletop again The sensor will tell motor A to swivel back into landing mode and the landing gear will extend so the helicopter can land This program is preloaded in the app under Program 14 Test it out and write down how the robot behave...

Страница 56: ...39 1x 38 1x 37 1x 40 2x 1 40x 2 19x 3 8x 4 4x 5 4x 6 1x 8 2x 11 4x 12 4x 13 4x 14 2x 15 3x 16 7x 17 6x 18 3x 20 7x 21 1x 22 3x 25 2 x 27 4x 28 1x 29 4x 30 7x 31 1x 32 4x 33 2x 34 2x 35 3x DOZER BOT 1 x 26 1 2 3 4 5 6 7 8 9 x2 Dozer Bot 53 ...

Страница 57: ...Motor B Motor A 10 11 12 14 15 16 13 DOZER BOT 54 ...

Страница 58: ...17 18 19 21 22 20 x2 100 mm Side view Dozer Bot 55 ...

Страница 59: ...23 24 25 26 27 28 29 56 DOZER BOT ...

Страница 60: ...30 31 32 33 34 35 36 x2 x2 Connect to Hole B 57 Dozer Bot ...

Страница 61: ...DOZER BOT Motor A Motor B Sensor Sensor 38 39 40 41 37 Done 42 58 ...

Страница 62: ...de down until it detects an object The dozer robot will then raise its blade until it is horizontal and then move backwards This program is preloaded in the app under Program 15 Test it out and write down how the robot behaves for each program segment below PROGRAMMING NOTES DEMO PROGRAM Program 15 OPENING SEGMENT SEGMENT 0 36 SEGMENT 37 60 SEGMENT 61 PROGRAMMING Programming the Dozer Bot 59 ...

Страница 63: ... 18x 44 1x 43 1x 41 1x 2 19x 3 2x 4 1x 5 2x 6 4x 11 2x 8 4x 12 7x 13 2x 14 1x 15 1x 16 7x 17 6x 18 2x 19 3x 20 1x 22 2x 24 1x 25 4x 27 4x 30 6x 29 5x 32 4x 33 2x 34 2x 35 2x 36 1x 37 1x 38 1x 39 1x 40 2x 42 2x 1 2 3 4 6 7 5 8 9 10 60 ...

Страница 64: ...Scorpion Robot 11 12 13 14 15 17 18 19 20 16 x2 61 ...

Страница 65: ...Sensor 21 23 24 25 22 Connect to hole B Connect to hole B 62 SCORPION ROBOT ...

Страница 66: ...Motor A Motor B Sensor 26 27 28 29 Done 30 63 Scorpion Robot ...

Страница 67: ... raise its tail This program is preloaded in the app under Program 16 Test it out and write down how the robot behaves for each program segment below PROGRAMMING NOTES DEMO PROGRAM Program 16 OPENING SEGMENT SEGMENT 0 30 SEGMENT 31 WHAT ELSE CAN YOU BUILD Now that you have built the eight robotic machines in this kit can you design your own robots and write your own programs to control them Use yo...

Страница 68: ...620380 03 050617 ...

Отзывы: