8
Adjusting the wheel/ depth skid
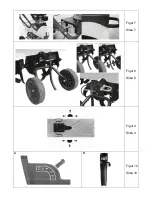
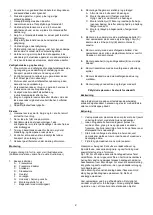
Fig 8. During operation, it may be necessary to raise the
wheel assembly, as it is connected to the depth skid.
Depress the pedal to the right of the support wheels to adjust
the wheel assembly/depth skid to one of the 3 available
positions.
The depth skid can be set to 3 different depths. The deeper it
extends into the soil, the deeper the tilling blades will work
and the slower the machine will advance. Setting the correct
tilling depth will significantly reduce the effort required. The
depth skid should always be adjusted to suit the ground
conditions. We recommend testing several depths to see
which works best.
Lubrication of gearbox
The gearbox is permanently lubricated at the factory, never
open the gearbox.
In order to add grease does as followed:
1. Remove the spark plug cover on the engine.
2. Place the pack of grease in a bucket of warm water.
This will make the consistency thinner, so it is easier to
add to the gear. Avoid cutting off too much of the tip on
the pack. It is important that the tip is as pointed as
possible.
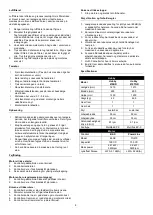
3. Loosen the 2 screws (Figure 12 a+b).
4. Add grease in hole “a” until it comes out of hole “b” (=
full), when the gearbox is in horizontal position.
5. Fit and tighten the screws again.
6. Fit the spark plug cover on the engine.
Figure 12
Check grease level and add grease to the gear for every
5 operating hours. Extra grease is not included.
Starting and stopping the engine
Remember: Always check the oil level prior to use!
The oil level must always be between the min. and max.
Mark on the dipstick. Always use SAE-30 oil. Use only
unleaded 95 octane gas. Never over-fill the gas tank.
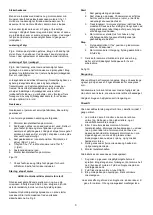
Warning: Stay out of dashed zone, while starting the engine!
Always start the engine from dotted operation zone See
Figure 9.
Starting the engine
1. Set the throttle control on the handle to max.
2. Position the choke at max. Move the choke lever fully to
the left. The choke is not required if the motor is hot.
3. Pull the start cord to start the motor. Always feed the
start cord back into the motor by hand.
4. When the motor is started, set the choke to minimum
(fully to the right) Engage the throttle slightly.
Stopping the engine
1. Set the throttle control to “low” and let the motor run for
approx. 30 seconds.
2. When the motor idles, set the throttle control to full stop.
Vibrations may travel up into the handle during use. We
therefore recommend taking a break every 2 hours.
Figure 10
Cleaning the tiller
The tiller should be cleaned after use. Use a garden hose to
wash off soil and dirt. Remove any grass etc. from the rotor
shaft. The chassis number should only be cleaned with a
damp cloth to avoid unnecessary wear. Avoid using a high-
pressure washer during cleaning.
Changing the oil
The oil should initially be changed after the first 5 hours of
use, and thereafter once per year.
1. Let the motor run for 5 minutes to heat up the oil. This
allows the oil to run more freely and makes for a more
complete oil change.
2. After 5 minutes, stop the motor. Remove the spark plug
cap. Drain the oil by unscrewing the sump plug.
Remember to drain the oil into a container of sufficient
capacity. NB: The motor must not be tipped backwards
more than 42,5 degrees.
3. Screw the sump plug back in and pour new oil into the
motor. Do this by removing the dipstick and pouring in
the recommended quantity of oil.
4. Refit the spark plug cap.
Alternatively, use an oil extractor kit.
1. Suck the oil up through the oil filler hole using the
syringe. Use the hose to reach the sump.
2. Transfer the used oil to the container.
3. Fill the engine with new SAE-30 oil.
4. Check the oil level using the dipstick.
Remember to dispose of used oil in a safe way.
Oil and oil extractor kit are not included
Air filter maintenance
Please inspect and clean the air filter on a regular basis. If
the filter has not been cleaned for a longer period, this will
have influence on the engines power take-off and the
exhaustion.
1. Clean around the air filter before it is removed.
2. Carefully remove the paper filter and check it. Brush it
with a soft brush. If it is very dirty, it must be changed.
Take care that no dirt gets into the intake of the engine.
3. Wash the black foam element on the right side in warm
soapy water.
4. Press the water out of the foam element and let it dry.
Put a few drops of SAE-30 oil on the filter to moisten it
lightly with oil. Carefully squeeze out any surplus oil.
Remount the element.
5. Check that all parts are fitted correctly and the cover
closed as shown in the picture.
Содержание 90264848110
Страница 4: ...Figur 4 Slika 4 Figur 5 Slika 5 Figur 6 Slika 6 ...
Страница 5: ...Figur 7 Slika 7 Figur 8 Slika 8 Figur 9 Slika 9 A B Figur 10 Slika 10 ...
Страница 6: ...Figur 11 Slika 11 Figur 12 Slika 12 ...
Страница 38: ...32 ...


