background image


6.8.2  Via Text Management 

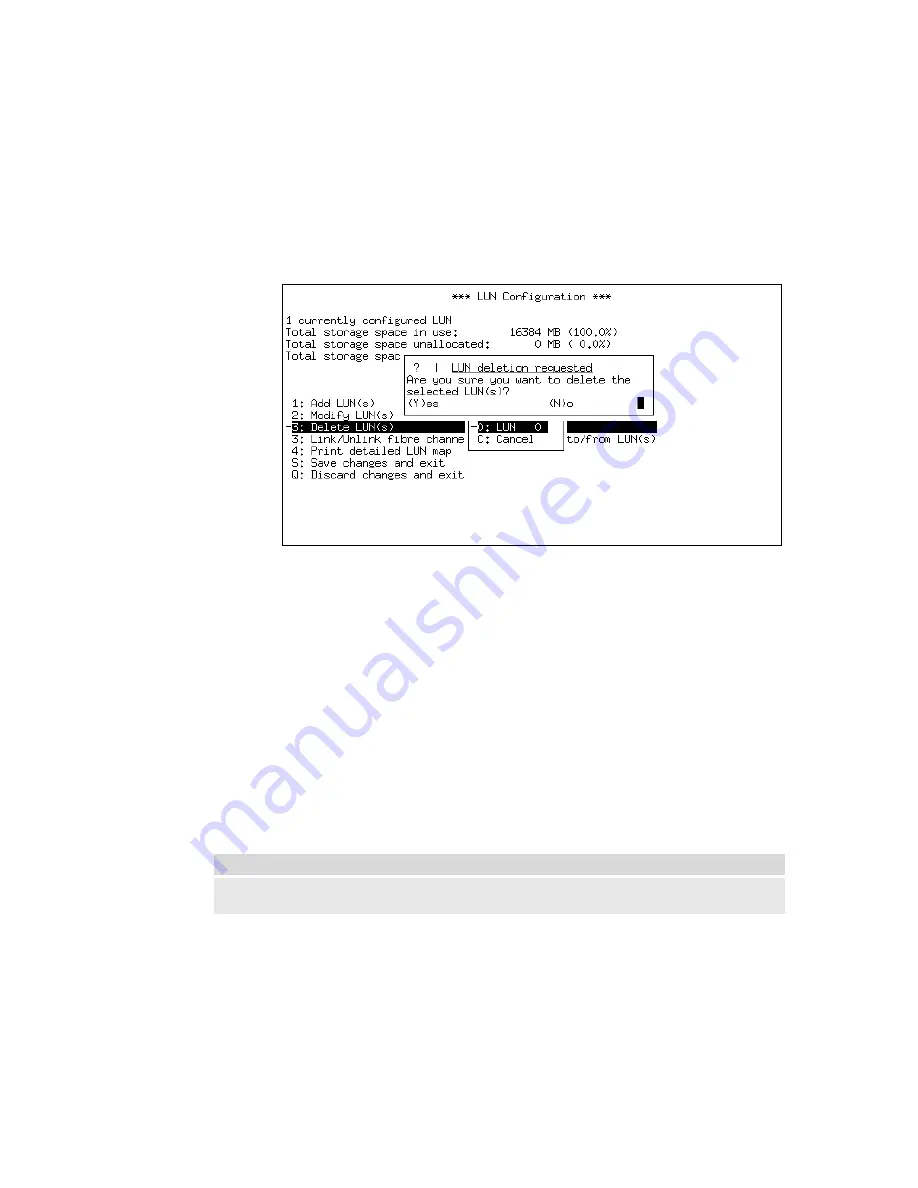
To delete LUNs via the Text Management Interface: 

• 

From the 

Telnet Main Menu

, select “

LUN Setup

” 

• 

Select “

Delete LUN(s)

” 

• 

Select a LUN or LUNs and press 

Enter

• 

Confirm LUN deletion by pressing “

Y

” or cancel by pressing “

N

” 

– see 

Figure 6-15: Deleting LUNs


• 

Select “

Exit to the LUN configuration menu

” 


Figure 6-15: Deleting LUNs 


To verify the deletion of the LUN, view the LUN Configuration menu 
for a total number of LUNs. 


• 

To save the changes once you have completed all LUN 
configuration, select “

Save changes and exit


6.9   Setting backup mode 

The RamSan-320 allows the administrator to set backup modes for each 
LUN individually. 


Warning: 

TMS does not recommend changing backup modes while the system is 
actively transferring data.   


RamSan-300/320 

User’s Manual 


- 67 - 

Содержание RamSan-3 Series

Страница 1: ...TEXAS MEMORY SYSTEMS INC RamSan 300 320 User s Manual Version 1 6 ...

Страница 2: ... Texas Memory Systems Inc All rights are reserved No part of this work may be reproduced or used in any form or by any means graphic electronic or mechanical including photocopying recording taping or information storage and retrieval systems without permission of the copyright owner RamSan 300 320 User s Manual ii ...

Страница 3: ...nagement Interface 17 Chapter 4 Administration Functions 19 4 1 Security 19 4 2 Configuring Ethernet settings 25 4 3 Power Down Settings 29 Chapter 5 Monitoring Functions 31 5 1 Viewing system health and status 31 5 2 Statistics 46 5 3 Logs 50 Chapter 6 LUN Configuration 52 6 1 A example LUN configuration 53 6 2 Adding LUNs 54 6 3 Viewing LUN status LUN map 56 6 4 Linking LUNs to from Fibre Channe...

Страница 4: ...Problems 78 Chapter 10 Specifications 79 10 1 Physical Characteristics 79 10 2 Operating Environment 79 10 3 Non operating Environment 79 Appendix A RamSan 3xx Series Replacement Parts 80 Appendix B FCC Safety Notices 83 Appendix C Warranty Maintenance Field Service and Repair Policy 84 RamSan 300 320 User s Manual iv ...

Страница 5: ...STRUCTIONS AND SAFETY PRECAUTIONS BEFORE OPERATING THE UNIT Before servicing the unit shutdown the unit and remove power cords from both power supply modules Wait 15 seconds before servicing the unit DO NOT REACH INSIDE THE PROTECTIVE ENCLOSURE AFTER REMOVING A POWER SUPPLY MODULE Caution for service personnel Power supply modules include Double Pole Neutral Fusing RISK OF FIRE OR EXPLOSION IF BAT...

Страница 6: ...mSan 300 10 07 2003 1 4 Updated Figure 2 1 RamSan 320 Layout Added Appendix B FCC Notice Added Appendix C Warranty Maintenance Field Service and Repair Policy Added battery maintenance information to Section 2 2 Updated all system screenshots Updated text management interface menu items Added LED configuration to Section 3 1 1 11 21 2003 1 5 Added Section 5 1 2 Identifying a RamSan Updated Figures...

Страница 7: ...fully non volatile solution The RamSan 320 has three modes of operation Active BackupTM mode DataSync mode and Mirror mode For more information on these three modes see Section 6 9 Setting backup mode The RamSan complements existing disk drives JBOD or RAID in performance sensitive applications Servers perceive the RamSan as another attached SCSI disk drive For some applications the RamSan is the ...

Страница 8: ... handles the system operation You can monitor power supply temperature and voltages from the system monitoring software If a RamSan 320 looses power it operates for five minutes before shutting down The shutdown process involves synchronizing data to the internal hard disk drives If the system determines that the battery life will not last the full shutdown delay period it starts the synchronizati...

Страница 9: ...kup that is already nearly completed Active Backup is an optional feature on the RamSan 320 therefore some systems may not display this option Datasync mode DataSync mode provides the highest performance for system operation In this mode reads and writes are done only to memory The disks remain offline during normal operation If power loss occurs and the shutdown timer reaches zero or the user req...

Страница 10: ...rmance storage With up to eight Fibre Channel ports in a 3U package the RamSan 3xx series delivers unparalleled bandwidth and I O The RamSan 3xx series is capable of 250 000 IOPS I O operations per second and 3 000 MB sec of read or write performance RamSan 300 320 User s Manual 6 ...

Страница 11: ...ies provide nine minutes of runtime With two hours of charge time the batteries provide 17 minutes of runtime With three hours of charge time the batteries provide 20 minutes of runtime As a precaution replace the RamSan s batteries every two years To obtain spare or new batteries for your RamSan contact Texas Memory Systems 2 3 System Inspection TMS ships the RamSan with a packing list Ensure tha...

Страница 12: ... Memory Board 13 Memory Board 4 Memory Board 9 Memory Board 7 Memory Board 8 Memory Board 3 Memory Board 11 Memory Board 0 Memory Board 15 Power Supplies Fibre Channel Port 1 Fibre Channel Port 2 Memory Board 6 Fibre Channel Port 3 Hard Disk Drives Front Panel Display Battery 1 Battery 2 Battery 3 1 2 3 Power MOM Fan Fan Fan Fan Fan Fan 11 12 9 10 7 8 5 6 3 4 1 2 Figure 2 1 RamSan 320 Layout RamSa...

Страница 13: ...e FC65 ports on the system are capable of connecting to point to point arbitrated loop and switched fabric topologies at either 2 Gigabit or 1 Gigabit speeds 2 6 Connecting the Power Supplies TMS equips the RamSan with dual redundant hot swappable power supplies that operate on 110 220 VAC line power A fully loaded RamSan requires approximately 350 watts of power Using the provided AC power cords ...

Страница 14: ...beep If the buzzer sounds silence it by pressing the Power switch once or by correcting the problem The silencing lasts until the problem is corrected Once the problem is corrected the buzzer will sound again if another power failure occurs In addition the button allows the user to force a hard shutdown of the system Only perform a hard shutdown when you are unable to perform a manual shutdown and...

Страница 15: ...the system has powered off due to some failure other than AC power loss In the event this happens press the Power button which is the large black button above the power supplies Please see Section 2 6 Connecting the Power Supplies 2 8 System Initialization The front panel display shows the boot process s current state Once the power is connected the system turns on automatically and the front pane...

Страница 16: ... set to Volatile mode the front panel displays Initializing instead of Restoring Data 3 Once the system has restored data the front panel displays System Status GOOD and shows the performance bars for each Fibre Channel port The numbers represent the Fibre Channel Controllers If a controller is not installed the number and corresponding performance will not display The top bars represent the port ...

Страница 17: ...ft of the display are used to make selections Menu The Menu button has two functions Function 1 On any of the status or performance displays pressing the Menu button launches the RamSan Main Menu Function 2 Escape function Once the menu is open pressing Menu returns the user to the prior screen Select When a menu item is on the display pressing Select will either execute that menu option or procee...

Страница 18: ...splay Set LED Mode Display Bandwidth Display IOPS Performance Demo LED Test Pattern Disable LEDs Exit Menu Set LED Brightness LED Brightness Level Exit Menu Display logo Exit Menu 3 2 Text Management Interface The RamSan s management port allows you to manage configure and monitor system behavior You may connect to the management port with either a DB 9 serial cable or an RJ 45 Ethernet cable 3 2 ...

Страница 19: ...ont panel display or from the serial port For complete instructions for configuring the Ethernet please refer to Section 4 2 Configuring Ethernet settings 3 2 3 General interface layout and instructions TMS designed the management program as a text based GUI This program displays all of the user s possible choices in a series of menus The user may select menu items by entering the number of the me...

Страница 20: ...ess the ESC key to return to the menu Once satisfied with the changes made on a menu the user must select S to save all of the changes Pressing ESC or selecting Q disregards any changes and returns to the previous menu TMS designed some screens to display status information and display data as in Figure 3 4 Text Management Interface Status Screen Figure 3 4 Text Management Interface Status Screen ...

Страница 21: ...ur example we see a and v v and indicate that it is possible to scroll down and up and indicates you have reached either the top or bottom of the sub menu 3 3 Web Management Interface Another way to get an overview of what is happening in a system is to use the web management interface At a glance this JAVA utility shows the status of all components and combines the information found in the Text M...

Страница 22: ...nformation the user simply clicks on the component Clicking on the management port also displays additional information about the system s actions Some of the components have multiple tabs of information The web interface outlines all failed components in red and all components with warnings in yellow Figure 3 6 Web Management Interface RamSan 300 320 User s Manual 18 ...

Страница 23: ... system The RamSan has one account admin 4 1 2 Set password Since it is possible to remotely access the RamSan through the management port TMS includes a password feature for system security The default password for the admin account is ssd Logging in directly through the serial console automatically bypasses the password feature which allows a system administrator access to the RamSan if the pass...

Страница 24: ...lick the General Config tab Enter your old password The system requires your old password for security reasons Enter your new password Confirm the new password Click the Change button The system immediately changes the administrator password Figure 4 1 Password Change via Web Management Interface RamSan 300 320 User s Manual 20 ...

Страница 25: ...you must verify your password For security reasons the system does not display the typed letters when typing in passwords Figure 4 2 Password Change 4 1 3 Enable disable Telnet The system allows the administrator to disable Telnet to prevent users from accessing the system through Telnet Note The RamSan does not allow you to disable access to the console This provides a method to re enable the Tel...

Страница 26: ... Management Control Processor graphic Click on the Network tab To enable Telnet check the Allow Telnet checkbox and press the Save button To disable Telnet uncheck the Allow Telnet checkbox and press the Save button Figure 4 3 Enable Disable Telnet RamSan 300 320 User s Manual 22 ...

Страница 27: ...net and visa versa Press the key or ENTER to toggle between the sections Select Save changes and exit to save the changes The menu displays the current Telnet status above the menu options as shown in Figure 4 4 Telnet Setup Users currently connected through Telnet remain connected until their session ends Figure 4 4 Telnet Setup RamSan 300 320 User s Manual 23 ...

Страница 28: ...it to save the changes The menu displays the current Web Access status above the menu options 4 1 5 Enable disable SNMP The system allows the administrator to start and stop the SNMP agent Via Web Management To enable disable SNMP via the web interface Click on the Management Control Processor graphic Click on the Network tab To enable SNMP check the Allow SNMP checkbox and press the Save button T...

Страница 29: ...et Setup Use the Select button to choose this option and continue with the configuration You may now use the arrow buttons to scroll through the following menu options Displays a list of the current IP configuration hostname IP address subnet mask gateway address if applicable and hardware Ethernet address To continue setting up the Ethernet configuration Shuts down and restarts the Ethernet port ...

Страница 30: ...ton To configure the RamSan with a static IP the system requires the IP address subnet mask and a possibly a gateway address After you have chosen Static IP Ethernet IP replaces the top line of the display and the display prompts you to enter an IP Use the or buttons to cycle through the numbers 0 through 9 To select the value use the Select button Then the input prompt moves to the next character...

Страница 31: ...ollowed by a success or failure message Then the display indicates Saving IP Config followed by a success or failure message Next the RamSan attempts to start the network with the new settings indicated on the front panel display with Restarting Network Upon success the system displays the new IP address on the front panel for 15 seconds or until any button is pressed Shutting Down Network Saving ...

Страница 32: ...etup To change to IP assignment mode Select IP assignment mode Select the appropriate assignment mode from the submenu If you choose DHCP or Disable Ethernet then select Save changes restart the network and Exit If the administrator sets the IP assignment mode to Static the Change IP address Change subnet mask and Change gateway options appear as shown in Figure 4 6 Static IP Settings Figure 4 6 S...

Страница 33: ...a manual shutdown press the Power button on the power supplies For additional details see Section 2 7 Turning on the System Important TMS recommends backing up the contents of the RamSan to your server or another storage device as a fail safe before performing a Manual Shutdown Via Front Panel Display To shut down the system using the front panel use the arrow buttons to cycle through the top leve...

Страница 34: ...o tab Press the Shutdown button Via Text Management To perform a manual shutdown via Text Management Interface From the Telnet Main Menu select Power down system Confirm the power down Once the user confirms the power down the system powers off after completing all writes To resume operation press Power button on to the left of the power supplies For additional details see Section 2 7 Turning on t...

Страница 35: ... aspects of the system The display presents the following information Restore Synchronize Progress During any synchronization or data restore the front panel cycles between the operation progress and estimated time remaining until completion The system displays Restoring Data when restoring data from disk and displays Initializing when starting from a volatile state If the system is rebuilding the...

Страница 36: ... removed ERROR Indicates that the RamSan has detected a system failure Error statements scroll across the front panel display Possible failures include Fan failure Power supply failed System overheated More than one disk removed or failed System Status GOOD System Status WARNING Warnings Fans slow System Status ERROR Errors Disk Failed In the case of either system warnings or failures the front pa...

Страница 37: ...nnel port The numbers represent the Fibre Channel Controllers If a controller is not installed the number and corresponding performance will not display The top bars represent the port A and the bottom bars represent port B The system stays in Active Monitor Mode for 10 minutes or until the user selects Deactivate Monitor from the front panel main menu Active Monitor Mode 1 2 3 4 RamSan 300 320 Us...

Страница 38: ...e LEDs to display bandwidth or IOPS To use the LEDs to display bandwidth select Display Bandwidth To use the LEDs to display IOPS select Display IOPS Once you select one of the above options the display will ask you to Enable Autoblink If you enable autoblink the top LED will blink even with constant bandwidth or IOPS LED Display Display Bandwidth RamSan 300 320 User s Manual 34 ...

Страница 39: ...ow make the front panel display start and stop blinking Via Web Interface To make the RamSan front panel blink via web interface Click on the Management Control Processor graphic Click on the General Info tab Click the Identify Device button The RamSan front panel will begin to blink To make the front panel stop blinking click the Identify Device button again Figure 5 1 Identify Device button RamS...

Страница 40: ... has been powered on Via Web Interface To view the system uptime via web interface Click on the Management Control Processor graphic Click on the General Info tab The General Info screen displays the Uptime below Firmware version Figure 5 2 System Uptime Status RamSan 300 320 User s Manual 36 ...

Страница 41: ... From the Telnet Main Menu select Health and Status The system displays the current system uptime in days hours minutes and seconds at the top of the Health and Status screen as shown in Figure 5 3 Health and Status Figure 5 3 Health and Status RamSan 300 320 User s Manual 37 ...

Страница 42: ...Via Web Interface Information concerning the disks batteries power supplies and fans are all found in separate locations through the Web interface The RamSan 300 does not display the disks or battery graphics Disks Not displayed for the RamSan 300 Click on the Disks graphic Click on the General Info tab Figure 5 4 Disk Status via Web interface RamSan 300 320 User s Manual 38 ...

Страница 43: ...Batteries Not displayed for the RamSan 300 Click on the Batteries graphic Click on the General Info tab Figure 5 5 Battery Status via Web interface RamSan 300 320 User s Manual 39 ...

Страница 44: ...Control Processor To view the MCP status via web interface Click on the Management Control Processor graphic Click on the General Info tab Figure 5 6 MCP General Info Tab for Status RamSan 300 320 User s Manual 40 ...

Страница 45: ...Power supplies Click on the Power Supply graphic Click on the General Info tab Figure 5 7 Power Supply Status via Web Interface RamSan 300 320 User s Manual 41 ...

Страница 46: ...Fans Click on the Fans graphic Click on the General Info tab Figure 5 8 Fans Status via Web interface RamSan 300 320 User s Manual 42 ...

Страница 47: ...s The states are classified as Good Warn and Error Good This states that everything is functioning under normal operating conditions Warn This indicates a potential problem to look into but the problem is not an immediate threat to system stability Error This indicates that the component should be investigated immediately RamSan 300 320 User s Manual 43 ...

Страница 48: ...Web interface allows you to view all of the fibre channel information but one fibre channel controller at a time Click on one of the Fibre Channel graphics Click on the General Info tab Figure 5 10 Fibre Channel Controller Status via Web Interface RamSan 300 320 User s Manual 44 ...

Страница 49: ...a Text Management From the Telnet Main Menu select Health and Status Select View Controller Status Figure 5 11 Fibre Channel Controller Status via Text Management Interface RamSan 300 320 User s Manual 45 ...

Страница 50: ... Viewing IO second summary Via Web Interface Click on one of the Fibre Channel graphics Click on the Statistics tab Click the radio button next to IOps The graphing tool provides the option to view read write and total IOPS as well as a running average of each of these statistics To decode the colors on the graphical display view the legend below the check boxes Figure 5 12 IOPS Performance Graph ...

Страница 51: ...atistics Select IO sec summary The IO sec Summary screen as shown in Figure 5 13 IO sec Summary shows the IO read r write w and totals t for each fibre channel controller in the system It also displays a total across all of the FCs present Figure 5 13 IO sec Summary RamSan 300 320 User s Manual 47 ...

Страница 52: ...Statistics tab Click the radio button next to Bandwidth The graphing tool provides the option to view read write and total bandwidth as well as a running average of each of these statistics To decode the colors on the graphical display see the legend below the check boxes Figure 5 14 Bandwidth Performance Graph via Web Interface RamSan 300 320 User s Manual 48 ...

Страница 53: ...ontroller Statistics Select Bandwidth summary The Bandwidth Summary screen displays the bandwidth read r write w and totals t for each fibre channel controller in the system It also displays a total across all of the fibre channel controllers present Figure 5 15 Bandwidth Performance via Text Management Interface RamSan 300 320 User s Manual 49 ...

Страница 54: ... of a system failure the system stores detailed information about the failure in the system event log This information is invaluable in determining why a component failed and provides a timeline for the system administrator to follow Before contacting Texas Memory Systems please have a copy of this log available 5 3 1 Viewing the system event and support logs Via Web Interface To view the system e...

Страница 55: ...earing the system event log Via Web Interface To clear the system event log via the web interface Click the Management Control Processor graphic Click the Clear Log button Via Text Management To clear the system event log via Text Management Interface From the Telnet Main Menu select Log Files Select Clear the System Log 5 3 3 Clearing logged ECC errors Via Text Management To clear the error log v...

Страница 56: ...iguration assumes no access control and equal shares of system memory for each Fibre Channel port For example if you have a 16 Gigabyte system with two Fibre Channel ports each port has access to only half of the system memory Host computers attached to the same network as the RamSan see two eight Gigabyte drives FC Port FC Port 8 Gigabytes LUN 1 8 Gigabytes LUN 0 16 Gigabytes System Memory Fibre ...

Страница 57: ...bre Channel ports in the RamSan This demonstration assigns each HBA a unique LUN The example results in the following configuration HBA 3 2 Gigabytes LUN 2 Port 2A HBA 4 2 Gigabytes LUN 3 Port 2B Fibre Channel Ports HBA 1 HBA 2 Port 1B 6 Gigabytes LUN 0 6 Gigabytes LUN 1 Port 1A Figure 6 2 Reconfigured LUN Mapping To change from the default configuration to the one described above perform the foll...

Страница 58: ...UN Config tab Click the New LUN button Select a LUN number from the drop down box Adjust the LUN size using the scroll bar Assign links to FC ports see Section 6 4 Linking LUNs to from Fibre Channel Controllers Assign LUN masks see Section 6 7 Managing access lists Set backup mode see Section 6 9 Setting backup mode Click the OK button The system adds the specified LUN Figure 6 3 Adding LUNs via t...

Страница 59: ...To change the number of LUNs to add Select Change number of LUNs to add Enter the number of LUNs to add and press ENTER To change the size of the added LUNs Select Change size of LUNs to add Enter the size of LUNs to add and press ENTER Once you have verified your selections at the top of the screen and are ready to add the selected LUNs Select Add LUNs The system adds the specified number of LUNs...

Страница 60: ...b Interface When using the Web Interface you can view the LUNs for the entire system or for the specific fibre channel controller To view the LUNs for the entire system Click on the Management Control Processor graphic Click on the LUN Config tab This screen displays the configuration of all LUNs Figure 6 5 Viewing System LUNs via Web Interface RamSan 300 320 User s Manual 56 ...

Страница 61: ...troller Click on the Fibre Channel Controller graphic Click on the Available LUNs tab This screen displays the available LUNs for the selected Fibre Channel Controller Figure 6 6 Viewing LUNs Assigned to FC ports via Web Interface RamSan 300 320 User s Manual 57 ...

Страница 62: ...nnel Controllers To make partitioned LUNs accessible to connected servers the administrator must link the LUNs to the RamSan s Fibre Channel controllers 6 4 1 Via Web Interface To change the links between LUNs and the Fibre Channel controllers via the Web Management Interface Click on the Management Control Processor graphic Click on the LUN Config tab Select the LUN to edit by clicking on the LUN...

Страница 63: ...ifferent channel on controller This displays a list of channels Select one and press ENTER In addition the Link Unlink LUN s screen indicates the number of LUNs currently linked to the selected controller To link a LUN to the selected controller select Link LUN s to selected controller From the sub menu that lists all LUN numbers not already linked to another FC port select a LUN number and press ...

Страница 64: ...rs above Select Unlink LUN s from selected controller A sub menu appears as shown in Figure 6 9 Unlink LUNs Option which provides a list of all LUNs that are linked to this controller To unlink a LUN or all linked LUNs select the LUN and press ENTER Select Exit to the LUN configuration menu To save the changes once you have completed all LUN configuration select Save changes and exit Figure 6 9 Un...

Страница 65: ...the Telnet Main Menu select LUN Setup Select Modify LUN s Select Select LUN Select the LUN to edit from the sub menu and press ENTER Select Assign different LUN to this LUN A sub menu displays a list of the available LUN numbers Select a LUN number and press ENTER For details see Figure 6 10 Assigning Different LUN Numbers Select Exit to the LUN configuration menu To save the changes once you have...

Страница 66: ...by clicking on the LUN graphic Click the Modify LUN button Select the size from the LUN Size scroll bar Click the OK button 6 6 2 Via Text Management From the Telnet Main Menu select LUN Setup Select Modify LUN s Select LUN See instructions in Section 6 5 Select Resize LUN Enter the new LUN size in MB and press ENTER Select Exit to the LUN configuration menu To save the changes once you have compl...

Страница 67: ...dify LUN button To add a mask enter the New Mask textbox and click the Add Mask button To delete a mask select the mask from the Masks listbox and click the Delete Mask button Click the OK button 6 7 2 Via Text Management Viewing Current Access Lists To get a list of the World Wide Name masks for the selected LUN as shown in Figure 6 11 Current Access Lists follow these steps From the Telnet Main ...

Страница 68: ...t The system only allows you to enter in hexadecimal numbers 0 F the system ignores any other keyboard input Deleting Access Lists To delete a worldwide port name from a LUN access list From the Telnet Main Menu select LUN Setup Select Modify LUN s Select LUN See instructions in Section 6 5 Select Delete WWN mask from LUN A submenu displays all masks listed Select the mask to be deleted and press ...

Страница 69: ...y LUN s Select LUN See instructions in Section 6 5 Select Set SCSI device identifier Enter a unique device identifier from 1 to 255 and press ENTER Select Exit to the LUN configuration menu To save the changes once you have completed all LUN configuration select Save changes and exit Figure 6 13 Setting SCSI Device Identifier RamSan 300 320 User s Manual 65 ...

Страница 70: ...LUNs 6 8 1 Via Web Interface To delete LUNs via the web interface Click on the Management Control Processor graphic Click on the LUN Config tab Select to LUN to delete by clicking on the LUN graphic Click the Delete LUN button Figure 6 14 Deleting LUNs via Web Interface RamSan 300 320 User s Manual 66 ...

Страница 71: ...he LUN configuration menu Figure 6 15 Deleting LUNs To verify the deletion of the LUN view the LUN Configuration menu for a total number of LUNs To save the changes once you have completed all LUN configuration select Save changes and exit 6 9 Setting backup mode The RamSan 320 allows the administrator to set backup modes for each LUN individually Warning TMS does not recommend changing backup mod...

Страница 72: ...ystem automatically optimizes this operation to backup the maximum amount of data at any given time without impacting performance This means that at any one time most of the data already resides on disk Upon emergency or shutdown the unit need only finish the backup that is already nearly completed Active Backup is an optional feature on the RamSan 320 therefore some systems may not display this o...

Страница 73: ...operational mode disables the backup functionality for the LUN making it completely volatile In the case of system shutdown or failure all data stored in the selected LUN will be lost intentionally RamSan 300 320 User s Manual 69 ...

Страница 74: ...hen more than one Fibre Channel Controller is installed the controllers can be set to back each other up The following two sections provide additional details 7 1 Changing Fibre Channel topology and link speed Via Web Interface To change the Fibre Channel topology and link speed via the web interface Click on the Fibre Channel Controller graphic Click on the Controller Setup tab Select from the To...

Страница 75: ...this menu indicates the controller s current settings To change the topology Select Change topology Choose the controller s topology from the sub menu and press ENTER To change the link speed Select Change link speed Choose the controller s link speed from the sub menu and press ENTER All modifications are visible at the top of the menu To save any changes Select Save changes and exit RamSan 300 3...

Страница 76: ...t your fibre channel administrator Important Saving changes made from this menu causes the system to reset the Fibre Channel Controller which may result in data corruption TMS does not recommend changing the controller settings while the controller is actually transferring data Note Some HBAs do not support direct attach point to point operation If you are having trouble with a direct attach conne...

Страница 77: ...ontroller s states In Figure 7 4 the selected controller is 2 and the display indicates that the controller s state is Primary Active Secondary is 3 The following list details what these states mean how a controller can end up in each state and what a controller s options are from the states Primary Active This default state is the most basic state In this state the controller is not associated wi...

Страница 78: ...the Primary Active state The controller remains in this state until the administrator configures it back to Primary Active state or until a failover occurs If a failover occurs the system copies all of the attributes of the primary controller to the secondary controller and activates its links From this state all of the secondary controller s attributes are meaningless and are not updateable until...

Страница 79: ...r backs up this secondary controller Changing this secondary controller to Primary Active state resets this controller and the primary controller In addition resetting the controller causes the system to temporarily loose the link Reads and writes occurring when the administrator resets this controller back to Primary Active state result in errors because the drives appear to have been removed TMS...

Страница 80: ...ert the replacement power supply in the RamSan chassis Make sure to insert the power supply squarely and press firmly until the power supply is fully inserted into the system Reconnect power to the new power supply The new power supply begins to operate immediately Important Replace failed power supplies as soon as possible 8 2 Hot Swapping Disk Drives The RamSan 320 includes three internal hard d...

Страница 81: ...d be perfectly safe it may affect system performance or downtime depending on the system mode as the system synchronizes the new disk drive 8 3 Batteries The RamSan 320 is equipped with three redundant 30 minute Lithium Ion batteries The batteries are designed to protect the data in SDRAM memory If the RamSan 320 looses external power the system continues to function by running on the internal bat...

Страница 82: ... in determining why a component failed and provides a timeline for the system administrator to follow Before contacting Texas Memory Systems please have a copy of this log available 9 2 Support Log The support log provides a snapshot of all current configuration settings Before contacting Texas Memory Systems please have a copy of this log available 9 3 Still Having Problems If the above steps do ...

Страница 83: ...0 lbs Voltage 90 264 VAC Ventilation Front to back airflow 10 2 Operating Environment Temperature 32 85 F 0 30 C Max relative humidity 80 non condensing Power consumption 350 W 10 3 Non operating Environment Temperature 32 150 F 0 65 C Relative Humidity 10 90 non condensing RamSan 300 320 User s Manual 79 ...

Страница 84: ...Appendix A RamSan 3xx Series Replacement Parts Figure A 1 MCP 65 Management Control Processor Figure B 2 FC 65 Dual Channel 2 Gigabit Fibre Channel Controller RamSan 300 320 User s Manual 80 ...

Страница 85: ...Figure B 3 Power Supply Module Figure A 5 16 Gigabyte Memory Blade RamSan 300 320 User s Manual 81 ...

Страница 86: ...Figure A 6 120 Gigabyte Replacement Hard Drive RamSan 300 320 User s Manual 82 ...

Страница 87: ...e with the instructions may cause harmful interference to radio communications Operation of this equipment in residential area is likely to cause harmful interference in which case the user will be required to correct interference at his own expense A Class A digital device also meets all requirements of the Canadian Interference Causing Equipment Regulations This device complies with Part 15 of t...

Страница 88: ... ten working days of receipt The customer is responsible for shipping the repaired or replaced equipment back In an emergency special arrangements may be negotiated subject to the availability of TMS resources and components Telephone and Software Support Telephone support is available for a period of five years after purchase during normal TMS business hours Firmware and software upgrades will be...

Страница 89: ...ware failure customer should call a special 800 number for 24 7 technical support 365 days a year to receive technical assistance from Texas Memory Systems technical support staff Gold Warranty also provides when necessary on site service at the customer location Monday through Friday between the customer location hours of 9 00 a m and 5 00 p m On site service is only applicable to non user replac...

Страница 90: ...y working days of receipt Customer will be charged current list prices for replacement components The customer is responsible for shipping the repaired or replaced equipment back In an emergency special arrangements may be negotiated subject to the availability of TMS resources and components Subject to availability TMS field service personnel will perform troubleshooting of equipment For customer...

Отзывы: