background image

4.1 Setup

4.1.1 Driver Installation

Download and install this driver: 

http://www.ti.com/lit/zip/sbac253

. This is a one-time step per computer. Unzip

the folder and run the .exe file with administrator privileges.

4.1.2 Firmware

The firmware comes pre-installed on the SCB. Firmware updates will be pushed through the GUI (requires
previous driver to be installed). Downloaded offline GUIs may check for GUI or Firmware updates depending on
the version.

4.1.2.1 Firmware Debug

If the firmware gets corrupted or must be manually reinstalled for any reason, follow these steps to reinstall the
firmware.
1. Configure the MCU on the SCB to be in Device Firmware Update (DFU) Mode.

a. It is possible that the MCU has already entered DFU mode. If so, the GUI will notify you and try to

update the firmware to the latest version after the GUI is connected to the PC.

b. DFU mode can be entered manually through one of the following methods while the SCB is powered on:

• Through software:

– Send the command 'bsl' on the SCB's USB Serial (COM) port.

• Though hardware (with the EVM removed):

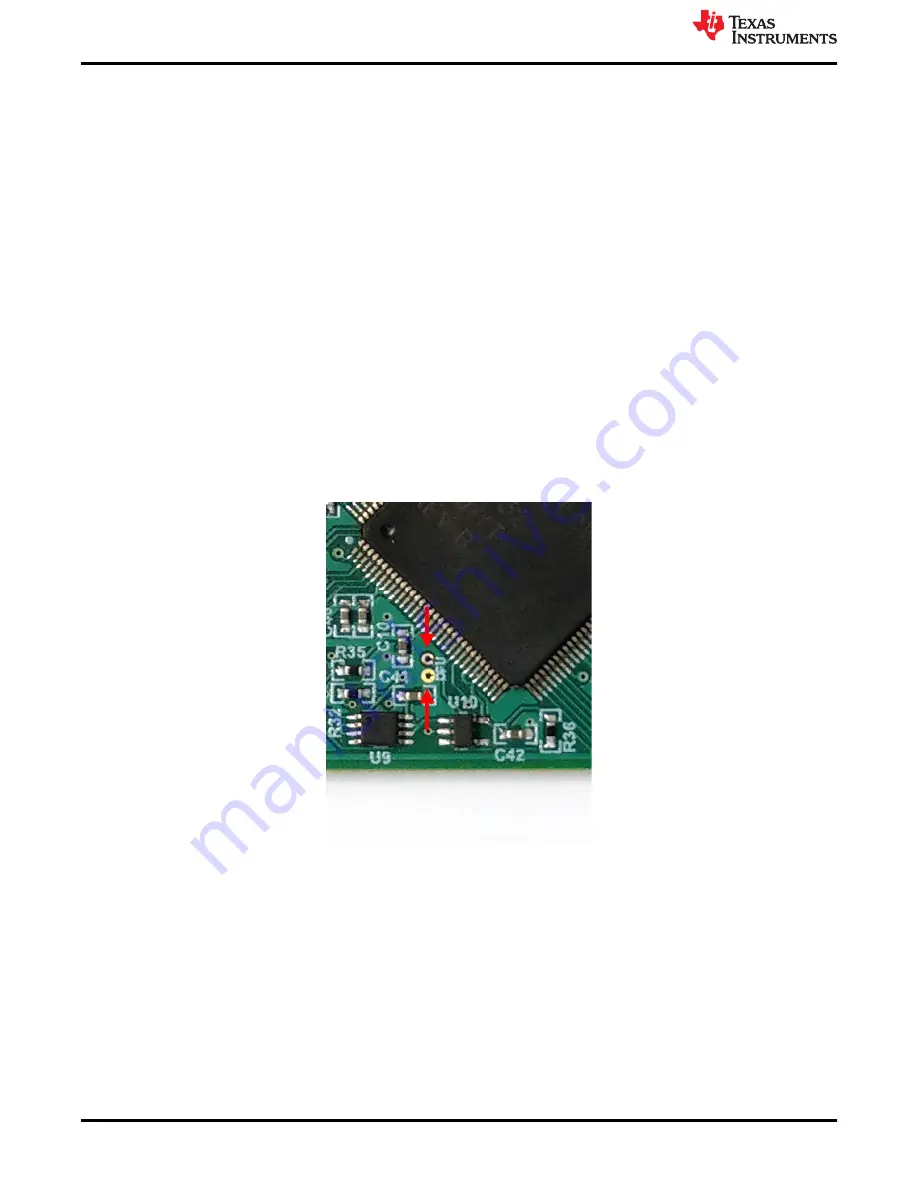
– Short the two test points labeled "DFU" (shown in 

Figure 4-2

) with a pair of tweezers (or wire)

while pressing the RESET button.

Figure 4-2. Test Points Used to Enter DFU Mode Manually

2. With the MCU in DFU mode, the firmware can now be uploaded through the method outlined in Step 1.

4.1.3 GUI Setup and Usage

Access the GUI in either the Google Chrome

®

 or Firefox

®

 browser:

• Search for 'TMAG5273EVM GUI' on 

https://dev.ti.com/gallery/

4.1.3.1 Initial Setup

To set up the GUI the first time, use the following instructions:
1. Make sure that the previously-mentioned driver was installed successfully to ensure that everything works

properly and that the GUI can update the EVM firmware, if necessary.

2. With the connected EVM and SCB unit plugged to the PC, go to the GUI link provided above.

EVM Operation

www.ti.com

6

TMAG5273 Evaluation Manual

SLYU058 – MAY 2021

Submit Document Feedback

Copyright © 2021 Texas Instruments Incorporated

Содержание TMAG5273

Страница 1: ...Bill of Materials 15 List of Figures Figure 1 1 TMAG5273 Evaluation Module 2 Figure 4 1 EVM on Sensor Control Board 5 Figure 4 2 Test Points Used to Enter DFU Mode Manually 6 Figure 4 3 GUI Composer A...

Страница 2: ...o select one of three magnetic field ranges that suits the magnet strength and component placements during system calibration Figure 1 1 illustrates the EVM Figure 1 1 TMAG5273 Evaluation Module Table...

Страница 3: ...the document PDF Table 1 3 Related Documentation DOCUMENT TITLE DOCUMENT LITERATURE NUMBER TMAG5273 data sheet SLYS045 2 Hardware The EVM is an easy to use platform for evaluating the main features an...

Страница 4: ...g a USB cable 4 Access the GUI in either the Google Chrome or Firefox browser a Search for TMAG5273EVM GUI on https dev ti com gallery 5 Apply a magnetic field to the sensor by waving one of the inclu...

Страница 5: ...the included SCB connect the EVM as shown in Figure 4 1 Figure 4 1 EVM on Sensor Control Board www ti com EVM Operation SLYU058 MAY 2021 Submit Document Feedback TMAG5273 Evaluation Manual 5 Copyright...

Страница 6: ...gh one of the following methods while the SCB is powered on Through software Send the command bsl on the SCB s USB Serial COM port Though hardware with the EVM removed Short the two test points labele...

Страница 7: ...o download the TI Cloud Agent and browser extension shown in Figure 4 4 These prompts will appear after you close the README md dialog Figure 4 4 TI Cloud Agent 4 Optionally the GUI can be downloaded...

Страница 8: ...hardware still does not connect make sure you are using the correct GUI and EVM combination 3 Click the Registers icon shown in Figure 4 7 also available on the left side menu to view the register ma...

Страница 9: ...fect device C1 and C2 are bypass capacitors that are placed near the sensor to help mitigate power supply noise and provide current quickly to the device when needed J1A and J1B are the main header pi...

Страница 10: ...e EVM schematic 3V3 SCL SDA PD4 0 1uF C2 GND VCC VCC INT SCL SDA GND 1 3 5 7 9 11 J1A NRPN062PARN RC 2 4 6 8 10 12 J1B NRPN062PARN RC 0 R1 VCC 4 INT 5 SCL 1 SDA 6 TEST 2 GND 3 TMAG5273DBV U1 INT SDA S...

Страница 11: ...Figure 6 5 show the PCB layers of the EVM Figure 6 2 Top View www ti com Schematics PCB Layout and Bill of Materials SLYU058 MAY 2021 Submit Document Feedback TMAG5273 Evaluation Manual 11 Copyright 2...

Страница 12: ...Figure 6 3 Top Layer Schematics PCB Layout and Bill of Materials www ti com 12 TMAG5273 Evaluation Manual SLYU058 MAY 2021 Submit Document Feedback Copyright 2021 Texas Instruments Incorporated...

Страница 13: ...Figure 6 4 Bottom View www ti com Schematics PCB Layout and Bill of Materials SLYU058 MAY 2021 Submit Document Feedback TMAG5273 Evaluation Manual 13 Copyright 2021 Texas Instruments Incorporated...

Страница 14: ...Figure 6 5 Bottom Layer Schematics PCB Layout and Bill of Materials www ti com 14 TMAG5273 Evaluation Manual SLYU058 MAY 2021 Submit Document Feedback Copyright 2021 Texas Instruments Incorporated...

Страница 15: ...Kitting Item 3025010 03 Cable USB A MALE to Micro B MALE 3 CDDS 6612041 6612041 Qualtek H3 1 Kitting Item D2X0 1 8 dia x 1 thick N42 magnet D2X0 K J Magnetics H4 1 Kitting Item D82DIA 1 2 dia x 1 8 t...

Страница 16: ...ther than TI b the nonconformity resulted from User s design specifications or instructions for such EVMs or improper system design or c User has not paid on time Testing and other quality control tec...

Страница 17: ...These limits are designed to provide reasonable protection against harmful interference in a residential installation This equipment generates uses and can radiate radio frequency energy and if not in...

Страница 18: ...instructions set forth by Radio Law of Japan which includes but is not limited to the instructions below with respect to EVMs which for the avoidance of doubt are stated strictly for convenience and s...

Страница 19: ...any interfaces electronic and or mechanical between the EVM and any human body are designed with suitable isolation and means to safely limit accessible leakage currents to minimize the risk of electr...

Страница 20: ...R DAMAGES ARE CLAIMED THE EXISTENCE OF MORE THAN ONE CLAIM SHALL NOT ENLARGE OR EXTEND THIS LIMIT 9 Return Policy Except as otherwise provided TI does not offer any refunds returns or exchanges Furthe...

Страница 21: ...are subject to change without notice TI grants you permission to use these resources only for development of an application that uses the TI products described in the resource Other reproduction and...

Отзывы: