Texas Instruments BUF08832 Скачать руководство пользователя страница 22

BUF08832EVM Software Overview

www.ti.com

5.2.3

Read DAC Button

By pressing the Read DAC button in the BUF08832EVM software, all of the BUF08832 DAC/V

COM

registers are read to obtain the respective current register contents. Once the read procedure is complete,
all of the corresponding text boxes are updated to show the current values present in the DAC/V

COM

registers.

5.2.4

Write DAC Button

The method used to write the values in the DAC/V

COM

registers is based on whether or not the Auto Write

feature is enabled. The BUF08832 has two methods of writing information into the DAC/V

COM

registers.

The first method allows for the output voltage to change immediately after the writing to the DAC register.
In the BUF08832EVM software, this mode is configured by enabling the Auto Write feature found in the
Buffer Menu dropdown menu. In this mode, as an individual channel is written to, the output voltage
changes as soon as the user moves to a different text box in the software. The second method of writing
to the DAC/V

COM

registers allows for the user to write multiple channels and then have all of the output

voltages change at the same time rather than each channel voltage changing as soon as it is written to.

Disabling the Auto Write feature in the software allows the user to enter all of the values desired for all of
the channels and then press the Write DAC button to change all of the output voltage of all of the
channels at one time. When the Auto Write feature is enabled, no change occurs to the output voltages
when the Write DAC button is pressed. No change occurs because after the text box for a given channel
has been updated, as soon as another item in the software is clicked, the Auto Write feature automatically
performs a write command to the updated channel that then updates the output voltage. When in the Auto
Write enabled mode, the Write DAC button cannot be pressed with different data in the corresponding
channel text boxes than the values already stored in the DAC/V

COM

register; thus, no change occurs.

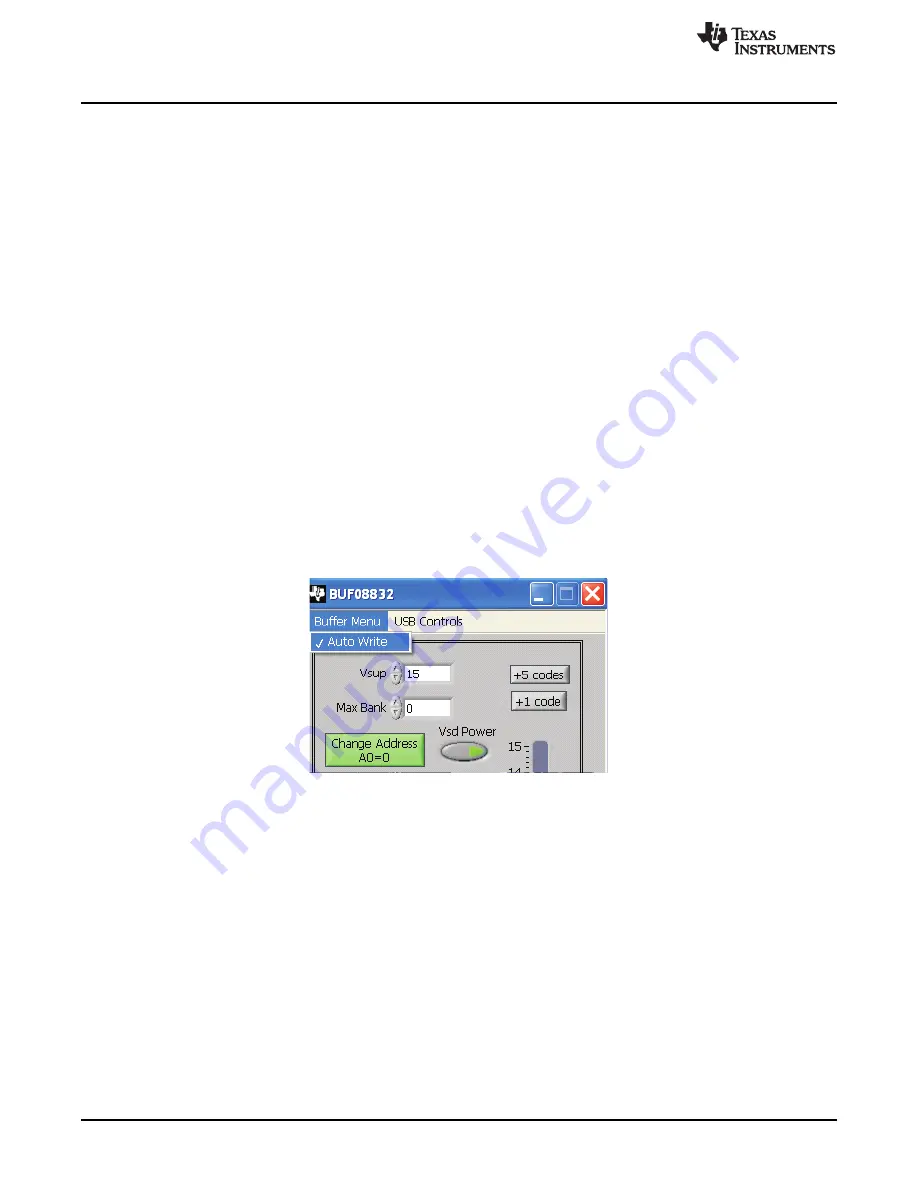
Figure 18

shows the location in the Buffer Menu showing the Auto Write feature enabled. Clicking on the

Auto Write feature again enables/disables the feature, depending on its current state.

Figure 18. Auto Write Feature Enabled

22

BUF08832EVM User Guide and Software Tutorial

SBOU081 – November 2009

Submit Documentation Feedback

Copyright © 2009, Texas Instruments Incorporated

Содержание BUF08832

Страница 1: ...EVM 9 7 Connecting the USB Cable 10 8 BUF08832EVM Default Jumper Settings 11 9 BKSEL Switch 14 10 BUF08832EVM Software Installation 16 11 BUF08832EVM Software Install Window 16 12 BUF08832EVM Softwar...

Страница 2: ...5 Pin Male DSUB on BUF08832_Test_Board 6 2 BUF08832_Test_Board Jumper Functions 12 3 USB_DIG_Platform Jumper Functions 13 26 BUF08832_Test_Board Bill of Materials 30 2 BUF08832EVM User Guide and Softw...

Страница 3: ...ation module 1 1 BUF08832EVM Kit Contents Figure 1 illustrates the hardware included with the BUF08832EVM kit Contact the Texas Instruments Product Information Center nearest you if any component is m...

Страница 4: ...972 644 5580 When ordering identify the document by both title and literature number Related Documentation Document Literature Number BUF08832 Product Data Sheet SBOS476 USB DIG Platform Users Guide...

Страница 5: ...a block diagram of the BUF08832_Test_Board The functionality of this PCB is relatively simple It provides connections to the I2 C interface and general purpose input outputs GPIO on the USB DIG Platf...

Страница 6: ...ction 10 I2 C_SDA2 No connection 11 NC No connection I2 C clock signal SCL channel 1 can be 12 I2 C_SCK_ISO disconnected using a switch I2 C data signal SDA channel 1 can be 13 I2 C_SDA_ISO disconnect...

Страница 7: ...gure 4 shows the block diagram for the USB DIG Platform This platform is a general purpose data acquisition system that is used on several different Texas Instruments evaluation modules The details of...

Страница 8: ...bserve proper ESD handling precautions when unpacking and handling the EVM including the use of a grounded wrist strap at an approved ESD workstation 3 2 Typical Hardware Connections To set up the BUF...

Страница 9: ...4 Connecting Power After the two parts of the BUF08832EVM are connected as Figure 6 shows connect the power to the EVM Always connect power before connecting the USB cable If you connect the USB cable...

Страница 10: ...und New Hardware USB Human Interface Device This pop up indicates that the device is ready to be used The USB DIG Platform uses the human interface device drivers that are part of the Microsoft Window...

Страница 11: ...rough 5 on the BUF08832_Test_Board are all typically set to the same position When set to the INT position the signals for digital supply bank select and the digital communication lines are generated...

Страница 12: ...IG_Platform or whether JMP3 INT digital supply pin is connected to terminal T1 allowing for an external supply to power the digital circuitry The default INT position connects the VSD pin to the VDUT...

Страница 13: ...he only reason to change from the default setting is if multiple boards are being used This jumper selects the voltage of the device under test supply VDUT 5V or 3V This jumper is JUMP9 5V typically t...

Страница 14: ...her Bank 0 or Bank 1 OTP is selected The EXT position for JMP2 allows for an external control signal connected to terminal T3 to determine the selection of which OTP bank to be used 3 7 4 JMP3 VSD Con...

Страница 15: ...ation should be populated at a time The use of both locations simultaneously will likely damage one or both of the devices being tested 3 7 8 Terminal Strip T5 Terminal strip T5 provides the individua...

Страница 16: ...rt the installation process as shown in Figure 10 Figure 10 BUF08832EVM Software Installation The BUF08832 software installer file then opens to begin the installation process as Figure 11 shows Figur...

Страница 17: ...button to complete the installation procedure 4 3 Software Description and Set Up The BUF08832EVM software allows the user to read and write to all registers in the BUF08832 gamma correction buffer Fu...

Страница 18: ...From Start select All Programs then select the BUF08832EVM program Figure 13 shows how the software should appear if the EVM is functioning properly Figure 13 BUF08832EVM Software Functioning Properl...

Страница 19: ...ason for this problem is that there may be a problem with your computer USB human interface device driver Make sure that when you plug the in the USB cable the computer recognizes the device If the so...

Страница 20: ...tween the BUF08832EVM and the software Without jumper JMP1 and the software address button configured correctly the software will not be able to communicate with the BUF08832 device Figure 15 BUF08832...

Страница 21: ...hown in Figure 17 Figure 17 Measuring and Entering Power Supply Voltage The voltage out of each DAC is calculated according to the VS value entered For example changing the value in the channel 6 cell...

Страница 22: ...e output voltages change at the same time rather than each channel voltage changing as soon as it is written to Disabling the Auto Write feature in the software allows the user to enter all of the val...

Страница 23: ...boxes to the respective current corresponding values 5 2 6 Save to File Button The register configurations of the BUF08832 DACs are displayed in both analog voltage and in hexadecimal see Figure 13 T...

Страница 24: ...ad data saved from previous evaluations A saved register configuration can be loaded into the BUF08832 using the Load From File button as shown in Figure 21 The program remembers where you saved the l...

Страница 25: ...Code buttons on the main software window These buttons allow for fine and coarse adjustments respectively to the highlighted channel giving the user the ability to quickly step the channel output up...

Страница 26: ...ired channel output The DAC code and corresponding output value of each channel change automatically This function is similar to the slider present on the primary BUF08832EVM software window that chan...

Страница 27: ...atile memory in the BUF08832 All eight channels including the VCOM channels are then programmed simultaneously The values are stored in the memory bank that is selected via the BKSEL switch see Sectio...

Страница 28: ...ows 1 Three times Max bank shows 2 16 times Max bank shows 15 Figure 25 Max Bank Field 6 BUF08832EVM Documentation This section contains the complete bill of materials and schematic diagram for the BU...

Страница 29: ...BKSEL 12 Vs2 19 OUT1 3 OUT2 4 OUT3 5 OUT4 6 OUT5 15 OUT6 16 OUT7 17 OUT8 18 Vcom 1 Vcom_fb 20 U2 BUF08832 C8 0 1uF Vs C7 0 1uF 1 2 T1 T_STRIP2 GND Vsd C9 4 7uF C10 1uF Vsd 1 2 3 JMP3 Vdut Ext Int Vsd...

Страница 30: ...ts SN74LVC1G17DBVR SOT235 CONN D SUB PLUG R A 25POS 11 1 DSUB25M J1 30GOLD With Threaded Inserts AMP Tyco Electronics 5747842 4 and Board locks SWITCH TOGGLE SPDT 4VA PC 12 1 S1 E Switch 200AWMSP1T1A1...

Страница 31: ...ation about temperatures and voltages For additional information on TI s environmental and or safety programs please contact the TI application engineer or visit www ti com esh No license is granted u...

Страница 32: ...ce TI is not responsible or liable for any such statements TI products are not authorized for use in safety critical applications such as life support where a failure of the TI product would reasonabl...

Отзывы: