background image

3 Battery Management Studio Software

The Battery Management Studio software is used for evaluation of the BQ769x2 monitor. It is also identified as
BQStudio for a compact name. If an earlier version of the BQStudio software is already installed from another
product evaluation, it should still be installed again to load the configuration files and tools specific to the current
version of the BQ76952.

3.1 System Requirements

The BQStudio software requires a Windows 7, or later, operating system. Additional items are required and are
described in the installation windows.

3.2 Installing BQStudio

Find the latest software version in the software section of the product folder 

http://www.ti.com/tool/BQSTUDIO

 or

search from 

ti.com

. There are multiple versions available and the BQSTUDIO-TEST version should be used with

the BQ76952 EVM. Check periodically for software updates. Use the following steps to install the BQStudio
software:

1. Uninstall older versions of BQStudio software. After uninstalling, delete the BatteryManagmentStudio

program directory.

2. Copy the archive file to a directory of your choice, extract all files and run the 

Battery Management Studio-

xxxxxx-Setup.exe

 application.

3. Follow the instructions and make selections as required on the setup windows selecting 

Next

, as required. TI

recommends installing the software in the default location.

4. On the last window select option check-boxes desired and 

Finish

 to complete the BQStudio software

installation.

3.3 BQ769x2 bqz File Installation

The BQStudio software uses a bqz file to configure the displays for the BQ769x2 device family or specific family
device. This is normally provided in the BQStudio installation. If provided separately, copy the .bqz file to the
config directory in the installation, typically C:\ti\BatteryManagementStudio\config.

3.4 BQStudio Operation and Registers View

BQStudio is used to communicate to the BQ769x2 for evaluation. It includes several tools to aid in configuration,
calibration and data display of the BQ769x2 during evaluation.

Although the software runs without connection to an interface board or powered device, it is recommended to
have both connected and the device on when starting the software. Follow the directions in the 

Quick Start

section. 

Figure 2-1

 shows typical connections for operation with the BQStudio software.

Start the software from the desktop shortcut 

Battery Management Studio

 or the from the Start menu.

When started, the software looks for the communication interface and the device. If the device is not found, it
opens a Target Selection Wizard. On the first window select the Monitor or All class and click the 

Next

 button. On

the second window select the newest or appropriate BQ769x2 version in the list and click the 

Finish

 button. This

selection will be remembered until the software is re-stared. If the device is not found, the user will be presented
with a 

Proceed?

 window which must be acknowledged. If the software still can not find the device, a 

Battery

Management Studio

 popup window appears indicating communication status. Acknowledge the message to

proceed.

www.ti.com

Battery Management Studio Software

SLUUC33A – NOVEMBER 2019 – REVISED OCTOBER 2020

Submit Document Feedback

BQ76952 Evaluation Module

7

Copyright © 2020 Texas Instruments Incorporated

Содержание BQ76952EVM

Страница 1: ... accuracy perform calibration adjust protection limits and enable FET control outputs space Table of Contents 1 Features 3 1 1 Kit Contents 3 1 2 Ordering Information 3 1 3 BQ76952 Circuit Module Performance Specification Summary 3 1 4 Required Equipment 3 2 BQ76952 EVM Quick Start Guide 4 2 1 Before You Begin 4 2 2 Quick Start 5 3 Battery Management Studio Software 7 3 1 System Requirements 7 3 2...

Страница 2: ... Example Connection with 15 Cells 21 Figure 4 6 Host Connection Concept 22 Figure 5 1 Top Silk Screen 24 Figure 5 2 Top Assembly 25 Figure 5 3 Top Layer 26 Figure 5 4 Layer 2 27 Figure 5 5 Layer 3 28 Figure 5 6 Bottom Layer 29 Figure 5 7 Bottom Silk Screen 30 Figure 5 8 Bottom Assembly 31 Figure 5 9 Schematic Diagram Monitor 41 Figure 5 10 Schematic Diagram Pin Configuration 42 Figure 5 11 Schemat...

Страница 3: ...odule Performance Specification Summary This section summarizes the performance specifications of the BQ76952 circuit module in its default 16 cell series FET configuration Typical voltage depends on the number of cells configured Typical current depends on the application Board cooling may be required for continuous operation at or below maximum current Table 1 2 Performance Specification Summary...

Страница 4: ...it current for safe operation CAUTION The circuit module has signal traces components and component leads on the bottom of the board This may result in exposed voltages hot surfaces or sharp edges Do not reach under the board during operation CAUTION The circuit module may be damaged by over temperature To avoid damage monitor the temperature during evaluation and provide cooling as needed for you...

Страница 5: ...minals and adjust to approximately 48 V 7 Press and release the WAKE switch 8 Start the BQStudio software The GUI should open with a register display Click on the Scan button to enable repeated update of the display The power supply may be adjusted within range of the part to observe voltage changes in the GUI register display 9 Select the Data Memory button in the BQStudio window 10 Select the Se...

Страница 6: ...shunts to uC_SCL and uC_SDA Figure 2 1 EVM Connection for Basic Operation BQ76952 EVM Quick Start Guide www ti com 6 BQ76952 Evaluation Module SLUUC33A NOVEMBER 2019 REVISED OCTOBER 2020 Submit Document Feedback Copyright 2020 Texas Instruments Incorporated ...

Страница 7: ...ile to configure the displays for the BQ769x2 device family or specific family device This is normally provided in the BQStudio installation If provided separately copy the bqz file to the config directory in the installation typically C ti BatteryManagementStudio config 3 4 BQStudio Operation and Registers View BQStudio is used to communicate to the BQ769x2 for evaluation It includes several tool...

Страница 8: ...r to the menu selection Help Help Contents for information The BQStudio window appears as shown in Figure 3 2 The register area is blank since the device is not attached The center pane of BQStudio displays tool tips when the cursor is held over an item name The tool tip provides some description of the item The tool tip closes after approximately 30 seconds To avoid the tool tip display move the ...

Страница 9: ...play shows device status registers and is read once when the device is detected To update the register values select the Refresh button at the top of the Registers tab To repeatedly read the registers select the Scan button To repeatedly read and log the register values to a file select the Start Log button and follow the prompts to save a log file When a log is running select Stop Log to end the ...

Страница 10: ... sections Not all devices have all the tools described Multiple tools can be active at one time tools which use the center pane for display are shown as a tabs at the top of the center section These tabs can be closed with the X as desired but closing the tab may terminate the operation running in the tab Figure 3 4 Tool Selections Battery Management Studio Software www ti com 10 BQ76952 Evaluatio...

Страница 11: ...view with a device connected Configuration settings are grouped into different functions accessed with buttons on the left side of the pane The Calibration section is displayed on initial selection Other functional sections can be displayed by clicking on the named button Figure 3 5 Data Memory View 3 6 1 Entering Saving and Loading Configuration Most of the configuration of the BQ769x2 is accompl...

Страница 12: ...rd inoperable Writes to OTP are not incremental all OTP is written at the same time Once the configuration and calibration has been determined and loaded in the registers it may be programmed to the BQ76952 OTP memory using the Program OTP button at the top of the pane Note that this is a permanent programming and is not reversible There are 2 writes possible if the device has been programmed once...

Страница 13: ...ution This may result in an apparent error at higher currents Calibration at higher currents will reduce this effect and should be done where it is important Voltages and temperatures may be calibrated individually or as a group All values entered will be calibrated If individual values are to be calibrated leave all the other entries blank As an example measure the battery voltage calculate the a...

Страница 14: ... 8 Calibration View Battery Management Studio Software www ti com 14 BQ76952 Evaluation Module SLUUC33A NOVEMBER 2019 REVISED OCTOBER 2020 Submit Document Feedback Copyright 2020 Texas Instruments Incorporated ...

Страница 15: ... 3 11 The Device Send and Receive section allows read or write to a single or consecutive locations The Command Sequence section allows reads and writes to be intermixed in a sequence Sequences may be stored to files or called from files Files may be assigned to buttons in the Command Sequence File Assignment Buttons section Results can be viewed in the Transaction Log and saved to a file if desir...

Страница 16: ... Command Sequence View Battery Management Studio Software www ti com 16 BQ76952 Evaluation Module SLUUC33A NOVEMBER 2019 REVISED OCTOBER 2020 Submit Document Feedback Copyright 2020 Texas Instruments Incorporated ...

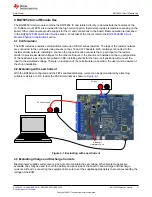
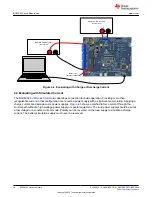
Страница 17: ...the top cell position of the header all lower inputs are pulled to VSS Installing shunts for the lower cell positions will connect the input to the simulated voltage There is no indication of the cell simulator connection the user must be aware of the shunt installation 4 2 Evaluating with Load Current With the BQ769x2 configured and the FETs enabled discharge current can be demonstrated by attach...

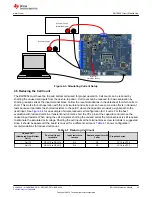
Страница 18: ...ower rating Applying a charge current can damage some power supplies Figure 4 3 shows a method to force current through the control path without a high wattage power supply or special equipment The load power supply should be set at a low voltage in a constant current mode Polarity can be reversed on the load supply to simulate a charge current The battery simulation supply must never be reversed ...

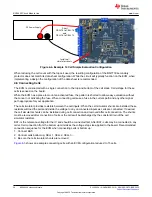
Страница 19: ...guration for 14 cells For the best evaluation with reduced cells in a transient environment short the VCx pins at the capacitor and remove the unused input resistor When using the cell simulator shorting the unused cell at the terminal block is still required to eliminate the simulated cell voltage Shorting the cell inputs at the terminal block screw terminals is suggested since it should be appar...

Страница 20: ...rs between the cell inputs When the cell simulator shunts are installed these resistors will load the cells and divide the voltage to any unconnected inputs as cells are connected If desired the cell simulator shunts can be installed during cell connection and removed after cell connection The shunts must be removed after connection of cells or the cells will be discharged by the constant drain of...

Страница 21: ... shown in Figure 4 6 the MCU runs from the battery voltage inside the protection FETs If the MCU board provides pull ups for the I2C lines remove the PU shunts from J15 and J18 Alternately the microcontroller board GND could be referenced to the PACK at J17 In this case the REG1 power supply would be modulated by the battery current Since the sense resistor is small this is not normally a concern ...

Страница 22: ... The cell simulator headers and I2C configuration are discussed with board connection diagrams J6 and J11 select the connection of the DFETOFF and CFETOFF pins Pins may be pulled low or high to REG1 J7 selects the connection of TS2 It may be taken to a terminal block for connection of an external wake or thermistor It may also be pulled to VSS The 10k R29 simulates a nominal temperature J20 and J2...

Страница 23: ...re configuration changes and could result in damage The user should check settings or replace the IC or EVM as required CAUTION Hardware changes after OTP programming may result in damage to the IC or board after reset if incompatible configuration is selected Changing the Communcation Mode The BQ76952 device and EVM support SPI and HDQ protocols in addition to I2C Changing the communication proto...

Страница 24: ...ted in the right lower corner Configuration headers are toward the right side of the board Pushbutton switches for wake up and reset of the BQ76952 are located near the bottom edge of the board The EVM layout and construction allows easy understanding of the connections and access to the test points for evaluation but the connector area and programming features result in a large board The board la...

Страница 25: ...op Assembly www ti com BQ76952EVM Circuit Module Physical Construction SLUUC33A NOVEMBER 2019 REVISED OCTOBER 2020 Submit Document Feedback BQ76952 Evaluation Module 25 Copyright 2020 Texas Instruments Incorporated ...

Страница 26: ...Top Layer BQ76952EVM Circuit Module Physical Construction www ti com 26 BQ76952 Evaluation Module SLUUC33A NOVEMBER 2019 REVISED OCTOBER 2020 Submit Document Feedback Copyright 2020 Texas Instruments Incorporated ...

Страница 27: ... Layer 2 www ti com BQ76952EVM Circuit Module Physical Construction SLUUC33A NOVEMBER 2019 REVISED OCTOBER 2020 Submit Document Feedback BQ76952 Evaluation Module 27 Copyright 2020 Texas Instruments Incorporated ...

Страница 28: ... Layer 3 BQ76952EVM Circuit Module Physical Construction www ti com 28 BQ76952 Evaluation Module SLUUC33A NOVEMBER 2019 REVISED OCTOBER 2020 Submit Document Feedback Copyright 2020 Texas Instruments Incorporated ...

Страница 29: ...ottom Layer www ti com BQ76952EVM Circuit Module Physical Construction SLUUC33A NOVEMBER 2019 REVISED OCTOBER 2020 Submit Document Feedback BQ76952 Evaluation Module 29 Copyright 2020 Texas Instruments Incorporated ...

Страница 30: ...om Silk Screen BQ76952EVM Circuit Module Physical Construction www ti com 30 BQ76952 Evaluation Module SLUUC33A NOVEMBER 2019 REVISED OCTOBER 2020 Submit Document Feedback Copyright 2020 Texas Instruments Incorporated ...

Страница 31: ...tom Assembly www ti com BQ76952EVM Circuit Module Physical Construction SLUUC33A NOVEMBER 2019 REVISED OCTOBER 2020 Submit Document Feedback BQ76952 Evaluation Module 31 Copyright 2020 Texas Instruments Incorporated ...

Страница 32: ...P CERM 1 uF 16 V 10 X7R 0805 805 EMK212B7105KG T Taiyo Yuden C13 1 0 022uF CAP CERM 0 022 uF 16 V 10 X7R 0603 603 C0603C223K4RACTU Kemet C20 1 0 01uF CAP CERM 0 01 uF 16 V 10 X7R 0603 603 8 85012E 11 Wurth Elektronik C25 1 2 2uF CAP CERM 2 2 uF 16 V 10 X7R 0805 805 EMK212B7225KG T Taiyo Yuden C27 1 100pF CAP CERM 100 pF 50 V 5 C0G NP0 0603 603 C0603C101J5GACTU Kemet C28 C31 C32 C33 C35 C39 C40 C41...

Страница 33: ...00 Wurth Elektronik H1 H2 H3 H4 4 Bumpon Hemisphere 0 44 X 0 20 Clear Transparent Bumpon SJ 5303 CLEAR 3M J1 J4 2 TERM BLOCK 3 5MM VERT 6POS PCB HDR6 OSTTE060161 On Shore Technology J2 J22 2 Header 2 54mm 5x1 Tin TH Header 2 54mm 5x1 TH PEC05SAAN Sullins Connector Solutions J3 1 TERM BLOCK 3 5MM VERT 5POS PCB HDR5 OSTTE050161 On Shore Technology J5 1 Header 100mil 6x1 Tin TH TH 6 Leads Body 608x10...

Страница 34: ...0N15NS5ATMA1 Infineon Technologies Q10 1 60V MOSFET N CH 60 V 0 31 A SOT 323 SOT 323 2N7002KW Fairchild Semiconductor Q12 1 150V MOSFET N CH 150 V 3 A PowerPAK SO 8 PowerPAK SO 8 SI7898DP E3 Vishay Siliconix R1 R27 R28 R31 R41 R67 R81 7 100 RES 100 5 0 1 W AEC Q200 Grade 0 0603 603 CRCW0603100RJNEA Vishay Dale R2 R3 R4 R7 R8 R11 R12 R13 R14 R16 R17 R18 R19 R21 R22 R23 R24 17 20 RES 20 0 1 0 25 W A...

Страница 35: ...603 CRCW06035K10JNEA Vishay Dale R60 1 62k RES 62 k 5 0 1 W 0603 603 RC0603JR 0762KL Yageo R64 R68 R73 R74 R76 R77 6 5 1k RES 5 1 k 5 0 25 W AEC Q200 Grade 0 1206 1206 CRCW12065K10JNEA Vishay Dale R65 1 7 5k RES 7 5 k 5 0 1 W AEC Q200 Grade 0 0603 603 CRCW06037K50JNEA Vishay Dale R80 1 27k RES 27 k 5 0 1 W AEC Q200 Grade 0 0603 603 CRCW060327K0JNEA Vishay Dale R87 R88 R90 R93 R95 R96 R98 R100 R101...

Страница 36: ...k Compact Testpoint 5006 Keystone U1 1 Multicell Battery Monitor and Protection Family PFB0048A TQFP 48 PFB0048A bq76952PFBT Texas Instruments U2 U3 U4 U5 4 Family 2 5S Overvoltage Protector with Internal Delay Timer DPJ0008A WSON 8 DPJ0008A BQ771807DPJR Texas Instruments U6 U7 U8 U9 4 Single Channel ESD in 0402 Package With 10pF Capacitance and 6V Breakdown DPY0002A X1SON 2 DPY0002A TPD1E10B06DPY...

Страница 37: ...7 F Diodes Inc F1 0 Fuse 30 A 62 VDC SMD 9 5x2x5mm SFK 3030 Dexerials Corporation FID1 FID2 FID3 FID4 FID5 FID6 0 Fiducial mark There is nothing to buy or mount N A N A N A J8 0 Terminal Block 3 5mm Pitch 2x1 TH 7 0x8 2x6 5mm ED555 2DS On Shore Technology J24 0 Header 2 54 mm 7x1 Gold TH Header 2 54 mm 7x1 TH PBC07SAAN Sullins Connector Solutions J25 0 Header 2 54 mm 11x1 Gold TH Header 2 54 mm 11...

Страница 38: ... 0 RES 0 5 2 W 2512 WIDE 2512 WIDE RCL12250000Z0EG Vishay Draloric R55 0 51 RES 51 5 0 1 W AEC Q200 Grade 0 0603 603 CRCW060351R0JNEA Vishay Dale R70 R71 0 5 1k RES 5 1 k 5 0 25 W AEC Q200 Grade 0 1206 1206 CRCW12065K10JNEA Vishay Dale TP1 0 Test Point Multipurpose Red TH Red Multipurpose Testpoint 5010 Keystone TP9 0 Test Point Multipurpose Black TH Black Multipurpose Testpoint 5011 Keystone TP43...

Страница 39: ...ts do not exceed 1 ton per year The SVHC s are Table 5 2 REACH Components Component Manufacturer Component part number SVHC Substance SVHC CAS when available Murata Resonator CSTCR4M00G55B R0 Lead Titanium Zirconium Oxide Pbx Tiy Zrz 03 12626 81 2 www ti com BQ76952EVM Circuit Module Physical Construction SLUUC33A NOVEMBER 2019 REVISED OCTOBER 2020 Submit Document Feedback BQ76952 Evaluation Modul...

Страница 40: ...ure 5 12 illustrate the schematics BQ76952EVM Circuit Module Physical Construction www ti com 40 BQ76952 Evaluation Module SLUUC33A NOVEMBER 2019 REVISED OCTOBER 2020 Submit Document Feedback Copyright 2020 Texas Instruments Incorporated ...

Страница 41: ...FBT U1 VC14 VC13 VC12 VC11 VC10 VC9 VC8 VC15 VC16 20 0 R16 20 0 R14 20 0 R17 20 0 R18 20 0 R19 20 0 R21 20 0 R22 20 0 R23 20 0 R24 13P 12P 11P 15P 14P 16P 9P 8P 10P 8P 9P 10P 11P 12P 13P 14P 15P 16P t RT2 VSS VSS TP8 REG2 VSS CFETOFF HDQ ALERT SDA SCL TS2 REGIN REG1 VSS VSS REG1 DFETOFF DDSG DCHG VSS VSS DDSG DCHG DFETOFF EXTTS2 1 2 3 J6 10k R25 REG1 VSS TP1 DNP TP9 DNP RST_SHUT 5 4 1 2 3 6 J5 EXT...

Страница 42: ...U8 U7 U6 PGND Multi function Pins for External Communication CFETOFF SPI_CS HDQ SPI_MOSI SDA SPI_MISO SCL SPI_SCLK ALERT HDQ 1 2 3 J11 REG1 10k R94 10k R97 REG1 REG1 10k R92 1 2 J12 REG1 10k R89 VSS 1 2 J15 1 2 J18 1 2 J20 10k R99 REG1 TP37 TP38 TP39 TP40 TP41 uC_SPI_CS 1 2 3 J13 uC_SPI_MOSI uC_HDQ uC_SPI_MISO_A uC_SDA uC_SPI_CLK uC_SCL uC_HDQ Pull up pull down selection uController interface type...

Страница 43: ...49 1 0k R37 1 0k R32 1 0k R36 1 0k R34 11P 10P 9P 12P 15P 14P 13P 16P 100 R41 100 R31 20k R58 20k R38 4 7 8 1 2 3 5 6 Q7 DNP 4 7 8 1 2 3 5 6 Q8 4 7 8 1 2 3 5 6 Q9 10M R52 BAT 13V 27V 2 4 cells VOUT 13V 47V 2 8 cells VOUT 13V 67V 2 12 cells VOUT 7 5k R45 4 7 8 1 2 3 5 6 Q12 SI7898DP E3 4 7 8 1 2 3 5 6 Q3 DNP 0 1uF C32 0 1uF C29 DNP 0 1uF C30 DNP 0 1uF C37 0 1uF C38 0 1uF C34 DNP 0 1uF C36 DNP 0 1uF...

Страница 44: ... P4 3 PM_UCB1CLK PM_UCA1STE 48 DVSS2 49 DVCC2 50 P4 4 PM_UCA1TXD PM_UCA1SIMO 51 P4 5 PM_UCA1RXD PM_UCA1SOMI 52 P4 6 PM_NONE 53 P4 7 PM_NONE 54 P5 6 TB0 0 55 P5 7 TB0 1 56 P7 4 TB0 2 57 P7 5 TB0 3 58 P7 6 TB0 4 59 P7 7 TB0CLK MCLK 60 VSSU 61 PU 0 DP 62 PUR 63 PU 1 DM 64 VBUS 65 VUSB 66 V18 67 AVSS2 68 P5 2 XT2IN 69 P5 3 XT2OUT 70 TEST SBWTCK 71 PJ 0 TDO 72 PJ 1 TDI TCLK 73 PJ 2 TMS 74 PJ 3 TCK 75 R...

Страница 45: ...n of BQ76942 BQ76952 Battery Monitors Texas Instruments BQ76942 BQ76952 Software Development Guide Texas Instruments BQ7718 Overvoltage Protection for 2 to 5 Series Cell Li Ion Batt w Int Delay Timer data sheet www ti com Related Documents from Texas Instruments SLUUC33A NOVEMBER 2019 REVISED OCTOBER 2020 Submit Document Feedback BQ76952 Evaluation Module 45 Copyright 2020 Texas Instruments Incorp...

Страница 46: ...other than TI b the nonconformity resulted from User s design specifications or instructions for such EVMs or improper system design or c User has not paid on time Testing and other quality control techniques are used to the extent TI deems necessary TI does not test all parameters of each EVM User s claims against TI under this Section 2 are void if User fails to notify TI of any apparent defects...

Страница 47: ... These limits are designed to provide reasonable protection against harmful interference in a residential installation This equipment generates uses and can radiate radio frequency energy and if not installed and used in accordance with the instructions may cause harmful interference to radio communications However there is no guarantee that interference will not occur in a particular installation...

Страница 48: ...y for convenience and should be verified by User 1 Use EVMs in a shielded room or any other test facility as defined in the notification 173 issued by Ministry of Internal Affairs and Communications on March 28 2006 based on Sub section 1 1 of Article 6 of the Ministry s Rule for Enforcement of Radio Law of Japan 2 Use EVMs only after User obtains the license of Test Radio Station as provided in R...

Страница 49: ... any interfaces electronic and or mechanical between the EVM and any human body are designed with suitable isolation and means to safely limit accessible leakage currents to minimize the risk of electrical shock hazard User assumes all responsibility and liability for any improper or unsafe handling or use of the EVM by User or its employees affiliates contractors or designees 4 4 User assumes all...

Страница 50: ...OR DAMAGES ARE CLAIMED THE EXISTENCE OF MORE THAN ONE CLAIM SHALL NOT ENLARGE OR EXTEND THIS LIMIT 9 Return Policy Except as otherwise provided TI does not offer any refunds returns or exchanges Furthermore no return of EVM s will be accepted if the package has been opened and no return of the EVM s will be accepted if they are damaged or otherwise not in a resalable condition If User feels it has...

Страница 51: ...se resources are subject to change without notice TI grants you permission to use these resources only for development of an application that uses the TI products described in the resource Other reproduction and display of these resources is prohibited No license is granted to any other TI intellectual property right or to any third party intellectual property right TI disclaims responsibility for...

Отзывы: