

31
Where to lubricate
Lubricate the areas shown with engine oil.
Apply grease with a brush to the areas shown.
NOTE: Apply grease to the steering gear assembly.
CAUTION:
If the unit is operated in dry areas that have
sand, use a dry graphite spray to lubricate the unit.
(Illustration 26)
HOW TO CHECK THE FUEL FILTER
NOTE: Before you replace the fuel filter or the fuel
line, the fuel tank must be empty.
If the
fuel filter
is dirty, the engine will run rough and have
less performance.
Remove the old filter (
Illustration 21
). Replace the old
filter with a new filter. Use an original equipment part. See
an authorized service dealer in your area.
CHECK THE TIRES
Check the air pressure in the tires. Tires with too much air
pressure will cause the unit to ride rough. Also, the wrong
air pressure will keep the mower housing from cutting
level.
The correct air pressure is 14 PSI (1 BAR).
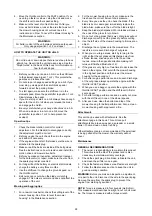
HOW TO LEVEL THE MOWER HOUSING
If the mower housing is level, the blade will cut easier and
the lawn will look better.
WARNING:
Before you make an inspection, adjustment, or repair to
the unit, disconnect the wire to the spark plug. Remove
the spark plug wire to prevent the engine from starting by
accident.
1. Make sure the unit is on a hard flat surface.
2. Check the air pressure in the tires. If the air pressure
is incorrect, the mower housing will not cut level.
Make sure the tires are inflated to 14 PSI. (1 BAR).
3. Open the cover (see Illustration 28 A).
4. Move the lift lever to the LEVEL ADJUSTMENT
position (Illustration 28 A).
5. Loosen the front and rear adjuster knobs (see
Illustration 28 A and Illustration 28 B).
Make sure both sides of the mower housing are
setting on a flat surface. Also, make sure the lift links
and adjuster plates are loose and can easily move up
or down.
6. Tighten the front and rear adjuster knobs. Make sure
the adjuster knobs are tight. If necessary, use a
wrench to tighten the adjuster knobs. For plastic
adjuster knobs, tighten to a torque of 7 foot pounds
(9,5 N-m). For metal adjuster knobs, tighten to a
torque of 10 foot pounds (13,5 N-m).
7. Raise the lift lever from the LEVEL ADJUSTMENT
position to a CUTTING HEIGHT position (see
Illustration 28 C).
8. Close the cover.
9. Mow for a short distance. If the height of cut is not
level, repeat the above steps.
CAUTION:
Do not operate with the mower housing in the
LEVEL ADJUSTMENT position. If you operate in the
LEVEL ADJUSTMENT position, the mower housing and
blades can be damaged.
Mower housing
HOW TO REMOVE THE MOWER HOUSING
1. Move the blade rotation control to the DISENGAGE
position.
2. Move the lift lever to the level adjustment position
(Illustration 29 B).
NOTE: Make sure the lift lever is locked in the LEVEL
ADJUSTMENT position.
3. Remove the hair pins and the washers from the rear
suspension arms (Illustration 27). See illustrations “C”
and “D”.
4. Remove the hair pins and washers from the
suspension links. See illustrations “A” and “B”.
5. Disconnect the extension spring from the blade
control rod. See illustration “E”.
6. Disconnect the front hanger from the frame support.
See illustration “F”.
7. Remove the mower drive belt from the stack pulley.
See illustration “G”.
8. Pull the mower housing away from the right side of
the unit.
9. To operate without the mower housing, move the lift
lever to the TOP position.
HOW TO INSTALL THE MOWER HOUSING
(Illustration 27)
1. Push the mower housing under the right side of the
unit.
2. Put the mower drive belt around the stack pulley.
Make sure the “V” side of the mower drive belt is
against the stack pulley. Also, make sure the mower
drive belt is not twisted.
3. Attach the front hanger to the frame support with the
hanger rod. Fasten with the fasteners as shown. See
illustration “F”.
4. Make sure the mower drive belt is between the stack
pulley and the two belt guides. See illustration “G”.
5. Attach the suspension links to the lifter assembly.
Fasten with the washers and hair pins. See
illustrations “A” and “B”.
6. Attach the rear suspension arms to the suspension
brackets. Fasten with the washers and hair pins. See
illustrations “C” and “D”.
7. Attach the extension spring to the blade control rod.
See illustration “E”.
8. Move the blade rotation control to the ENGAGE
position. Make sure the mower drive belt is inside all
the belt guides and is also below the spacer tube.
9. Make sure the mower housing is level. See the
instructions on “How to level the mower housing”.
10. Check the operation of the blade rotation control. See
the instructions on “How to adjust the blade rotation
control”.
Содержание 7600E
Страница 2: ...2 Illustrationer Illustrations Abbildungen Illustrationer Illustrations Abbildungen 1 2 ...
Страница 3: ...3 3 4 ...
Страница 4: ...4 5 6 7 8 9 ...
Страница 5: ...5 10 11 12 ...
Страница 6: ...6 13 A B C 14 15 16 ...
Страница 7: ...7 17 18 19 20 21 22 23 24 ...
Страница 8: ...8 25 26 ...
Страница 9: ...9 27 28 A B C 29 B ...
Страница 10: ...10 30 31 32 ...