background image


GB Original instructions 

 
Safety ...........................................................................  5


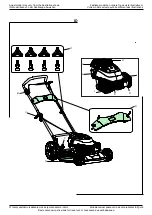
Identification of the parts .............................................. 6


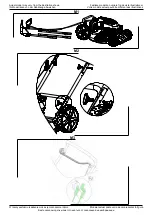
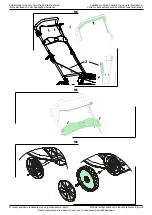
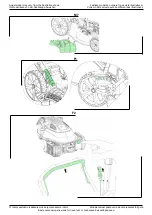
Mounting ...................................................................... 6


Cable Adjustment .........................................................  6


Operation ..................................................................... 6


Water nozzle ................................................................ 7


Oil change ....................................................................  7


Air Filter ........................................................................  7


Blade ............................................................................  7


Spark plug ....................................................................  7


Storage and maintenance ............................................ 8


Warranty terms and conditions ..................................... 8


Technical specifications ............................................. 30


Troubleshooting ......................................................... 32


CE Certificate of conformity ........................................ 38


Safety 
 
Setup 


Do not put hands or feet near or under rotating 
parts. 


Read this manual carefully. Make sure that you are 
familiar with the different controls, settings and 
handles of the equipment.  


Know how to stop the unit and ensure that you are 
familiar with emergency stop. 


Never allow children or people unfamiliar with 
these instructions to use the machine. Note, that 
local regulations can restrict the age of the 
operator. 


If you feel unwell, tired or have consumed alcohol 
or drugs, do not operate the machine. 


Always inspect the machine before usage Ensure 
that no parts are worn or damaged. 


Replace worn out or damaged elements and bolts 
in sets to preserve balance. 


The operator of the machine is responsible for 
people’s safety.  


Never use the machine near children or animals. 


The operator of the machine is held liable for any 
accidents or hazards to other people and their 
property. 


Thoroughly inspect the area, where the equipment 
is to be used, if necessary remove any  foreign 
objects.  


Do not refuel gasoline indoors or while the engine 
is running. 


Spilled gasoline is extremely flammable, never 
refuel while the engine is still hot. 


Wipe off any spilled gasoline before starting the 
engine. Spilled gasoline on a hot engine may 
cause a fire or explosion! 


Boots with non-slip soles with steel jacket is 
required. Avoid loose-fitting clothes. 


Operation 


After striking a foreign object, stop the engine 
immediately, remove the spark plug cap and 
inspect the machine thoroughly for damage. Repair 
the damage before continuing. 


If the machine should start to vibrate abnormally, 
stop the engine and check immediately for the 
cause. Vibration is generally a warning of damage. 


Always turn off the engine and ensure that all 
moving parts have come to a complete stop before 
making any repairs, adjustments, or inspections.  


Exercise extreme caution when operating on 
slopes.  


Never operate the machine at a fast pace.  


Do not overload machine capacity by attempting to 
push at too fast a rate. 


Do not carry passengers. 


Never allow any bystanders in front of unit. 


Only operate the machine at daylight or in fully 
illuminated areas.  


Ensure a stable foothold and always keep a firm 
hold on the handles. Always walk, never run. 


Do not operate the machine when barefoot or 
wearing sandals. 


Exercise extreme caution when changing direction 
on slopes  


Never attempt to make any adjustments, while the 
engine is running. 


Use extreme caution when reversing or pulling the 
machine backwards 


Never operate the engine indoor or in areas with 
low ventilation. The exhaustion from the engine 
contains carbon monoxide. Failure to observe 
could result in permanent injury or death. 


Due to vibrations from the handle, long time use 
can result in white fingers. 
If fatigue is felt in arms, hands or fingers – or visible 
signs of white fingers is appearing, the work should 
be stopped immediately, and a sufficient time of 
break should be taken for recovery. To avoid white 
fingers, each user should operate the machine for 
no more than 1.5 hours per day. 


Gasoline safety 


Use extreme care in handling gasoline.  


Gasoline is extremely flammable and the fumes are 
explosive.Serious personal injury can occur, when 
gasoline is spilled on yourself or your clothes. 
Rinse your skin and change clothes immediately! 


Use only an approved gasoline container. Do not 
use soft drink bottle or similar! 


Extinguish all cigarettes, cigars, pipes and other 
sources of ignition. 


Never refuel your machine indoors. 


Let the engine cool down before refilling 


Never fill the fuel tank to more than 2.5 cm below 
filler in order to provide space for fuel to expansion. 


After refueling, ensure that the cap tighten 
securely. 


Never use the lock-function on the gasoline gun, 
when refueling. 


Do not smoke while refueling. 


Never refuel gasoline inside a building or where 
gasoline fumes may get in contact with an ignition 
source.  


Keep gasoline and engine away from appliance, 
pilot lights, barbecues, electric appliances, power 
tools, etc. 

 
Maintenance and storage 


The engine shall be stopped when carrying out 
maintenance and cleaning operations, when 
changing tools and when being transported by 
means other than under its own power. 


Check regularly that all bolts and nuts are 
tightened. Retighten if necessary. 


The engine must be completely cooled before 
storing indoors or covered. 


If the machine unused for a period of time, please 
refer to the instructions in this manual.  


Maintain or replace safety and instruction labels, as 
necessary. 


Only use orginal spare parts or accessories. If  not 
orginal  parts  or accessories is used, the liablility is 
no longer applied.   

Содержание Smart 5105WS

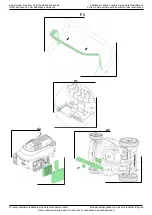
Страница 1: ... 5555 www texas dk post texas dk ACHTUNG DENKEN SIE DARAN VOR INBETRIEBNAHME MOTORÖL SAE 30 AUFZUFÜLLEN ATENTIE GÂNDIRE TU AMINTIȚI ÎNAINTE ULEI MOTOR DE FUNCȚIONARE SAE 30 COMPLETEAZA IMPORTANT REMEMBER TO FILL WITH ENGINE OIL SAE 30 BEFORE START IMPORTANT NE PAS OUBLIER DE REMPLIR AVEC DE L HUILE DE MOTEUR SAE 30 AVANT LE DEMARRAGE VIGTIGT HUSK AT PÅFYLDE MOTOROLIE SAE 30 FØR START ВАЖНО НЕ ЗАбУ...

Страница 2: ... Ihr Modell kann von der Abbildung abweichen Votre modèle actuel peut être différent des illustrations W rzeczywistości urządzenie może się nieznacznie różnić Modelul actual poate varia de cel prezentat în figură Фактическая модель может отличаться от показанной на изображении ID B C P D R I H C J K L S Q ...

Страница 3: ...strationer Ihr Modell kann von der Abbildung abweichen Votre modèle actuel peut être différent des illustrations W rzeczywistości urządzenie może się nieznacznie różnić Modelul actual poate varia de cel prezentat în figură Фактическая модель может отличаться от показанной на изображении M2 M3 M1 ...

Страница 4: ...istości urządzenie może się nieznacznie różnić Modelul actual poate varia de cel prezentat în figură Фактическая модель может отличаться от показанной на изображении M4 M6 M5 1 Mounting the inner rear wheel cover as shown in the illustration 2 Mounting the rear wheel as shown in the illustration 1 Mounting the inner rear wheel cover as shown in the illustration 2 Mounting the rear wheel as shown i...

Страница 5: ...strationer Ihr Modell kann von der Abbildung abweichen Votre modèle actuel peut être différent des illustrations W rzeczywistości urządzenie może się nieznacznie różnić Modelul actual poate varia de cel prezentat în figură Фактическая модель может отличаться от показанной на изображении M7 F2 F1 ...

Страница 6: ...rationer Ihr Modell kann von der Abbildung abweichen Votre modèle actuel peut être différent des illustrations W rzeczywistości urządzenie może się nieznacznie różnić Modelul actual poate varia de cel prezentat în figură Фактическая модель может отличаться от показанной на изображении F3 A2 A1 A3 ...

Страница 7: ...ative Fjern tændrørshætten fra tændrører før service eller reparation Stop maskinen før oprydning Hold afstand til personer børn og dyr Advarsel Klingen er skarp rør ikke ved knivbladet Indsæt ikke hænder eller fødder under klipperskjoldet Advarsel Brug kun korrekt værktøj og reservedele Remove the spark plug cap from the spark plug before service or repair Stop the engine before cleaning of work ...

Страница 8: ...overbelaste maskinens kapacitet ved at forsøge at skubbe den for stærkt Undlad at køre med passagerer Tillad aldrig tilskuere at opholde sig foran enheden Betjen kun maskinen i dagslys eller i fuldt oplyste områder Sørg for godt fodfæste og hold godt fast i håndtagene Gå løb aldrig Undlad at betjene maskinen med bare fødder eller iført sandaler Udvis ekstra forsigtighed ved ændring af retning på s...

Страница 9: ...r på nedre styrerør Fastgør med vingemøtrik sæt fra indersiden afstyret 4 Tilpas kabler og fastgør medkabelholdere Montering af motorstopkabel Illustration M3 1 Skub med et let tryk den øverste bøjle ID B fremad 2 Isæt motorstop kabel fra ydersiden i hullet i bøjle ID B og lås Montering af kabler rekylstarter Illustration M4 1 Træk og hold bøjle for motorstop inde for at frigøre startsnor grebet p...

Страница 10: ...renses jævnligt Hvis filteret ikke er blevet renset i en længere periode vil dette kunne mærkes på motorens kraftoverførsel samt kunne beskadige motoren Se Illustration A2 1 Rengør let omkring luftfilteret inden dækslet fjernes 2 Tryk de to flapper ned træk forsigtigt i dækslet 3 Tag forsigtigt papirfilteret ud og undersøg det Børst det med en blød børste Hvis det er meget snavset skal det udskift...

Страница 11: ...il erhvervsbenyttelse har 1 års garanti Reklamationen dækker mangelfuld udførelse dvs fabrikationsfejl eller materiale og funktionsfejl Forbehold og krav Normal slitage og udskiftning af sliddele er IKKE omfattet af reklamationsretten Sliddele hvor der IKKE garanteres for holdbarheden over 12 måneder Knive Kabler Remme Sikringer og kontakter Membraner pakninger Tændrør Motorvæsker olie benzin Star...

Страница 12: ...n front of unit Only operate the machine at daylight or in fully illuminated areas Ensure a stable foothold and always keep a firm hold on the handles Always walk never run Do not operate the machine when barefoot or wearing sandals Exercise extreme caution when changing direction on slopes Never attempt to make any adjustments while the engine is running Use extreme caution when reversing or pull...

Страница 13: ... lock Mounting the recoil starter Illustration M4 1 Pull the engine brake handlebar and hold in order to release the starter cord on theengine 2 Pull gently the starter cord from the engine Engine brake handlebar MUST be hold 3 Attach the starter grip on the rack of handlebar 4 Release the engine brake handlebar and the starter grip Mounting the breastplate illustration M5 1 For models with breast...

Страница 14: ...laps down and gently pull the cover 3 Carefully remove the paper filter and inspect it Brush it with a soft brush If it is very dirty replace it Be careful that no dirt gets into the inlet 4 Wash the black foam element in the right side in warm water and soap 5 Press the water out of the foam element and let it dry Put a few drops of SAE 30 oil on the filter to moisten it lightly Carefully squeeze...

Страница 15: ...od of 1 year The warranty covers material and or fabrication faults Restrictions and requirements Normal ear and replacement of wearing parts are NOT covered by the warranty Wearing parts which are NOT covered for more than 12 months Blades Cables Belts Fuses Switches Membranes gaskets Spark plugs Engine liquids oil gasoline Starter cords Filters Battery If the battery is not stored correct frost ...

Страница 16: ...gründlich auf Beschädigungen Reparieren Sie die Beschädigungen bevor Sie fortfahren Sollte die Maschine anfangen ungewöhnlich zu vibrieren stoppen Sie die Maschine und untersuchen Sie sofort die Ursache Vibration ist im Allgemeinen ein Hinweis auf eine Beschädigung Vor allen Reparaturen Einstellungen oder Überprüfungen stellen Sie immer den Motor ab und vergewissern Sie sich dass alle bewegten Tei...

Страница 17: ...remse die in drei Sekunden den Motor und das Messer anhält Jede Vorsichtsmaßnahme wirkt nur wenn sie auch genau eingehalten wird Beachten Sie bei der Montage Ihres Rasenmähers die folgende Beschreibung Identifizierung der Teile Siehe Abildung ID Hinweis Die Abbildungen können von Ihrem Modell abweichen B Griffstange Motorbremse C Seilzuganlasser D Flügelmutter H Benzintankdeckel I Luftfilter J Aus...

Страница 18: ...d im Seil spüren ziehen Sie dann schnell und kräftig Lassen Sie den Seilzugstarter niemals los sondern lassen Sie ihn vorsichtig wieder zur Startposition zurücklaufen Stoppen Abbildung F3 1 Lassen Sie die Bügel für Motorbremse und Eigenantrieb los um den Rasenmäher und den Motor auszuschalten Hinweis Die Messer drehen sich nach dem Stoppen noch bis zu 3 Sekunden lang weiter Wasserdüse An der linke...

Страница 19: ...rn Warnhinweis Das Messer muss so geschärft werden dass es ausgewuchtet ist Es können sonst Schwingungen auftreten die den Motor beschädigen Beschädigungen am Motor wegen fehlerhaften Schärfens sind von der Garantie ausgeschlossen Wir empfehlen deshalb das Messer in einem Kundendienstzentrum schärfen zu lassen Wartung der Zündkerze 1 Ziehen Sie den Zündkerzenstecker ab 2 Entfernen Sie Schmutz und ...

Страница 20: ...t sich NICHT über Schäden Mängel hervorgerufen durch Mangelnde Wartung und Instandhaltung Strukturelle Veränderungen Ungewöhnliche äußere Bedingungen Schäden an Karosserie Mähdeck Lenker usw Unsachgemäße Verwendung oder Überladung Verwendung von falschem Öl Benzin oder anderen Flüssigkeiten die den in der Bedienungsanleitung empfohlenen widersprechen Schlechtes oder verunreinigtes Benzin das die V...

Страница 21: ...fiez que toutes les parties mobiles sont complètement arrêtées avant de réaliser une réparation un réglage ou une inspection Faites preuve d une extrême prudence lors d une utilisation en pente N utilisez jamais la machine à vive allure Ne dépassez pas la capacité de la machine en essayant de travailler trop rapidement Ne transportez pas de passagers Ne laissez jamais des passants se tenir devant ...

Страница 22: ... la poignée et de la hauteur Ill M2 La hauteur des poignées est réglable Cela signifie qu elles peuvent s ajuster en fonction de vos préférences Il peut s avérer utile de décider quelle hauteur vous conviendra le mieux avant d installer la poignée 1 Montez le tube du guidon milieu á le tube du guidon inférieur 2 Fixez l écrou papillon à l intérieur du support latéral et dans la poignée inférieure ...

Страница 23: ...sous du plateau de coupe Remarque Pour obtenir de meilleurs résultats nettoyez le plateau de coupe avec la fonction injecteur d eau après chaque tonte Si l herbe sèche l efficacité de cette fonction ne sera pas optimale Remarque tous les modèles ne sont pas équipés Injecteur d eau de la vitesse Vidange d huile L huile doit être vidangée après 5 heures lors de la première utilisation puis au moins ...

Страница 24: ...es 2 ans Vous pouvez faire contrôler votre tondeuse une fois par an par le SAV le plus proche de chez vous Rangement rangez la tondeuse dans une pièce propre et sèche Nettoyez la machine après chaque utilisation Enlevez l herbe et les saletés de l intérieur du capot Basculez l avant de la tondeuse pour la nettoyer à 45 degrés maximum Si vous le basculez sur le côté le carburateur et le filtre à ai...

Страница 25: ...k i upewnić się że wszystkie ruchome części całkowicie się zatrzymały Zachować najwyższą ostrożność podczas pracy na zboczach Nigdy nie pracować w szybkim tempie Nie przeciążać urządzenia pracując w zbyt szybkim tempie Nie przewozić osób Nie pozwalać osobom postronnym stawać przed urządzeniem Pracować tylko w dzień lub przy dobrym oświetleniu Zachowywać stabilność i mocno trzymać uchwyty Chodzić n...

Страница 26: ...żna regulować wysokość uchwytu Oznacza to że można go ustawić na odpowiedniej dla operatora wysokości Przed instalacją uchwytu należy ustalić jaka wysokość będzie najlepsza dla operatora 1 Zamocuj środkowy uchwyt na dolnym uchwycie 2 Włożyć nakrętkę motylkową od wewnątrz wspornika bocznego oraz do dolnej części uchwytu 3 Przymocować uchwyt górny na dolnym Dokręcić nakrętkę motylkową od wewnątrz uc...

Страница 27: ...ić silnik Obroty ostrza spowodują oczyszczenie spodniej części kosiarki Uwaga Kosiarkę najelpiej wyczyścić zaraz po koszeniu Jeżeli trawa wyschnie czyszczenie nie będzie tak wydajne Uwaga nie wszystkie modele wyposażone są w Dysza wodna Wymiana oleju Pierwszą wymianę oleju należy wykonać po 5 godzinach pracy kosiarki a następnie co najmniej 1 raz w roku Konieczny będzie zestaw do odciągania oleju ...

Страница 28: ...orocznego przeglądu kosiarki lokalnemu serwisowi Przechowywanie Kosiarkę przechowywać w suchym i czystym pomieszczeniu Maszynę należy oczyścić każdorazowo po użyciu Z wnętrza obudowy układu koszącego należy usuwać trawę i brud Przechylać przód kosiarki do czyszczenia o maksymalnie 45 stopni W razie przechylenia na bok gaźnik i filtr powietrza muszą zawsze być skierowane do góry W przeciwnym razie ...

Страница 29: ...e reglare sau inspecţie Fiţi extrem de atent la operarea în pante Nu operaţi niciodată maşina rapid Nu suprasolicitaţi capacitatea maşinii încercând să lucraţi la o viteză prea rapidă Nu transportaţi pasageri Nu permiteţi persoanelor să staţioneze în faţa unităţii Operaţi maşina numai la lumina zilei sau în zone iluminate complet Asiguraţi un suport stabil pentru picioare şi ţineţi mânerele în mod...

Страница 30: ...şi în bara mâner inferioară 3 Ataşaţi bara mâner superioară pe cea inferioară Strângeţi cu piuliţa fluture din interiorul barei mâner 4 Adaptaţi cablul şi asiguraţi l cu coliere pentru cablu Montarea cablului de frână al motorului Figura M3 1 Împingeţi cu grijă bara mâner superioară ID B spre înainte 2 Introduceţi cablul de frână al motorului de la exterior în orificiul din consola de pe bara mâne...

Страница 31: ...zaţi furtunul pentru a ajunge la baia de ulei 3 Transferaţi uleiul uzat într un recipient gol 4 Umpleţi motorul cu ulei SAE 30 5 Verificaţi nivelul uleiului cu joja de ulei Min Max Amintiţi vă să eliminaţi uleiul uzat astfel încât să nu polueze mediul înconjurător Utilizaţi staţia dvs locală de reciclare Întreţinerea filtrului de aer Vă rugăm să inspectaţi şi să curăţaţi filtrul de aer în mod regu...

Страница 32: ...otorul până la eliminarea reziduurilor de combustibil Scoateți capacul bujiei Scoateți bujia și se toarnă o lingură de ulei în gaura Trageți de demaror de mai multe ori Pune bujia dar nu purta capota Schimbați uleiul în conformitate cu programul de mai sus Acum cositoare este ștearsă Îndepărtați orice murdărie și iarbă de la masina de tuns iarba Scufundati cârpă în ulei și apoi acopera carcasa și ...

Страница 33: ...ьно осмотрите машину на предмет повреждений Прежде чем продолжить работу устраните повреждение Если во время работы машины появится неестественная вибрация заглушите двигатель и установите причину неполадки Вибрация как правило является признаком поломки Всегда глушите двигатель и убедитесь что все вращающиеся части полностью остановились прежде чем начать осмотр или работы по ремонту настройке Бу...

Страница 34: ...я C Шнуровой стартер D Барашковая гайка H Заглушка патрубка бензозаправки I Воздушный фильтр J Выхлопная система K Свеча зажигания L Заглушка маслозаливного патрубка P Регулировка высоты Q Ограждение бокового выброса R Пусковой насос S Грудной упор могут отличаться от вашей модели Сборка Распаковка Рисунок М1 Извлечь газонокосилку из коробки вытянув ее сбоку Коробка содержит газонокосилка 1 шт Ком...

Страница 35: ...ручку тормоза двигателя и рукоять самоходного режима для отключения косилки и ее двигателя Примечание Нож продолжает вращаются до 3 х секунд после остановки Насадка для разбрызгивания В левой части деки газонокосилки расположена насадка для разбрызгивания осуществляющая промывку деки См рисунок ID F При использовании впуска воды машина должна быть установлена на минимальную высоту и расположена на...

Страница 36: ...нокосилку Проверьте затяжку всего крепежа Регулярно проверяйте состояние ножа Нож должен быть всегда острым Рекомендуется менять нож не реже чем раз в два года Рекомендуется обращаться в сервисный центр один раз в год для проведения технического обслуживания Хранение Храните газонокосилку в сухом чистом помещении Очищайте газонокосилку после каждого использования очищайте внутреннюю поверхность де...

Страница 37: ...und power level Garantierter Schalldruckpegel Garantie niveau de puissance acoustique 98 dB A 98 dB A Motor model Engine model Motor Modell Moteur modèle TG470 TG470 Ydelse Power Kapazität Capacité 139 cc 139 cc Dane techniczne Specificaţii Технические характеристики Model Model модель Smart 5105WS XM 510W Szerokość cięcia Lamă Ширина стрижки 51 cm 51 cm Regulacja wysokości Înălțimea de ajustare Р...

Страница 38: ... på elektrode Luftfilteret er snavset eller defekt Kontrollér at hætten sidder godt fast på tændrøret Kontrollér at tændrør for snavs og fugt følg vejledningen i manualen Kontrollér og juster afstanden på elektrode følg vejledningen i manualen eller udskift tændrør Kontrollér at luftfilter for snavs og rens følg vejledningen i manualen ellers udskift Plæneklipperen starter men kører ujævnt Problem...

Страница 39: ... gap between the spark plug and the electrode The air filter is dirty or defective Check that the cap is firmly attached to the spark plug Check that there is no dirt on the spark plug following the instructions in the manual Check and adjust the spark plug gap following the instructions in the manual Aalternatively replace the spark plug Check the air filter for dirt and clean it following the in...

Страница 40: ...alscher Abstand zwischen Zündkerze und Elektrode Der Luftfilter ist schmutzig oder defekt Stellen Sie sicher dass der Stecker fest an der Zündkerze sitzt Stellen Sie sicher dass kein Schmutz an der Zündkerze ist Folgen Sie dabei den Anweisungen im Handbuch Überprüfen Sie den Elektrodenabstand der Zündkerze Folgen Sie dabei den Anweisungen im Handbuch Oder tauschen Sie wahlweise die Zündkerze aus Ü...

Страница 41: ...a bougie et l électrode Le filtre à air est sale ou défectueux Vérifiez que le capuchon est solidement fixé à la bougie Vérifiez qu il n y a pas de saleté sur la bougie en suivant les instructions du manuel Vérifiez et réglez le capuchon de la bougie en suivant les instructions du manuel Ou remplacez la bougie Vérifiez que le filtre à air ne soit pas sale et nettoyez le en suivant les instructions...

Страница 42: ...wany Świeca zapłonowa jest mokra lub brudna Nieprawidłowy odstęp pomiędzy elektrodami świecy Filtr powietrza jest brudny lub uszkodzony Sprawdzić czy nasadka świecy jest prawidłowo przymocowana Sprawdzić czy świeca zapłonowa nie jest brudna zgodnie z instrukcją obsługi Sprawdzić i wyregulować odstęp pomiędzy elektrodami świecy według procedury opisanej w instrukcji obsługi Lub wymienić świecę Spra...

Страница 43: ...ă sau murdară Spaţiu incorect între bujie şi electrod Filtrul de aer este murdar sau defect Verificaţi dacă acest capac este ataşat ferm la bujie Verificaţi dacă nu există murdărie pe bujie respectând instrucţiunile din manual Verificaţi şi ajustaţi spaţiul bujiei respectând instrucţiunile din manual Alternativ înlocuiţi bujia Verificaţi filtrul de aer dacă este murdar şi curăţaţi l respectând ins...

Страница 44: ...ия и электродом Воздушный фильтр запачкан или поврежден Убедитесь что колпачок прочно соединен со свечой зажигания Убедитесь в отсутствии грязи на свече зажигания следуя инструкциям руководства по эксплуатации Проверьте и отрегулируйте зазор свечи зажигания следуя инструкциям руководства по эксплуатации Можно также заменить свечу зажигания Проверьте не запачкан ли воздушный фильтр и очистите его с...

Страница 45: ...e elektrode Het luchtfilter is vies of functioneert niet Controleer op de dop stevig vastzit aan de bougie Controleer of er geen vuil op de bougie zit volgens de instructies in de handleiding Controleer de afstand tot de bougie en pas deze aan volgens de instructies in de handleiding Verwijder eventueel de bougie Controleer het luchtfilter op vuil en maak het schoon volgens de instructies in de ha...

Страница 46: ...tes Zgodność z wymaganiami dyrektywy maszynowej następujące In conformitate cu directivele următorul text i 2006 42 EC Overensstemmelsesvurdering procedure i henhold til bilag III VI Conformity assessment procedure according to Annex III VI Konformitätsbewertungsverfahren nach Anhang III VI Procédure d évaluation de la conformité conformément à l annexe III VI Procedura oceny zgodności zgodnie z z...

Отзывы: