background image

8


Adjusting the wheel/ depth skid 

 
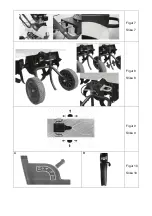
Fig 8. During operation, it may be necessary to raise the 
wheel assembly, as it is connected to the depth skid. 
Depress the pedal to the right of the support wheels to adjust 
the wheel assembly/depth skid to one of the 3 available 
positions. 
 
The depth skid can be set to 3 different depths. The deeper it 
extends into the soil, the deeper the tilling blades will work 
and the slower the machine will advance. Setting the correct 
tilling depth will significantly reduce the effort required. The 
depth skid should always be adjusted to suit the ground 
conditions. We recommend testing several depths to see 
which works best. 
 

Lubrication of gearbox 

 
The gearbox is permanently lubricated at the factory, never 
open the gearbox. 
 
In order to add grease does as followed: 
 
1.  Remove the spark plug cover on the engine. 
2.  Place the pack of grease in a bucket of warm water. 

This will make the consistency thinner, so it is easier to 
add to the gear. Avoid cutting off too much of the tip on 
the pack. It is important that the tip is as pointed as 
possible.  

3.  Loosen the 2 screws (Figure 12 a+b). 
4.  Add grease in hole “a” until it comes out of hole “b” (= 

full), when the gearbox is in horizontal position.  

5.  Fit and tighten the screws again. 
6.  Fit the spark plug cover on the engine. 
 
Figure 12 


Check grease level and add grease to the gear for every 
5 operating hours. Extra grease is not included. 


Starting and stopping the engine 


Remember: Always check the oil level prior to use! 

The oil level must always be between the min. and max. 
Mark on the dipstick.  Always use SAE-30 oil. Use only 
unleaded 95 octane gas. Never over-fill the gas tank.  
 
Warning: Stay out of dashed zone, while starting the engine!   
Always start the engine from dotted operation zone See 
Figure 9. 
 

Starting the engine


1.  Set the throttle control on the handle to max.  
2.  Position the choke at max. Move the choke lever fully to 

the left. The choke is not required if the motor is hot. 

3.  Pull the start cord to start the motor. Always feed the 

start cord back into the motor by hand.  

4.  When the motor is started, set the choke to minimum 

(fully to the right) Engage the throttle slightly. 


Stopping the engine 

1.  Set the throttle control to “low” and let the motor run for 

approx. 30 seconds. 

2.  When the motor idles, set the throttle control to full stop. 


Vibrations may travel up into the handle during use. We 
therefore recommend taking a break every 2 hours. 

 
Figure 10 


Cleaning the tiller 

 
The tiller should be cleaned after use. Use a garden hose to 
wash off soil and dirt. Remove any grass etc. from the rotor 
shaft. The chassis number should only be cleaned with a 
damp cloth to avoid unnecessary wear. Avoid using a high-
pressure washer during cleaning. 
 

Changing the oil 

 
The oil should initially be changed after the first 5 hours of 
use, and thereafter once per year.   
1.  Let the motor run for 5 minutes to heat up the oil. This 

allows the oil to run more freely and makes for a more 
complete oil change.  

2.  After 5 minutes, stop the motor. Remove the spark plug 

cap. Drain the oil by unscrewing the sump plug. 
Remember to drain the oil into a container of sufficient 
capacity. NB: The motor must not be tipped backwards 
more than 42,5 degrees. 

3.  Screw the sump plug back in and pour new oil into the 

motor. Do this by removing the dipstick and pouring in 
the recommended quantity of oil.  

4.  Refit the spark plug cap. 
 
Alternatively, use an oil extractor kit. 
 
1.  Suck the oil up through the oil filler hole using the 

syringe. Use the hose to reach the sump. 

2.  Transfer the used oil to the container. 
3.  Fill the engine with new SAE-30 oil. 
4.  Check the oil level using the dipstick. 
 

Remember to dispose of used oil in a safe way. 

Oil and oil extractor kit are not included  


Air filter maintenance 

 
Please inspect and clean the air filter on a regular basis. If 
the filter has not been cleaned for a longer period, this will 
have influence on the engines power take-off and the 
exhaustion.   
 
1.  Clean around the air filter before it is removed.  
2.  Carefully remove the paper filter and check it. Brush it 

with a soft brush. If it is very dirty, it must be changed. 
Take care that no dirt gets into the intake of the engine. 

3.  Wash the black foam element on the right side in warm 

soapy water. 

4.  Press the water out of the foam element and let it dry. 

Put a few drops of SAE-30 oil on the filter to moisten it 
lightly with oil. Carefully squeeze out any surplus oil. 
Remount the element. 

5.  Check that all parts are fitted correctly and the cover 

closed as shown in the picture.  


Содержание Hobby 610BR

Страница 1: ...K 5260 Odense S Denmark Version 15 1 Tel 45 6395 5555 www texas dk post texas dk DK Betjeningsvejledning GB Instruction manual DE Bedienungsanleitung F Manuel de l utilisateur PL Instrukcja obsługi RO Manual de Utilizara РУС Руководство пользователя ...

Страница 2: ...tivement le manuel de l utilisateur avant de faire fonctionner le moteur Toujours porter une protection oculaire et auditive Porter des gants de sécurité Porter des chaussures de sécurité antidérapantes РУС Предупреждение Внимание вращающиеся фрезы Перед запуском двигателя внимательно прочитайте инструкцию по эксплуатации Всегда надевайте средства защиты органов слуха и зрения Работайте в защитных...

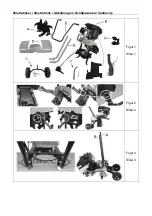
Страница 3: ...Illustrationer Illustrations Abbildungen Изображения Ilustracije Figur 1 Slika 1 Figur 2 Slika 2 Figur 3 Slika 3 ...

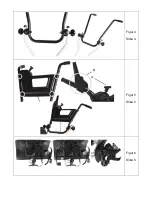
Страница 4: ...Figur 4 Slika 4 Figur 5 Slika 5 Figur 6 Slika 6 ...

Страница 5: ...Figur 7 Slika 7 Figur 8 Slika 8 Figur 9 Slika 9 A B Figur 10 Slika 10 ...

Страница 6: ...Figur 11 Slika 11 Figur 12 Slika 12 ...

Страница 7: ...otoren kører Spildt benzin er yderst brandfarlig påfyld aldrig mens motoren stadig er varm Aftør spildt benzin før start af motoren Den kan forårsage brand eller eksplosion Vær opmærksom på mulige farer ved arbejde på vanskelig jord f eks meget stenet eller hård jord Det er påkrævet at bære støvler med skridsikre såler og stålkappe Undgå at bære løstsiddende tøj Betjening Start altid motoren fra s...

Страница 8: ... Monteringsbolte for styr I Bagkonsol med monteringskit 2 Montering af bagkonsol støttehjul og jordspyd A Afmonter de 4 bolte samt 4 bøsninger B Monter bagkonsol I fastgør med bolte Vigtigt Husk at monterer de 4 bøsninger C Monter støttehjul C fikser og isæt bøjle fra højre igennem beslag Derefter anbring fjedre på bøjle og fastgør med split D Montor jordspyd på bagkonsollen fastgør med split 3 Mo...

Страница 9: ...iepinden Efterfyld med SAE 30 olie Brug kun blyfri 95 oktan brændstof på motoren Overfyld aldrig tanken Advarsel Ophold dig aldrig stiplede zone når du starter maskinen Start altid maskinen fra den prikkede sikkerhedszone Se Fig 9 Start 1 Sæt gasreguleringen på maks 2 Sæt chokeren på maks Chokerarmen skal flyttes helt til venstre Hvis motoren er varm er det ikke nødvendigt at anvende choker 3 Træk...

Страница 10: ... altid opbevare din maskine på et tørt og rent sted Fejlfinding Motor vil ikke starte 1 Kontroller gaskontrollen er sat korrekt 2 Kontroller tændrøret 3 Kontroller der er frisk brændstof på tanken 4 Se separat motorvejledning for yderligere fejlsøgning Motoren har uregelmæssig motorgang 1 Kontroller gaskontrollen ikke står på Maks choker 2 Kontroller der er frisk brændstof på tanken Knivene vil ik...

Страница 11: ...e multi machine which can be used all year With more than 50 years of experience in the production and sale of tillers and other garden products we have obtained a very large knowledge experience and know how in this area You can benefit from this when you need guidance to your Texas product We value our customers trust and pay much attention to aftersales service which means a full service of spa...

Страница 12: ...e before leaving the zone After striking a foreign object stop the engine immediately remove the spark plug cap and inspect the machine thoroughly for damage Repair the damage before continuing If the machine should start to vibrate abnormally stop the engine and check immediately for the cause Vibration is generally a warning of damage Always disengage the levers turn off the engine and remove th...

Страница 13: ...d the hand wheel Note The arrows on the plastic brackets They must be aligned when mounting 5 Mount throttle box A and the clutch cables B as shown on the picture 6 Mount the blades using the cotter bolts and pins 7 Mount the side guards using the bolts and nuts supplied 8 Mount depth skid from underneath and lock with the cotter pin supplied Fill the motor with oil See changing the oil section fo...

Страница 14: ...Stopping the engine 1 Set the throttle control to low and let the motor run for approx 30 seconds 2 When the motor idles set the throttle control to full stop Vibrations may travel up into the handle during use We therefore recommend taking a break every 2 hours Figure 10 Cleaning the tiller The tiller should be cleaned after use Use a garden hose to wash off soil and dirt Remove any grass etc fro...

Страница 15: ...odged between the blades 2 Release any stones by removing the blades 3 Check the cables are in good working order and fitted correctly 4 Check the belt is in good working order and fitted correctly 5 Ensure the belt tensioner is adjusted correctly The blades will not stop 1 Stop the engine and contact your dealer Noise vibration and precautionary measures 1 Long term exposure to noise levels excee...

Страница 16: ...etrieb Starten Sie immer den Motor in einer Sicherheitszone Verlassen Sie die Sicherheitszone nicht während Sie die Maschine bedienen Wenn es erforderlich ist die Sicherheitszone zu verlassen dann stellen Sie zuvor den Motor aus Wenn ein Fremdkörper getroffen wurde stoppen Sie sofort den Motor entfernen Sie den Zündkerzenstecker und untersuchen Sie die Maschine gründlich auf Beschädigung Repariere...

Страница 17: ... Anbausatz 2 Montage der hinteren Konsole Stützrad und Hacksporn A Entfernen Sie die 4 Bolzen und 4 Buchsen aus dem Getriebe B Montieren Sie die hintere Konsole I und mit Bolzen sichern Wichtig Vergessen Sie nicht den 4 Buchsen montieren C Montieren Sie das Stützrad C und stecken Sie die Leiste von der rechten Seite durch den Halter ein Hiernach setzen Sie die Feder auf der achse der Leiste Mit de...

Страница 18: ...zen und anziehen 6 Den Zündkerzenstecker wieder aufstecken Abbildung 12 Überprüfen Sie nach Jeder 5 Betriebsstunde den Fettstand wenn notwendig fett nachfüllen Fett ist nicht mitgeliefert Starten und Stoppen des Motors ACHTUNG Vor dem Einschalten immer den Ölstand kontrollieren Der Ölfüllstand muss zwischen der Mindest und der Höchstmarkierung auf dem Ölpeilstab liegen Verwenden Sie ausschließlich...

Страница 19: ...ten Tuch sauber Wischen Sie mit einem in Öl getauchten Lappen nach um Rostansatz zu vermeiden Das Gerät muss an einem trockenen und sauberen Ort gelagert werden Fehlersuche Der Motor springt nicht an 1 Kraftstoffeinstellung kontrollieren 2 Zündkerze prüfen 3 Alter des Benzins im Tank kontrollieren 4 Weitere Hinweise zur Fehlersuche sind der separaten Motoranleitung zu entnehmen Der Motor läuft nic...

Страница 20: ...oteur avant de quitter la zone Après avoir heurté un corps étranger arrêtez immédiatement le moteur retirez le capuchon de la bougie et inspectez minutieusement la machine pour détecter un éventuel dégât Réparez le dégât avant de continuer Si la machine commence à vibrer de manière anormale arrêtez le moteur et identifiez immédiatement la cause Les vibrations signalent en général un dégât Mettez t...

Страница 21: ...la position et barre d insertion de la droite à travers le support Ensuite insérer le ressort de la fixer bar avec une goupille fendue D Patin de profondeur d insertion sur la serrure de la console avec une goupille fendue 3 Montez les deux directions inférieures avec les boulons suivants C Faites attention à la direction la gauche et la droite sont différentes La direction A doit être montée à dr...

Страница 22: ...ours être compris entre les marques MIN et MAX sur la jauge Utilisez toujours de l huile SAE 30 Utilisez uniquement de l essence 95 octanes sans plomb Ne remplissez jamais le réservoir d essence Avertissement Rester en dehors de la zone hachurée lors du démarrage du moteur Toujours démarrer le moteur depuis la zone de sécurité en pointillés Voir figure 9 Commencer 1 Réglez la commande d accélérati...

Страница 23: ...épannage Le moteur ne démarre pas 1 Assurez vous que la commande d alimentation est correctement réglée 2 Vérifiez la bougie 3 Assurez vous que le réservoir est rempli d essence fraîche 4 Reportez vous aux instructions séparées sur le moteur pour tout autre dépannage Le moteur ne fonctionne pas normalement 1 Assurez vous que la commande d accélération n est pas réglée au maximum 2 Assurez vous que...

Страница 24: ...o uderzeniu obcego obiektu natychmiast zatrzymać silnik zdjąć zakrętkę świecy zapłonowej i sprawdzić urządzenie Naprawić uszkodzenia przed kontynuowaniem pracy Jeśli urządzenie zacznie wibrować nieprawidłowo zatrzymać silnik i poszukać przyczyny Wibracje zazwyczaj świadczą o uszkodzeniu gdy urządzenie jest pozostawiane bez nadzoru należy zawsze rozłączyć dźwignie wyłączyć silnik i wyjąć świecę zap...

Страница 25: ...rzewód przepustnicy oraz przewód sprzęgła w sposób pokazany na rysunku 6 Zamontować ostrza za pomocą śrub z zawleczkami i kołków 7 Zamontować osłony boczne za pomocą dołączonych śrub i nakrętek 8 Zamocować ostrza przy pomocy klinów oraz przetyczek Napełnić silnik olejem Więcej szczegółów patrz rozdział dotyczący wymiany oleju Ubranie robocze Podczas używania maszyny należy nosić dopasowane ubrania...

Страница 26: ...przepustnicę Zatrzymanie silnika 1 Ustaw sterownik przepustnicy na low niskie obr i pozwól silnikowi pracować przez około 30 sekund 2 Gdy silnik pracuje na biegu jałowym ustaw sterownik przepustnicy na znak stop Podczas pracy na kierownicę mogą przenosić się wibracje Dlatego zalecamy przerwy w pracy co 2 godziny Rysunek 10 Czyszczenie glebogryzarki Po użyciu glebogryzarkę należy wyczyścić Do zmyci...

Страница 27: ...ks 2 Sprawdź czy w zbiorniku jest świeża benzyna Ostrza nie chcą się obracać 1 Sprawdź czy pomiędzy ostrzami nie utkwiły kamienie 2 Usuń wszelkie kamienie demontując zespoły noży 3 Sprawdź czy linki są w dobrym stanie i czy są prawidłowo zamocowane 4 Sprawdź czy pasek jest w dobrym stanie i czy jest prawidłowo zamocowany 5 Sprawdź czy napinacz paska jest prawidłowo ustawiony Zespoły ostrzy nie zat...

Страница 28: ...nţă opriţi motorul înainte de părăsirea zonei După lovirea unui obiect străin opriţi motorul imediat îndepărtaţi capacul bujiei şi examinaţi maşina în detaliu dacă prezintă deteriorări Reparaţi deteriorările înainte de a continua Dacă maşina începe să vibreze anormal opriţi motorul şi verificaţi imediat cauza Vibraţiile reprezintă în general o avertizare de deteriorare Dezactivaţi întotdeauna mane...

Страница 29: ... Montați cele două ghidonul mai mici cu șuruburile furnizate C Rețineți că ghidonul stânga și dreapta sunt diferite Mai mică ghidon A trebuie să fie montate pe dreapta Mai mică ghidon B trebuie să fie montate pe partea stângă 4 Muntele superioară ghidonul cu șuruburile furnizate și roata de mână Notă săgețile de pe suporturi de plastic Acestea trebuie să fie aliniate la montaj 5 Mount acceleratie ...

Страница 30: ... este pornit setaţi clapeta la minim complet la dreapta Acceleraţi clapeta uşor Oprirea 1 Setaţi controlul clapetei de acceleraţie la low inferior şi lăsaţi motorul să funcţioneze timp de aprox 30 secunde 2 Când motorul funcţionează la ralanti setaţi controlul clapetei de acceleraţie la oprire completă Vibraţiile pot ajunge în mâner în timpul utilizării Recomandăm să luaţi o pauză la fiecare 2 ore...

Страница 31: ...re cuţite s au blocat pietre 2 Eliberaţi orice pietre prin îndepărtarea cuţitelor 3 Verificaţi cablurile dacă sunt în stare regulamentară de lucru şi dacă sunt fixate corect 4 Verificaţi cureaua dacă este în stare regulamentară de lucru şi dacă este fixată corect 5 Asiguraţi vă că dispozitivul de tensionare a curelei este ajustat corect Cuţitele nu se opresc 1 Opriţi motorul şi contactaţi furnizor...

Страница 32: ...оторой можно пользоваться круглогодично Имея более чем 50 летний опыт производства и продажи садовой техники мы обладаем обширными знаниями и инновационными разработками которые несомненно окажут Вам помощь при выборе продукции Texas Мы высоко ценим доверие наших клиентов и большое значение уделяем послепродажному обслуживанию нашей техники Мы обеспечиваем полную сервисную поддержку поставки запас...

Страница 33: ...зводите комплексную замену износившихся или поврежденных элементов и болтов чтобы сохранить балансировку Оператор машины отвечает за безопасность людей Никогда не используйте машину рядом с детьми или животными Оператор машины несет ответственность за любые происшествия или риск которому подвергаются люди и их имущество Тщательно осмотрите местность где будет использоваться культиватор При необход...

Страница 34: ...Обслуживание и хранение При обслуживании и чистке смене навесного оборудования и перевозке не своим ходом необходимо глушить двигатель Регулярно проверяйте затяжку всех болтов и гаек При необходимости затяните повторно Двигатель должен полностью остыть прежде чем машина будет поставлена на хранение или накрыта чехлом Если машина не используется длительное время ознакомьтесь с инструкциями в этом р...

Страница 35: ...лать 2 3 прохода культиватором на небольшом отрезке земли в различных направлениях Не культивируйте очень влажную почву поскольку образуются комки грунта которые будет трудно разбить Регулировка руля Рис 4 Угол руля можно регулировать Для этого используйте два маховика на руле чтобы установить требуемое положение Во время транспортировки руль можно откинуть вперед Внимание Убедитесь что тросы не з...

Страница 36: ...трующий элемент в теплой мыльной воде 4 Выжмите его и дайте ему высохнуть Поместите несколько капель SAE 30 масла на поролоновый фильтр Аккуратно отожмите излишки масла Установите все в обратной последовательности 5 Убедитесь что все детали установлены правильно и закройте крышку как показано на рисунке Обслуживание свечи зажигания Выкрутите свечу зажигания Очистите грязь и налет со свечи зажигани...

Страница 37: ...ботинки с нескользящей подошвой и стальным носком 7 Делайте 30 минутный перерыв каждые 2 рабочих часа Технические характеристики Hobby Модель Hobby 610BR Hobby 610TGR Длина мм 1210 1210 Ширина мм 600 600 Высота мм 1230 1230 Вес кг 42 42 5 Кол во передач вперед 1 1 Кол во передач назад 1 1 Рукоятка Регулируемая Регулируемая Рабочая ширина см 55 55 Рабочая глубина см 33 33 Скорость вращения фрез об ...

Страница 38: ...h in poznejših sprememb Postopek ugotavljanja skladnosti v skladu s Prilogo III VI u suglasnosti sa specifikacijama direktive za strojeve i naknadnim izmjenama 2006 42 EC 2004 108 EC Overensstemmelsesvurdering procedure i henhold til bilag III VI Conformity assessment procedure according to Annex III VI Konformitätsbewertungsverfahren nach Anhang III VI Procédure d évaluation de la conformité conf...

Отзывы: