background image


POWER PANEL 

plus

 M


N°  ME07.99077 

70 

B. Vuille 


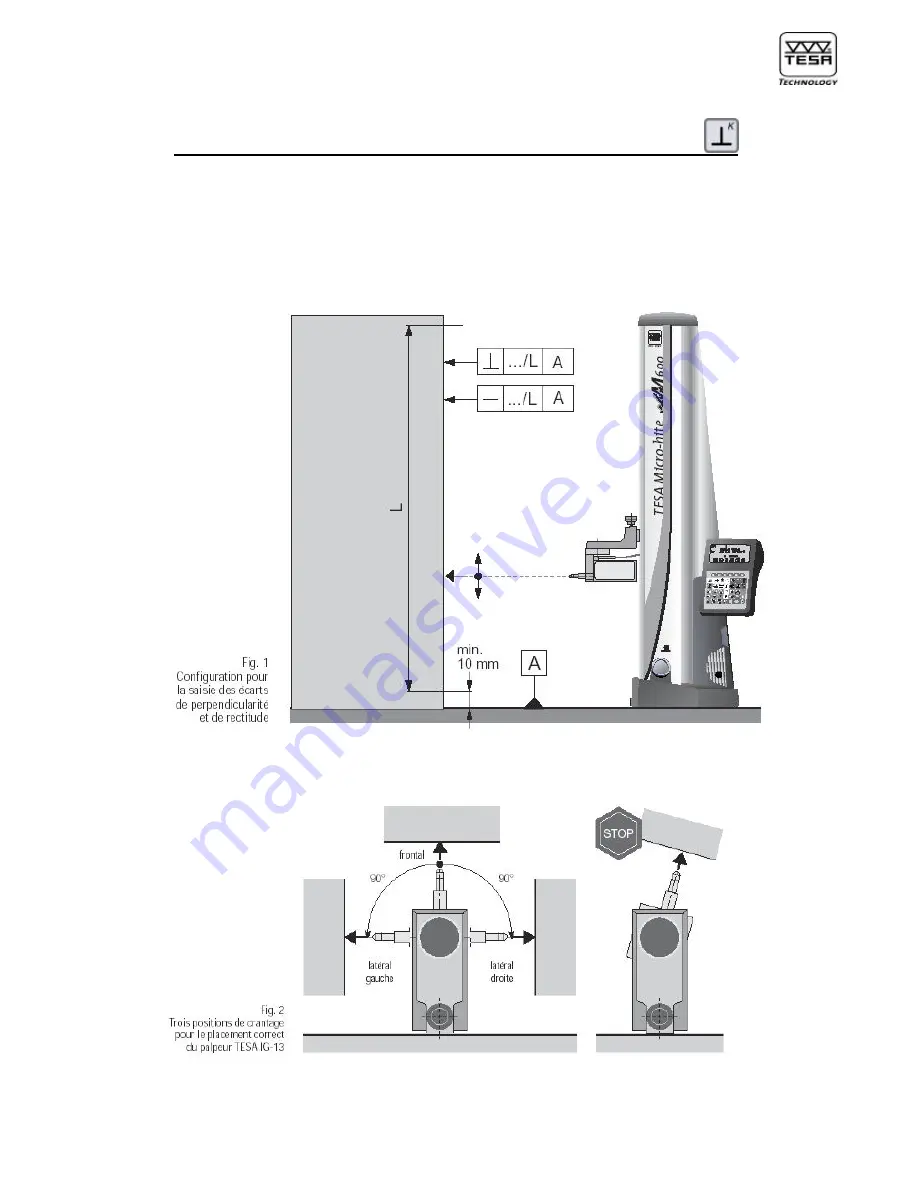
11) Measuring perpendicularity and straightness deviations 


Your POWER PANEL 

plus 

M allows you to establish perpendicularity and straightness 

deviations using the TESA IG-13 digital probe or an RS type measuring instrument. 
Form and position errors are captured according to ISO 1101. For more information on 
the way to proceed when measuring, read chapter 4.17 in the instruction manual that 
came with your TESA Micro-Hite plus M height gauge. 


Содержание Power Panel Plus M 00760220

Страница 1: ...ER PANEL plus M N ME07 99077 1 B Vuille Instruction Manual POWER PANEL plus M N 00760220 or 00760221 Used in conjunction with the standard sets TESA Micro Hite plus M 350 00730063 600 00730064 900 00730065 ...

Страница 2: ... Unit system 28 5 2 Printing a language or header 29 5 3 Temperature stabilisation 29 5 4 Standard parameters 30 5 5 RS 232 input output 31 5 6 Printer 31 5 7 Temperature compensation 32 5 8 Date and time 36 5 9 Header text 36 5 10 Default parameters 37 6 Features and functions 38 6 1 Measuring lengths using the function Single probe contact 38 6 2 Measuring lengths using the function Dual probe c...

Страница 3: ...h the main part 103 15 3 Aligning the coordinate system to the bore axis 104 15 4 Changing measured values into polar coordinates 106 15 5 Registering a measured dimension 107 15 6 Auxiliary geometric functions 108 15 6 1 Translating the coordinate system from the reference axis to new axis 110 15 6 2 Rotating the coordinate system through its origin point 111 15 6 3 Creating a fictitious origin p...

Страница 4: ...pendicularity and 2D measurements 140 19 Statistics menu 150 20 Interfaces 156 20 1 RS 232 digital input 156 20 2 RS 232 digital output 157 20 3 CENTRONICS output and printer type A4 158 21 Printing formats 159 22 Exporting data files to PC 161 22 1 Data file format 162 23 Sales programme 162 24 Warranty 163 25 Declaration of conformity 164 ...

Страница 5: ...obe coming first 2D measurement with graphical representation of the coordinate axes available on display along with the measured part features Creation of a part programme by learning Automatic edition and generation of the measurement cycles The memory can accept up to 9999 part features distributed in several part programmes each including as much as 999 values Memory capacity for 25 000 measur...

Страница 6: ...POWER PANEL plus M N ME07 99077 6 B Vuille 2 Keyboard à Function keys Paper feed for built in printer Switching ON or OFF Hold this key down 0 6 sec to validate your action ...

Страница 7: ... centre and the width of a rib Measuring parallelism and runout errors Calculating and further displaying the median obtained from the last two probe contacts or the last two numbered values you ve selected earlier in the logbook Cancelling both references A and B with return to menu St1 2 for taking a new reference A and or B along with a new probe constant if you wish to Also permits to reset th...

Страница 8: ...nfiguration menu Probe will stop moving as soon as key is released Probing down with detection of the lowest culmination point Probing down with detection of the highest culmination point Displaying a bore or shaft diameter as well as the width of a groove or a rib whether temporarily or permanently difference value obtained from two probe contacts Measurement of the centre and the width of a groo...

Страница 9: ...USE key to stop the height gauge temporarily Measuring mode for angles Measuring mode for perpendicularity and straightness deviations After exiting this menu you ll either need to take the probe constant or have it captured again 2D measuring mode Saving a part programme created by learning Statistics menu Configuration menu Executing a part programme ...

Страница 10: ... left by one single position or one field In mode measurement causes the programme to display the measured values at the rate of 4 while moving back in the logbook Moving the cursor down by one single position or one field In mode measurement causes the programme to access the logbook and have the last four measured values displayed The remaining values will then appear subsequently while moving b...

Страница 11: ...on glass scale for initialisation then places itself into position at the master piece Is TESA IG13 connected yes no Access mode for perpendicularity measurement Probe constant capture St2 Probe datum point Measure St1 Probe datum point Measure no ON OFF Cancel reference A or B Cancel both references A and B Cancel reference A or B Cancel both references A and B ...

Страница 12: ...ng for the reference mark Move up over a distance of approx 100 mm or down if you can t get any value V shaped sign indicates the direction to which carriage moves Once you ve travelled past the reference mark probe insert will automatically position itself up to the centre of the master piece Start probe constant acquisition using or rotating the power control by 1 click for probing internal part...

Страница 13: ...n automatically Cancelling all data files Exiting test menu If you answer yes all data files will be deleted along with the programme files If no height gauge is connected when starting up Display shows Special cases 1 No communication with EEPROM Access measurement mode without correction ...

Страница 14: ... probing the master piece internal part or pressing or for probing the external part Capturing probe constant on the master piece internal part Probe contact 1 Position probe insert in master piece internal or or use the rotary power control Probe contact 1 up V shaped sign shows the direction to which carriage moves when capturing relevant value Exit constant mode Probe contact 2 Probe contact 2 ...

Страница 15: ...probe diameter is usually slightly smaller than the true diameter since the probe flexure is taken into account as the probe constant is being captured Tc related temperature value only appears if you ve selected Temperature Compensation Capturing probe constant on the master piece external part Probe contact 1 Position probe insert below the lower face of the master piece or Probe contact 1 up Ex...

Страница 16: ...e of the master piece or rotate the power control by one click Probe contact 2 down Exit constant mode Probe contact 3 Probe contact 3 down Exit constant mode Displayed value after probe constant acquisition or rotate the power control by one click Probe contact 4 up Ready for capturing reference value ...

Страница 17: ...be contacts will be deleted Probe contact 5 is then automatically executed Criteria Resolution to 0 1 µm 0 5 µm Resolution to 1 µm 2 µm Cancellation of the last two probe contacts Probe contact 5 Probe contact 5 up Exit constant mode Probe contact 6 Position probe insert above the upper face of the master piece or rotate the power control by one click Probe contact 6 down Ready for capturing refer...

Страница 18: ...o high relevant value will be displayed Criteria Resolution to 0 1 µm 0 5 µm Resolution to 1 µm 2 µm Resolution reduced to 1 µm Alternatives Repeat value capture by pressing either key or Validate captured value with delta to 1 µm by pressing key Measuring in one coordinate direction Displayed data once you ve pressed the function key Ready for capturing reference value with a single probe contact...

Страница 19: ...emains stored in the memory even after the height gauge has been switched off Ready for probe constant acquisition 3 2 Programming the retraction travel Changing value Default value is 3 mm Input new value Maximum permissible value matches the measuring travel Minimum value is 3 mm If no retraction is required enter zero ...

Страница 20: ...ntact 3 3 Capturing a reference value Measuring without inversion of the probing direction mode St 1 Capturing reference value St 1 with a single probe contact Position probe insert close to the reference point to be probed then start value capture by pressing the function key enabling single probe contact or rotating the power control ...

Страница 21: ...5 mm s 1 or 15 mm s 2 At higher speed using the rotary power control 3 If value numbering isn t activated display shows St 1 instead of M0 Measuring with inversion of the probing direction mode St 2 Capturing reference value St 2 with two probe contacts Position probe insert close to the reference point to be probed then start value capture by pressing the function key enabling one or two probe co...

Страница 22: ...peed of 7 5 mm s 1 or 15 mm s 2 At higher speed using the rotary power control 3 Approaching second probing point Once first probe contact has occurred you may decide to activate St 2 or not Mode St 2 Full contact V shaped signs appear according to the direction to which the carriage moves Number of signs at a speed of 7 5 mm s 1 or 15 mm s 2 At higher speed using the rotary power control 3 If num...

Страница 23: ...ation If either of the keys for fast displacement is pressed within less than 3 seconds you ll be able to select one of the 6 measuring functions available for probing another point If the rotary power control is used to move the probe insert TESA Micro Hite plus M will repeat the same function at the new location In either case the reference value will match the average of both probe contacts 2 B...

Страница 24: ...ME07 99077 24 B Vuille 3 4 PRESET function Entering a PRESET value against an indirect reference Input PRESET value PRESET value once entered e g 35 0066 mm Ready for capturing indirect reference with a single probe contact ...

Страница 25: ... be created to make the height gauge easy to use and to learn Display mode for Length measurement measured values plus symbols for the functions Perpendicularity and straightness measurement measured values plus symbols Digit size Main display 12 7 x 6 4 mm 7 decade display plus minus sign Auxiliary display 6 3 x 4 2 or 3 8 x 2 9 mm 7 decade display plus minus sign Active reference Numbered value ...

Страница 26: ... two measured values 3 Quit Automatic displaying of the difference value obtained from the last two measured values F4 1 Temporary displaying of the difference value resulting from two probe contacts made on a bore a shaft or a groove on the main display 2 Continuous displaying of the difference value resulting from two probe contacts made on a bore a shaft or a groove on the main display 3 Quit C...

Страница 27: ...EL plus M N ME07 99077 27 B Vuille 4 2 Display format in mode measurement Large Small Display shows the last measured value in a large format plus the last four ones in a small format main and auxiliary display ...

Страница 28: ...ubmenus press the key with the relevant letter or the arrow keys to move the cursor Next confirm by pressing To exit each submenu press either of both following keys Use this key if you want to validate all changes before exiting Use this key if you want to delete all changes before exiting 5 1 Unit format A Allows you to choose the desired unit system for length and angle measurement as well as t...

Страница 29: ... and header with then press to confirm To cancel all changes and return to the configuration menu press 5 3 Speed Stabilisation C Allows you to set the desired probe speed for fast displacement or for approaching the measuring point During the waiting time given for stabilisation the measured value may only vary to the extent of the limit value which depends on the selected resolution Criteria Res...

Страница 30: ...part both in large format When set to Small display shows the last measured value in large format in the upper part whilst the last four ones appear in a small format in the lower part Print With Manual you won t be able to print until you press With Auto printing occurs after each value acquisition or computing operation Beep With ON a loud beep sound warns you after each value acquisition With t...

Страница 31: ...Baud Rate 4800 Format 7b 2P 2S 0h Choose parameters with then press to confirm To cancel all changes and return to the configuration menu press Note Output without RTS CTS 5 6 Printer F Allows you to activate the built in printer Model 00760220 along with the Centronics output of the A4 printer The drivers you may choose are the following A Epson LX 80 B HP PCL Ex HP Laser Jet 1200 series You re a...

Страница 32: ...asurement mode RS for capturing the value via the RS port in measurement mode RS Auto for automatic value capture via the RS port before each probe contact Switching the height gauge off causes your selection to be lost All values captured in this way will be corrected based on the following information TR Reference temperature default value 20 C TC Height gauge temperature TP Workpiece temperatur...

Страница 33: ...emperature Tough displayed value will not be assigned the correction along with the new value for Tp will be effective with the next probe contact In measurement mode with numbering included you are not allowed to enter any value unless you ve captured the first reference value or press the key or to reach M0 In mode Executing a part programme you may input the workpiece temperature as soon as the...

Страница 34: ...alue will be further input in the configuration menu Warning If the reference is on the workpiece Manual input via RS port Press the RS key for value capture using this port or Press Enter to confirm value capture New value will be further input in the configuration menu Warning If the reference is on the workpiece ...

Страница 35: ... once prompted a message appears to warn you Automatic input via RS port No operation is required Display shows temperature value or Press Enter to confirm value capture New value will be further input in the configuration menu Warning If the reference is on the workpiece ...

Страница 36: ...des 6 lines that can be complemented using the arrow plus alphanumeric keys This 6 line header may also be entirely modified if necessary The text you can edit using this option will include 31 characters per line The header you ve edited will remain stored even after the language has been changed or the height gauge switched off To have the predefined lines appearing in the chosen language the de...

Страница 37: ...on with then enter text and press to confirm To delete all characters press 5 10 Default parameters J Use this option if you want to reset all configuring parameters to the default values If so answer All to Parameters and Yes to Are you sure Then Press to confirm To reinitialise the header lines only select Header and Yes then press to confirm Default parameter or the selection you ve validated w...

Страница 38: ...and functions 6 1 Measuring lengths using the function Single probe contact Used function keys Without inversion of the probing direction With inversion of the probing direction 6 2 Measuring lengths using the function Dual probe contact Used function keys ...

Страница 39: ... procedure Position probe insert in the groove by pressing both positioning keys or rotating the power control Probe moves up automatically for first value capture Single probe symbol appears as first value is being captured Once retracted probe insert comes to a standstill ...

Страница 40: ...displacement can be accelerated by means of the rotary power control Probing procedure is ended Probe retraction occurs automatically Display switches over to normal display 6 4 Measuring ribs Probing procedure Position probe insert below the rib by pressing both positioning keys or rotating the power control ...

Страница 41: ... probe symbol appears as first value is being captured Once retracted probe insert comes to a standstill Position probe insert above the rib by pressing both positioning keys or rotating the power control or rotating the power control by one click Probe moves down automatically for capturing second value ...

Страница 42: ...ches over to normal display 6 5 Measuring bores Probing procedure Position probe insert into the bore using both positioning keys or the rotary power control Release measurement cycle by pressing the relevant function key or lightly rotating the power control twice in the direction you want to start probing Probe moves up ...

Страница 43: ...nce default setting But you may choose to travel past this point twice by pressing the ENTER key If the value dispersion is exceeding 10 µm an acoustic signal prompts you to repeat the probing procedure The option you ve selected remains stored for each probe contact with detection of the culmination point To return to the single probe contact option press the Enter key again or switch the height ...

Страница 44: ...tion point with a BEEP sound and highlighted probe symbol to warn you This point must be probed once default setting But you may choose to travel past this point twice by pressing the ENTER key If the value dispersion is exceeding 10 µm an acoustic signal prompts you to repeat the probing procedure Once culmination point is detected probing procedure is ended Probe retraction occurs automatically ...

Страница 45: ... probe insert below the diameter to be measured by pressing both positioning keys or rotating the power control Release the measurement cycle by pressing the relevant function key Probe moves up Probe symbol appears as soon as probe insert has stabilised after contacting the workpiece feature ...

Страница 46: ...epeat the probing procedure The option you ve selected remains stored for each probe contact with detection of the culmination point To return to the single probe contact option press the Enter key again or switch the height gauge off Highlited symbol for detection of the culmination point Once retracted probe insert comes to a standstill or use the rotary power control Position probe insert above...

Страница 47: ...tion point with a BEEP sound and highlighted probe symbol to warn you This point must be probed once default setting But you may choose to travel past this point twice by pressing the ENTER key If the value dispersion is exceeding 10 µm an acoustic signal prompts you to repeat the probing procedure Once culmination point is detected probing procedure is ended Probe retraction occurs automatically ...

Страница 48: ...edian is usually calculated from the measured values obtained for both part features that were last displayed M 04 205 0232mm M 05 74 9963mm Calculation of the mean value of the two part features you ve last measured At this point your Power Panel plus M gives you the choice between three possibilities Store median value as a M06 dimension with the aid of the function key F6 ...

Страница 49: ...ut the measurement directly Registering median value as dimension M6 M05 M04 Acknowledged median value as dimension Prompting median function Calculation of the mean value of the two part features you ve last measured Calculating the median based on chosen or keyed in values Auxiliary display shows the last four measured values from the table Higher value appears highlighted ...

Страница 50: ...lues downwards Choose desired values using the arrow keys or enter value number through the keyboard Display shows desired value M5 along with the last four ones from the table Higher value is highlighted 3 times Or Choose displayed value M1 as first parameter for calculating the median Choose displayed value M2 as second parameter for calculating the median ...

Страница 51: ...ian as M7 M5 M2 6 8 Calculating distances Providing the option Value Numbering was not selected earlier you can access this function any time by pressing A distance value is usually calculated from the measured values obtained for both part features that were last displayed M 04 205 0232mm M 05 74 9963mm ...

Страница 52: ...es Store distance value as M06 dimension by pressing function key F6 Skip value storage and access directly the function by pressing for calculating a new distance M M Skip value storage and take the measurement directly Registering distance value as dimension M6 M05 M04 Acknowledged distance value as dimension Prompting distance function Calculation of the distance between both part features you ...

Страница 53: ...one measured value upwards Skip one measured value downwards Skip one page 4 values upwards Skip one page 4 values downwards Choose desired values using the arrow keys or enter value number through the keyboard Display shows desired value M5 along with the last four ones from the table Higher value is highlighted 3 times Or Choose displayed value M1 as first parameter for calculating distance valu...

Страница 54: ...POWER PANEL plus M N ME07 99077 54 B Vuille Choose displayed value M2 as second parameter for calculating distance value or Confirm displayed value M2 for the calculation of distance value M7 M5 M2 ...

Страница 55: ...ay after each probe contact or M 08 84 9040mm 84 904 mm Standard display after each probe contact M 08 84 9040mm 123 5762 mm Main display will then show the difference obtained from both probe contacts with the part feature that comes next The centre of the part feature being measured will appear on the auxiliary display ...

Страница 56: ...rmat With use of the cable No 04761049 bidirectional as above or opto RS With use of the cable No 04761046 monodirectional 4800 bauds or 1200 bauds for a measuring instrument from an earlier generation 7b 2P 2S oh M 07 123 5762mm 84 9040 mm RS function may be activated from the main display or through St 1 2 M 08 124 5762mm RS Measured value may be captured as follows by pressing RS key using the ...

Страница 57: ...data through the keyboard M 07 123 5762mm 84 9040 mm This function can be activated from the main display or through St 1 2 M 08 mm Enter desired value through the keyboard then confirm by pressing M 08 127 7453mm Ready for all subsequent value acquisitions ...

Страница 58: ...return to the reference mode you ve previously quitted press F6 Position probe insert using the arrow keys or rotating the power control After you ve access the menu Measuring flatness and parallelism errors on a flat surface display shows the measured value against active reference F1 Measurement outset downwards F2 Measurement outset upwards F3 Data input for PRESET value F4 Measurement in ABS m...

Страница 59: ...ows the measured value against active reference V sign indicates probe moving direction Rotary power control may be used for approaching relevant probing point Zero value appears once probe insert has stabilised Display shows measured value at once V sign indicates new probe moving direction ...

Страница 60: ...AUSE has been prompted display shows both Min and Max values Value acquisition is deferred Measured value reappears V sign indicates probe moving direction or or rotating the power control by one click Measured value stops fluctuating Display shows both Max and Min values ...

Страница 61: ...ook M Prompting for value rotation on main display Max and Min values or Press or to get both Max and Min values appearing in turn on the main display Proceed in a same way for the remaining values Registering measured value F5 M Only allowed if value numbering is ON If you ve activated value numbering in configuration menu value shown on main display is added in the logbook M ...

Страница 62: ...rallelism errors Prompting for parallelism measurement in ABS mode Display shows value measured against active reference value If St 1 is enabled you may only press F1 or F2 according to the probing direction or rotating the power control Display shows value measured as probe is being displaced V sign indicates probe moving direction Rotary power control may be used for approaching the relevant po...

Страница 63: ...tive reference value or or rotating power control by one click Measured value stops fluctuating Display shows the deviation along with both absolute Max and Min values M adds displayed value in the logbook Prompting for calculating parallelism deviation with PRESET 98 0000 Display shows measured value against active reference ...

Страница 64: ... Once probe insert has stabilised display shows PRESET value or or rotating the power control by one click Measured value stops fluctuating Display shows the deviation along and both Max and Min values with PRESET value M adds value shown on main display in the logbook Exiting menu Return to main display All subsequent measurements are taken based on the reference value you ve activated before acc...

Страница 65: ... is available Angle of any inclined surface to the reference surface Possible condition before accessing menu mode St 2 with value numbering Measuring mode Calculating the angle can only be enabled from main display Calculating relevant angle Prompt angle measurement To quit this menu and return to standard mode press ...

Страница 66: ... B Vuille Measuring angle of any inclined surface to reference surface Mode 1 Angle calculation based on two probing points General Probe contacts of any type are allowed in either modes St 1 or St 2 P1 Probe point P1 P2 Probe point P2 ...

Страница 67: ...shows calculated value in selected unit Conversion into degree minute and second Conversion into decimal degree Conversion into radian Storage of X value for all subsequent angle measurements If a part programme is created by learning this value remains constantly available in the memory and it will not be necessary to enter it again bye executing the programme Perform new probe contact or exit Mo...

Страница 68: ... measurement Temporary conversion into degrees Temporary conversion into radian Press F4 to replace radian by the unit you ve previously selected by pressing F3 Entering gauge block dimension Prompt for value input once you ve probed point P2 Activate value input ...

Страница 69: ...confirm Angle arc tg P2 P1 X is calculated Display shows calculated value in the unit previously selected in configuration menu Registering gauge block height Value remains stored for all subsequent probe contacts Exiting mode 1 End mode 1 and return to angle measurement Pressing this key lets you exit Angle measurement ...

Страница 70: ...establish perpendicularity and straightness deviations using the TESA IG 13 digital probe or an RS type measuring instrument Form and position errors are captured according to ISO 1101 For more information on the way to proceed when measuring read chapter 4 17 in the instruction manual that came with your TESA Micro Hite plus M height gauge ...

Страница 71: ...ore all other keys First option TESA IG 13 could be recognised by switching the height gauge on Second option Function key could be prompted Whenever the RS tool along with TESA IG 13 are simultaneously connected priority is given to the IG 13 1 Travelling past reference mark with automatic recognition of TESA IG 13 2 Prompting for function key Display shows computed value in Z axis along with pro...

Страница 72: ...X axis only Entering a PRESET value in the Z axis Setting the counter to zero in both X and Z axes Entering the measuring range in the Z axis Entering the measuring range in the X axis based on the graph scale No probe or dial gauge could be recognised when accessing measuring mode Prompt for rejected measured value No IG 13 probe or dial gauge is connected Press the key to return to standard mode...

Страница 73: ...clockwise by one click allows you to start probing up Activating this key or rotating the power control counter clockwise by one click lets you start probing down the speed v at which probe will move should have been initially set to ON in the configuration menu Activating this key lets you start probing while keeping probe displacement v under control using the rotary power control or rotating th...

Страница 74: ...ue capture and probe displacement To end value capture You may also use the rotary power control To aboard the value capture Prompting for PAUSE mode Stop data acquisition Display shows current value along with the value captured in Z axis as this mode was accessed Exiting PAUSE mode Start data acquisition back again ...

Страница 75: ... point you may decide to prompt for either of the following options Perpendicularity error Highest measured value with its position Lowest measured value with its position Straightness angle Straightness error Curve diagram of measured values Printing measured values Use these keys or the rotary power control to start a new measurement Use this key to get data displayed when starting up back again...

Страница 76: ...POWER PANEL plus M N ME07 99077 76 B Vuille ...

Страница 77: ...lly enabled in the configuration menu to print measured values related to both perpendicularity error and Z range or Use either of both keys to return to measurement results previously displayed Use these keys to access other measured values Use these keys or the rotary power control to start a new measurement Use this key to get data displayed when starting up back again The reference values and ...

Страница 78: ... in Z axis appears on the auxiliary display From this stage you may ask for all operations described under Prompting for perpendicularity error to be executed accordingly Save highest value in the logbook Prompting for lowest value Main display shows lowest value Min while its position in Z axis appears on the auxiliary display ...

Страница 79: ...ng for straightness angle Main display shows straightness angle At this point you may press either of the following keys and to change temporarily angle unit into decimal degree or radian or to return to displayed measurement results of Use these keys or the rotary power control to start a new measurement to activate the same functions as described earlier in this chapter Save straightness angle i...

Страница 80: ...Prompting for straightness error Main display shows measured straightness error From this stage you may ask for all operations described under Prompting for perpendicularity error to be executed accordingly Save straightness angle in the logbook Return to measurement results of previously displayed ...

Страница 81: ...ay press either of the following keys or to return to measurement results of previously displayed Use these keys or the rotary power control to start a new measurement to activate the same functions as described earlier in this chapter Entering PRESET value in Z axis Input PRESET value Entering 100 0 through the keyboard Displayed value once entered Confirm by pressing or skip validation and press...

Страница 82: ... of both Z and X axes to zero Set both counters temporarily to zero This setting will be cancelled each time you start measuring Measuring range in Z axis Input relevant value through the keyboard This value may be lying within 2 and 1000 mm Confirm by pressing or skip validation and press F4 to quit Confirm input value by pressing or cancel input value by pressing F4 ...

Страница 83: ...yboard Both values may be lying within 0 0500 and 50 0000 mm Confirm by pressing or skip validation and press F5 to quit Confirm scale values by pressing or cancel both values by pressing F5 Exiting perpendicularity mode Exiting this mode means that probe constant will need to be captured again Previous measured values remain stored ...

Страница 84: ...porarily stop value capture e g when getting over a groove see chapter 9 and 11 for more information PAUSE can be prompted from the measuring mode System has switched over to the standby condition To access reference C temporarily or To exit PAUSE mode and return to previous stage In the PAUSE mode you re not allowed to capture a new probe constant as this operation could affect the measurement cy...

Страница 85: ... 99077 85 B Vuille Prompting for reference C Prompt for the measuring mode as configured before accessing this command Capture reference value Displayed value after first probe contact Displayed value after second probe contact ...

Страница 86: ...POWER PANEL plus M N ME07 99077 86 B Vuille Calculation of the distance between the last two measured values Displayed value after third probe contact Quit PAUSE mode and return to previous stage ...

Страница 87: ...ction is given a name along with a single or several measured values Fonction N Type Ref Axe Val 1 Val 2 Val 3 Unité Cote Texte Nom M01 Pal H A Z xxxx xxxx mm M02 Reb int H A Z xxxx xxxx mm M03 Reb Ext H A Z xxxx xxxx mm M04 Pal B A Z xxxx xxxx mm M05 Reb int B A Z xxxx xxxx mm M06 Reb Ext B A Z xxxx xxxx mm ...

Страница 88: ...Nom M07 Rainure A Z xxxx xxxx xxxx xxxx mm M08 Tenon A Z xxxx xxxx xxxx xxxx mm M09 Diam Int A Z xxxx xxxx xxxx xxxx mm M10 Diam Ext A Z xxxx xxxx xxxx xxxx mm M11 Batt Si Abs A Z Max xxxx xxxx Min xxxx xxxx mm M12 Moy A Z xxxx xxxx mm M13 Delta A Z xxxx xxxx mm M14 RS xxxx xxxx mm M14 Clav xxxx xxxx mm ...

Страница 89: ...al 3 Unité Cote Texte Nom M15 Ang 2Pal A Palp 1 xxxx xxxx Palp 2 xxxx xxxx X xxxx xxxx Rad M18 Perp Perp X xxx xxxx Z xxxx xxxx mm M19 Perp max Perp Xmax xxx xxxx Z xxxx xxxx mm M20 Perp min Perp Xmin xxx xxxx Z xxxx xxxx mm M21 Ang Perp Angle x xxxxxx Rad M22 Rect Rect xxx xxxx mm ...

Страница 90: ...message appropriately To measure the centre heights you may proceed in either of the following ways With detection of the culmination point by pressing or Without detection of the culmination point by pressing or Relevant value will not be displayed as the measurement results are being processed Fonction N Type Ref Axe Val 1 Val 2 Texte Nom H1 Centre mm A Y X xxxx xxxx xxxx xxxx xxxx xxxx xxxx xxx...

Страница 91: ...ode 2D M values saved in the logbook may either be retained or erased if automatic numbering has been selected In this example Yes prompts for next value M1 No prompts for next value M6 Starting up 2D measurement in Y axis or Exit 2D measuring mode Prompt for manual input of relevant number Rotation through X axis ...

Страница 92: ...lle 14 1 Measuring in coordinate direction Y Measuring in Y axis Probe bore 1 with detection of the culmination point Display shows measured value H 1 Y Confirm next proposed value or input a new number Enter number of next bore to be probed ...

Страница 93: ...e Input desired number to Hy Confirm number of next bore to be probed Probe bore 3 with detection of the culmination point Enter number of next bore 6 to be probed with detection of the culmination point End Measuring in coordinate direction Y ...

Страница 94: ...oordinate direction X Prompting for workpiece rotation Confirm default value angle to 90 or displayed value if you ve previously pressed F5 You may also change angle unit or input a new angle value Rotation angle is limited to 45 to 135 Validate workpiece rotation ...

Страница 95: ...e is proposed in the order of the probe contacts made in X axis Probe bore 6 with detection of the culmination point Bore that comes next in the table is proposed in the order of the probe contacts made in X axis Data can either be analysed or checked at the end of the couples of probe contacts End Measuring in coordinate direction X The measurement results can be checked before 2D analysis is sta...

Страница 96: ...splay shows angle value with reverse sign Confirm rotation through axis Y Probe bore 7 without detection of the culmination point in Y axis Display shows measured value H 7 Y and Repeat workpiece rotation through X axis then confirm Display shows height value which was last captured in this axis 90 ...

Страница 97: ...X and Y At this point you may activate either of the following keys To define the origin point of the coordinate system To calculate the regression circle based on measured part features To check the measurement results Initialise the register of measurement quit the 2D mode and return to the reference M0 Initialise all 2D measurements H et M and return to the beginning of the 2D mode ...

Страница 98: ...o have measured values displayed or enter desired number directly through the keyboard Next press Enter to confirm Prompt for part feature 6 Confirm to view all relevant values Use arrow keys to scroll part features in desired order Special case bore 7 was not probed in both axes but in a single axis X with detection of the culmination point ...

Страница 99: ...e regression circle may be within 3 and 64 This option is useful then the regression circle consist of many elements It s allow just to enter the number of bores and the the first one 1 3 6 8 Input each number If desired feature has been used already or if it was not probed you ll get a warning message Use arrow key to move the cursor to dr for entering relevant number Display shows measured diame...

Страница 100: ...ter and the difference between both max and min values At this point you may either return to the probing mode by pressing or access the 2D analysis mode by activating the function key to have the origin point of the coordinate system be first determined Returning to the probing mode Perform new probe contact or exit 2D mode by pressing key ...

Страница 101: ... values M you want to print out First you need to determine the origin of the coordinate system 15 1 Translation of the origin of coordinates to the bore axis Prompting for origin point If bore 1 is the origin press function key F1 or input any other desired number through the keyboard Confirm your entry by pressing Enter number of the bore to be used to form the origin of the coordinate system ...

Страница 102: ... desired part feature directly using the keyboard In this case confirm by pressing Available functions Conversion into polar coordinate system New point of origin Alignment of the coordinate system Rotation of measured value through the main system Registration of the measured value shown on the main display as Mn 1 providing automatic value numbering is set to On When saving a part programme this...

Страница 103: ...layed value through the main system Shift Y value to main display Shift mean diameter to main display Shift measured diameter in Y axis to main display Shift measured diameter in X axis to main display Press key once again to restore display to its starting condition ...

Страница 104: ...15 3 Aligning the coordinate system to the bore axis This function is prompted for once the origin point has been determined Enter number of the relevant bore to proceed in X axis If you want to proceed in the Y axis first press key Input number 3 ...

Страница 105: ...L plus M N ME07 99077 105 B Vuille Confirm by pressing Display shows the feature you ve selected in the new coordinate system Proceeding in the Y axis Enter desired number Follow the same procedure as for X axis ...

Страница 106: ...E07 99077 106 B Vuille 15 4 Changing measured values into polar coordinates Prompting for changing coordinates Display shows the feature you ve selected in the new polar coordinate system Changing into cartesian coordinates ...

Страница 107: ...stant table M i e the distance between both part features 1 and 3 in the example shown below Display shows selected value Add value in constant table M Example M6 when answering YES at prompt 2D or M1 when answering NO Important When executing a part programme by learning you won t be able to view any numbered value except for those saved in the constant table M ...

Страница 108: ...99077 108 B Vuille Example prompting part feature with number 6 or from the previous step Display shows prompted feature 15 6 Auxiliary geometric functions Have part feature 6 being displayed in polar coordinates before going on ...

Страница 109: ...rage of the measured value shown on the main display as Mn 1 providing automatic value numbering is set to On When saving a part feature this value alone will be saved as measured dimension Return to main geometric functions The following functions may either be accessed from the main or auxiliary geometric functions Calculation of angle value between 3 part features Calculation of the distance be...

Страница 110: ...WER PANEL plus M N ME07 99077 110 B Vuille 15 6 1 Translating the coordinate system from the reference axis to new axis Prompt for auxiliary geometric functions Prompt for translation of coordinate system ...

Страница 111: ...er of relevant part feature Confirm translation of origin point and return to analysis main menu Display shows origin point in the new coordinate system 15 6 2 Rotating the coordinate system through its origin point Prompt for auxiliary geometric functions ...

Страница 112: ...7 112 B Vuille Prompt for rotation of coordinate system Entering 36 22 via the keyboard Input rotation angle of coordinate system Confirm input value Display shows part feature you ve previously selected in the new coordinate system ...

Страница 113: ...ate system Entering data through the keyboard Enter R value angle value and feature number through the keyboard Use the arrow keys to move from a field to another Display shows radius with angle alone to avoid mixing it with a probed feature If your entry needs to be complemented or the number you ve input has to be changed you ll get a warning message ...

Страница 114: ... the keyboard Enter both X and Y values along with relevant number Use the arrow keys to move from one field to another Display shows both values alone to avoid mixing them with a probed feature If your entry needs to be complemented or the number you ve input has to be changed you ll get a warning message ...

Страница 115: ...eometric functions Number of displayed Px matches that of measured H max 12 per page Number of features used for calculating the regression circle may be within 3 and 64 This option is useful then the regression circle consist of many elements It s allow just to enter the number of bores and the the first one ...

Страница 116: ...arrow key to move the cursor to dr for entering relevant number Display shows measured diameter of the regression circle along with both max and min values Introduction with option N Enter number of bores and the number of the first one Confirm with F6 The first display of this page will appear Possibility to change elements Follow the procedure describe up woods ...

Страница 117: ...g data through the keyboard and pressing F2 if you ve selected origin Enter requested data Special case Press F2 to enter the origin point from analysis allowing reference value to be used as origin point Display shows relevant angle which may be saved using the function key M If your entry needs to be complemented or one of the selected features does not exist you ll get a warning message ...

Страница 118: ...r relevant function This function can also be prompted from 2D analysis Entering data through the keyboard Enter requested data If your entry needs to be complemented or one of the selected features does not exist you ll get a warning message Display shows measured distance in the cartesian coordinate system along with X X6 X3 Y Y6 Y3 ...

Страница 119: ...function can also be prompted from 2D analysis Entering data through the keyboard Enter requested data If your entry needs to be complemented or one of the selected features does not exist you ll get a warning message Display shows measured distance in the polar coordinate system along with R R6 R3 A A6 A3 ...

Страница 120: ...me by learning you need just measure as usual then press the key as detailed in the example that follows Create a learn programme once you ve executed 5 probe contacts and store measured distance between both features M5 and M4 as M6 Enter file name Max 16 characters Entering data through alpha numeric keyboard ...

Страница 121: ... file name Save your file Learn programme and return to the measuring mode All measured values captured since you ve switched your height gauge on will be registered together with those related to the probe constant or the references If you don t want to include constant or reference values activate to instruct the programme to only store those values measured since that time you ve pressed this k...

Страница 122: ...nal Access 2D mode by pressing Perform 2D measurements Hy Hx Establish the origin of the coordinate system with alignment levelling d01 dn Execute needed calculation then assign desired numbered values M01 Mn Create a learn programme file where this procedure will be saved by pressing This file will contain the values captured in either of both 1D and 2D modes as well as those obtained when measur...

Страница 123: ...r editing files Cursor shows programme file you ve last created To load numbered values from the programme into the memory back again At this point you re also allowed to add any value especially in 2D mode To edit a desired part programme where you may add tolerance values or enter or erase numbered values To delete selected part programme in the memory To access data files with the measurement r...

Страница 124: ...ws programme file you ve last created Confirm both displayed file and data or Provided constant and reference values have not been changed in the meanwhile display shows data as they were as you ve saved the part programme Note This option lets you get back the measured values you ve stored before switching your height gauge off for instance You may also add two dimensional dimensions what is not ...

Страница 125: ...FF ON To work with or without tolerances arrows and N 0 To define the sample size if you want to use control limits A4 printer Built in printer RS outputs So as to have the desired values printed on your reports you may choose between the options available from each of the three outputs namely All dimensions Out of tolerance dimensions Classification To move from a field to another use the arrow k...

Страница 126: ...lso input a preset value or enter desired retraction travel Capture constant value as the programme is started up if required If not jump to the next step M1 Display shows probing direction to capture the reference value Common case Display shows entered tolerances with both control limits UCL and LCL If displayed sample size is 0 this means that no control limits will be displayed and entered ...

Страница 127: ...F Probing down Default name corresponds to the definition of the probe contact to be made Once you ve accessed this field using the arrow keys you may enter a specific name for each numbered d value max 16 characters If so confirm each entry by pressing Nominal Default value is displayed when creating the part programme Once you ve accessed this field using the arrow keys you may ask for the relev...

Страница 128: ...ber through the keyboard Confirm by pressing Inserting a dimension First choose the programme step you want to be inserted before the one shown on display Capturing constant value F1 Capturing reference value F2 Capturing a measured value by pressing the relevant key Entering a bore centre instead of numbered value M1 Input bore centre and diameter through the keyboard ...

Страница 129: ...02 M01 before inserting Inserting the calculation of the bore diameter To have this done the function you ve previously selected must include a dual probe contact Display shows dimension M03 M02 before inserting Tolerances may be changed along with both UCL LCL control limits according to the configuration of this part programme ...

Страница 130: ...rances may be changed along with both UCL LCL control limits according to the configuration of this part programme Inserting the calculation of a distance before the dimension M05 witch will be M06 Identical procedure for the median calculation Data introduction N of previous dimension only authorized Use the keyboard to introduce the number or select the dimension by means of the arrows Use F6 or...

Страница 131: ...limits according to the configuration of this part programme Save your file before exiting the Edit mode You may create a new file by simply changing the file name and leave the older one unchanged Display shows pointed file once saved Remember that the ON OFF key cannot be used as long as both managing and edition modes are activated ...

Страница 132: ...red programme file using the arrow keys Do not use the ON OFF key while both managing and edition modes are activated Programme file which was last saved is pointed Confirm your selection by answering prompt accordingly All related data files are automatically cancelled as selected file is being removed from the programme ...

Страница 133: ...ing the arrow keys Do not use the ON OFF key while both Generation and Edition modes are activated Programme file which was last saved is highlighted Prompt for result files Select desired file using the arrow keys To erase files one after the other use the function key To exit this mode and return to the measuring mode press the function key ...

Страница 134: ...probe has reached its correct position This option is enabled when POS is set to ON AUTO POS Prompt for next dimension Positioning Response time of display Waiting time for stabilisation Displayed value OFF OFF Enter Manual Enter to start probing Infinite Infinite Last measured value Next value is prompted once Enter is pressed OFF ON Enter Auto Infinite As set Last measured value Probe is positio...

Страница 135: ...de was first prompted Use Start if you want the values measured in the Learn mode to be loaded in data file 01 Relevant workpiece will be given the number 1 If not move the cursor to new file Procedure if numbered value M1 must be captured as the part programme is started up AUTO ON OFF and POS ON OFF as described hereafter Example with creation of a new data file If the copy of the 1 st part is c...

Страница 136: ...F M1 Pos OFF Position probe manually or or using the rotary power control Probe relevant bore Numbered value M1 has been captured Display shows numbered value M1 Proposal for M2 calculating bore diameter M1 Condition M1 Auto OFF M2 Pos ON or or using the rotary power control Display shows bore diameter M2 along with next measurement to be taken Conditions M2 Auto ON M3 Pos ON ...

Страница 137: ...obed once for a shaft or a rib Automatic positioning is ended Activate double beep sound once probing point has been approached Start measuring function M3 as soon as the required waiting time for positioning is over Automatic capture of numbered value M3 Probe part feature M3 Numbered value M3 has been captured Display shows numbered value M3 along with next measurement to be taken Condition M3 A...

Страница 138: ...n your settings in the edition mode e g AUTO OFF for M4 or or using the rotary power control Display shows numbered value M 5 Last measured value usually includes Workpiece classification with good or scrap as well as automatic printing if selected in the edition mode End of measure part N 1 Indication of the part classification Symbol appearing if the part is within tolerance Symbol appearing if ...

Страница 139: ...r exit To view out of tolerance values To cancel the measured workpiece To erase last measured value To save the measured values in data file and start probing another workpiece or to list M and H values in their chronological order To print the measured values with header hold key down to have this done To prompt for the header you want to modify To prompt for the statistics menu Choose another p...

Страница 140: ...parameters in the edition mode Display shows numbered value M 5 Response and waiting times are those previously entered in the configuration mode Enabling automatic probing sequence Probing down is in progress Displayed data depend on the type of measurement to be taken Activating key according to set parameters in the edition mode Display shows numbered value M6 reference B Response and waiting t...

Страница 141: ...de Programme is waiting until first probe contact is started up or using the rotary power control Display shows floating value V sign indicates moving direction The rotary power control may also be used for for approaching the probing point Contact the workpiece surface with the probe and start probing once it has stabilised Main display shows instant value V sign indicates moving direction ...

Страница 142: ...p depends on the action you want to take i e execute another measurement measure perpendicularity or flatness perform a 2D measurement In this example display asks for a 2D measurement to be taken Carrying on with angle measurement Activating key according to the previous dimension parameters set in the edition mode Prompt for angle measurement using a gauge block Proceed step by step for all angl...

Страница 143: ...n entered manually as described in chapter 10 Gauge value has been registered in the memory in the Learn mode If so jump to next step or or using the rotary power control Display shows angle value once gauge block has been measured and gauge value has been input through the keyboard or called out from the memorised value in the Learn programme Carrying on with perpendicularity measurement Activati...

Страница 144: ...The probe may also be positioned by rotating the power control or or using the rotary power control Probe moves as instructed when creating part programme Once measured value has been captured probe stops moving automatically or you may use the keyboard or the rotary power control Prompt for pause optional No probe contact is allowed Auxiliary display shows Z value as data acquisition has been sto...

Страница 145: ...programme Display shows numbered value M7 Max Min along with the Z range Activating key according to the previous dimension parameters set in the edition mode Display shows numbered value M8 Max along with related position in the Z axis Activating key according to the previous dimension parameters set in the edition mode Display shows numbered value M9 Min along with related position in the Z axis...

Страница 146: ... shows straightness value M11 Carrying on with 2D measurement Displaying positioning along with related probe contact This sequence may be interrupted using the rotary power control Usual configuration Automatic displaying and positioning based on both given response and waiting times Displaying positioning along with related probe contact This sequence may be interrupted using the rotary power co...

Страница 147: ...robe contact This sequence may be interrupted using the rotary power control Display shows probe position for next value capture H3 Displaying positioning along with related probe contact This sequence may be interrupted using the rotary power control Displayed value H3 once done After response time is over probe moves into position for next value capture H6 Displaying positioning along with relat...

Страница 148: ...put replaces the previous one Auxiliary display shows probe position for next value capture H1 Carrying on with next values that are identical for both X and Y axes Display shows H values captured in both axes Display shows numbered value M7 Response time is the one previously entered in configuration mode ...

Страница 149: ...onfiguration mode Activating key according to the previous dimension parameters set in the edition mode Display shows numbered value M8 Last measured value usually includes Workpiece classification with good or scrap as well as automatic printing if select ed in the edition mode Prompt for listing scraps Display shows out of tolerance values along with related deviations from the upper or lower to...

Страница 150: ...g statistics menu from measuring mode Displayed bore diameter as measured on 25 workpieces subsequently Default values as prompted from the table e g M1 to M25 These values are accepted as being identical to one another e g for bores diameters Choose the values you want to have statistically processed M to M Enter each value number or use the arrow keys to select both first and last values 1 plus ...

Страница 151: ...ues M12 to M22 Displayed histogram Processed data include 10 classes as well as the number of inspected workpieces with their related percentage i e M 11 22 for numbered values M11 to M22 Nb 11 for inspected workpieces S for standard deviation Press this key to enter header text Press this key to print desired histogram with the header text ...

Страница 152: ...d return to the measuring mode Prompting statistics menu from execution or managing data files Access from the execution mode You may prompt for this menu once each part has been measured or analysis of out of tolerance values has been required Access from managing data file menu Use the arrow keys to select desired result file and prompt statistics menu ...

Страница 153: ...ntered desired values for UCLX and LCLX If not you ll get the message No limits To enter header text To print statistical data related to selected value M1 in the example To call out M1 related histogram To call out M1 related Xbar card mean value of sample To exit statistics menu or to choose another dimension Use this arrow key to select desired dimension or enter number of desired dimension thr...

Страница 154: ...cted dimension Prompting for histogram Displayed data related to M1 with 8 good classes 2 out of tolerance values Standard deviation S Cp upper T minus lower T 6S Cm upper T minus lower T 8S To enter header text Print the histogram of the selected dimension M1 in this example or to choose another dimension ...

Страница 155: ... shows the last 25 samples of n workpieces Samples that are not within control limits are either marked with the arrow key or with pointed to the relevant limit value or to choose another dimension or to display previous or next samples 25 items Quit Xbar card Return to the execution mode or in the managing files menu ...

Страница 156: ...s input allows the connection of an opto electronic measuring instrument RS type which can be purchased from TESA or any other manufacturer The following parameters can be altered as desired in the configuration menu Data rate 4800 bauds Character length 7 bits Start 1 bit Stop 2 bits Parity even Transmission format With use of the cable No 04761049 bidirectional as above or opto RS With use of th...

Страница 157: ...r using a remote control switch hand or foot switch connected to EXT P at the rear of your control panel Data mm 9999 999 9 cr lf transfer In 99 99999 cr lf Bidirectional data transfer This transfer mode allows direct control of the height gauge from a PC Given instructions are as below Each order must be ended using ASCII code CR cr Measured value ID cr Insrument s identification TE cr lf VER cr ...

Страница 158: ...hat can be used A Epson LX 80 B HP PCL HP Laser Jet 1200 series Paper length From 9 to 13 inches Standard length is 12 inches Use the configuration menu to select desired printer Note As long as the printer buffer does not contained a full page most of the Laser printer do not start to print To print a non completed page press the appropriate button on the printer of the key on the panel ...

Страница 159: ...me Drawing Nbr Company Operator ____________________________________ Deviation from perpendicularity X 0 3460 mm Z 100 7285 mm Highest value X1 0 0000 mm Z1 0 0000 mm Lowest value X2 0 3460 mm Z2 99 9635 mm Deviation from straightness RCT 0 00283460 mm Sloping deviation ANG 0 05 26 deg Graphical curve z 100 mm X 0 3460 X 0 3460 ...

Страница 160: ...r Part name Drawing Nbr Company Operator Deviation from perpendicularity X 0 3460 mm Z 100 7285 mm Highest value X1 0 0000 mm Z1 0 0000 mm Lowest value X2 0 3460 mm Z2 99 9635 mm Deviation from straightness RCT 0 00283460 mm Sloping deviation ANG 0 05 26 deg Graphical curve 100 mm X 0 3460 X 0 3460 ...

Страница 161: ...e 22 Exporting data files to PC A program used on a PC allows the transfer of program and data files from the column gauge into the PC and in the opposite way By means of this program it is possible to load a language file into the column gauge ...

Страница 162: ...0 0 0500 0 0500 0 0067 M005 angle 0 08x45 Angle XY 45 664 45 000 2 000 2 000 0 664 M006 lg 0 50 Composante X 0 6159 0 5000 0 0500 0 0500 0 1159 0 0659 M007 Lg 1 4 Composante X 1 4153 1 4000 0 0500 0 0500 0 0153 M008 Ø1 63 Composante Y 1 6323 1 6300 0 0200 0 0300 0 0023 M009 Ø1 83 Composante Y 1 8262 1 8300 0 0300 0 0300 0 0038 M010 Lg 0 08 Composante X 0 0956 0 0800 0 0200 0 0300 0 0156 M011 lg 2 ...

Страница 163: ...ibility is limited to the repair of the product or if we consider it necessary to its free replacement The following are not covered by our guarantee batteries and damages due to incorrect handling failure to observe the instruction manual or attempts by any non qualified party to repair the product any consequences whatever which may be connected either directly or indirectly with the prod uct su...

Страница 164: ...the measured values is ensured by our Quality Assurance Declaration of conformity with ISO CEI Guide 22 as well as EN 45014 Manufacturer TESA S A Full name and address TESA SA Rue du Bugnon 38 CH 1020 RENENS Switzerland We declare that the following product s Product name TESA MICRO HITE plus M Power Panel plus M Product type 00730060 00730061 00730062 00730063 00730064 00730065 00760220 00760221 ...

Отзывы: