background image

Help Window

When setting up a task, you must resolve any settings issues before the system can start that task. For
example, if you have set the IC Inlet Rate higher than 0 mL/min but have not selected an IC Inlet, you
must resolve the issue by either setting the IC Inlet Rate to 0 mL/min or selecting an IC Inlet. If there are
any settings issues with a task, the system disables 

Start

 on the Setup Confirmation screen and enables

Help

.

If you touch 

Help

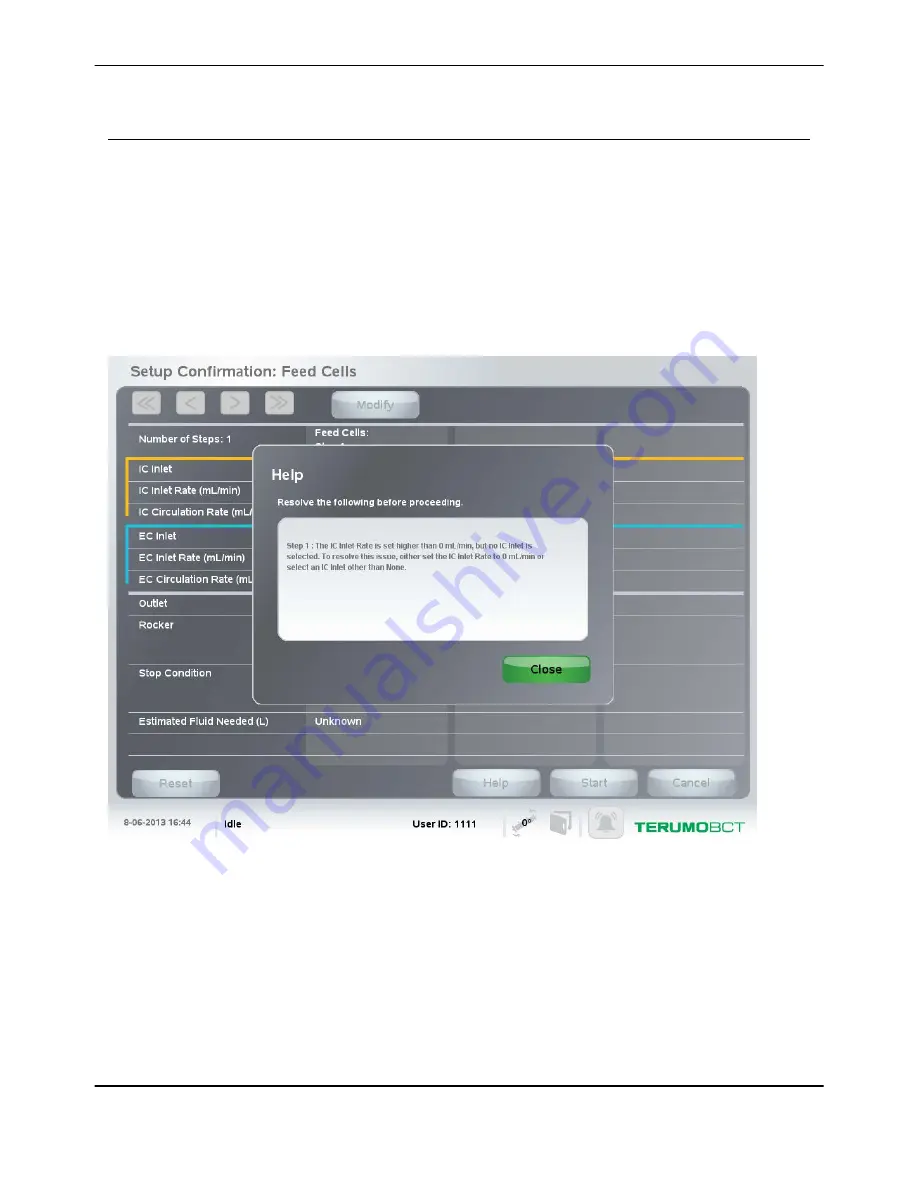
, the Help window appears and provides information about any settings issues that you

must resolve before you can start the task. The information on the Help window includes the step in
which the settings issue occurs, an explanation of the issue, and the options for resolving the issue. 
Figure 3-10 shows an example of the Help window.

Figure 3-10: Help window

Touch Screen

3-20

Quantum

®

 Cell Expansion System • Operator's Manual for Software Version 2.1

Содержание Quantum Cell Expansion System

Страница 1: ...Quantum Cell Expansion System SOFTWARE VERSION 2 1 Operator s Manual...

Страница 2: ...Quantum Cell Expansion System Operator s Manual for Software Version 2 1 Part No 104101 164 Reorder No 720394 002 2016 01...

Страница 3: ...3 Terumo BCT Inc 10811 W Collins Avenue Lakewood Colorado 80215 USA USA Phone 1 877 339 4228 Phone 1 303 231 4357 USA Fax 1 866 715 6768 Fax 1 303 542 5215 Terumo BCT Europe N V Ikaroslaan 41 1930 Zav...

Страница 4: ...ystem Cautions 1 6 Service Cautions 1 6 Cell Expansion Process Cautions 1 6 Service Information 1 8 Return of Used Product 1 8 Use of Additional Devices and Supplies During Cell Expansion 1 9 Disposal...

Страница 5: ...Confirmation Screen 3 15 Setup Screen 3 17 Help Window 3 20 Using the Data Entry Pad 3 21 4 Troubleshooting Troubleshooting Alarms 4 2 Clearing An Alarm 4 5 About Remote Alarm Notification 4 5 Power F...

Страница 6: ...s Load Cell Expansion Set 7 2 Prime Cell Expansion Set 7 10 Separating the Tubing Lines 7 11 Unload Cell Expansion Set 7 12 Connect Sampling Coil 7 13 8 System Management Tasks Remove IC Air 8 2 Remov...

Страница 7: ...er Reports 15 3 Configuration Reports 15 4 Viewing Reports 15 5 Viewing a Current Report 15 5 Viewing a Stored Run Report 15 5 Sorting Stored Run Reports 15 6 Deleting Stored Run Reports 15 7 Sending...

Страница 8: ...pecifications System Specifications 17 2 Environmental Specifications 17 2 Electrical Power and Safety Specifications 17 2 Physical Specifications 17 3 Touch Screen Specifications 17 4 Electromagnetic...

Страница 9: ...vi Quantum Cell Expansion System Operator s Manual for Software Version 2 1...

Страница 10: ...1 Preface Quantum Cell Expansion System Operator s Manual for Software Version 2 1 1 1...

Страница 11: ...rtain conventions to help you identify information This section describes these conventions Numbered Steps All sequential multiple step instructions are numbered as shown in the following example 1 At...

Страница 12: ...ge to the system or other property Note Notes emphasize important details Intended Use Warning It is the responsibility of the user to validate the safety and efficacy of the expanded cells for their...

Страница 13: ...ice on the bottom left corner This connection also functions as a safety disconnect for the device 6 Individuals who operate the Quantum system must be appropriately qualified and trained 7 Avoid pinc...

Страница 14: ...anical hazards 4 If a spill occurs on the primary power switch or on the auxiliary power switch unplug the device and call your service representative Do not touch the switch to turn off the power 5 T...

Страница 15: ...environment for the Quantum system should be maintained between 16 C and 27 C 60 8 F and 80 6 F 8 The rotor cover on each pump must be closed and the rotor latch must be locked before you turn on and...

Страница 16: ...hen loading the cell expansion set do not turn the internal mounting clips more than a quarter turn or you could pinch the tubing 9 If you have loaded a cell expansion set but you do not plan to prime...

Страница 17: ...m Terumo BCT prior to shipping Instructions for cleaning and materials including appropriate shipping containers proper labeling and an RGA number may be obtained from the Terumo BCT Quality Assurance...

Страница 18: ...tor specified in Table 17 3 of this manual to connect to the external gas supply Cell culture fluids For instructions on how to safely use these items with the Quantum system refer to the guidelines p...

Страница 19: ...Preface 1 10 Quantum Cell Expansion System Operator s Manual for Software Version 2 1...

Страница 20: ...2 Introduction Quantum Cell Expansion System Operator s Manual for Software Version 2 1 2 1...

Страница 21: ...mechanisms in place for adding media loading cells harvesting cells and taking samples without opening the system The Quantum system includes an incubator and a cell expansion set used for expanding d...

Страница 22: ...on the front of the device Location Component Function 1 Bag pole Allows you to hang bags during the cell expansion process When you are facing the device the bag pole is located directly above the de...

Страница 23: ...data 5 USB port Allows service personnel to connect the Quantum system to an external device for the purpose of transferring data 6 Carrying handles Allows you to grasp the Quantum system when moving...

Страница 24: ...pressure 4 Gas flow control knob Allows service personnel to adjust the gas flow rate from the external gas source into the system 5 Primary power switch Protects the device from damage caused by an e...

Страница 25: ...ting plate 4 Pegs Hold the tubing line guide in place 5 Rocker arm Holds the bioreactor in place in the incubator 6 Rocker Rotates the bioreactor to facilitate priming and to keep cells from settling...

Страница 26: ...unction 1 EC inlet pump Pumps fluid from an inlet bag to the EC circulation loop 2 IC inlet pump Pumps fluid from an inlet bag to the IC circulation loop via the air removal chamber ARC 3 IC circulati...

Страница 27: ...rotor cover in place over the pump rotor 2 Prongs Hold the tubing in place around the pump rotor 3 Pump rotor Rotates the pump 4 Rotor cover Protects the pump rotor and enables the pump to function pr...

Страница 28: ...e IC media line into the system 4 Cell valve Controls the flow of fluid from the cell line into the IC inlet line and subsequently into the IC circulation loop via the ARC 5 Wash valve Controls the fl...

Страница 29: ...equently into the harvest bag 9 IC circulation valve Controls the flow of fluid through the IC circulation loop 10 IC outlet valve Controls the flow of fluid into the IC outlet line 11 EC outlet valve...

Страница 30: ...rculation loop 2 EC inlet pressure sensor Measures the fluid pressure in the EC circulation loop 3 IC inlet pressure sensor Measures the fluid pressure in the IC circulation loop 4 IC outlet pressure...

Страница 31: ...ent Valve Distribution Valve EC Media Valve Wash Valve Air Removal Valve IC Circulation Valve Harvest Valve IC Outlet Valve EC Outlet Valve IC Inlet Pressure Sensor IC Outlet Pressure Sensor EC Inlet...

Страница 32: ...e kit and case labels of the set refer to the instructions for use that ship with the tubing set Each cell expansion set includes the following main components A hollow fiber bioreactor A gas transfer...

Страница 33: ...aste bags Bags that collect fluid exiting the cell expansion set The operator manually attaches these bags to the outlet line of the cell expansion set using a sterile tubing welder Sampling coil A co...

Страница 34: ...em Run reports record when a user signs in or out of the system as well as any tasks that a user performed or alarms that occurred while that user was signed in to the system For instructions on confi...

Страница 35: ...ID on the status bar Signing Out of the System Complete the following steps to sign out of the system From the home screen 1 Touch Sign Out The system prompts you to confirm that you want to sign out...

Страница 36: ...r new password and touch Enter The password must be at least 4 characters long but no more than 10 characters The data entry pad closes 7 Touch the Confirm New Password field A data entry pad appears...

Страница 37: ...pply requirements for the Quantum system 5 Turn the primary power switch on the back of the device to the on position 6 Turn the auxiliary power switch on the front of the device to the on position Th...

Страница 38: ...3 Touch Screen Quantum Cell Expansion System Operator s Manual for Software Version 2 1 3 1...

Страница 39: ...Home Screen When you turn on the Quantum system the home screen appears Figure 3 1 shows the home screen when the system is idle and Figure 3 2 shows the home screen when the system is performing a t...

Страница 40: ...is idle or the name of the task that the system is currently performing 2 Task When touched the Task Selection screen is displayed 3 Configuration When touched the Configuration Selection screen is d...

Страница 41: ...the system involved in the current state are depicted in their normal colors i e the IC side of the bioreactor is yellow and the EC side of the bioreactor is blue and the parts of the system not invol...

Страница 42: ...he system performs a task this section displays the task name which step of the task the system is currently performing and the total number of steps in the task When the system is not performing a ta...

Страница 43: ...o gray However if you choose to hide the Alarm window by touching the minimize button the alarm button stays orange to remind you that there are unresolved system alarms If you touch the button when i...

Страница 44: ...ome screen when the system is performing certain tasks Next When touched allows you to confirm that the system should move to the next step in a task When a Set Management task such as Prime Cell Expa...

Страница 45: ...allows you to sign in to the system This button appears on the home screen only if user authentication is enabled and the touch screen has locked after a period of inactivity Sign Out When touched al...

Страница 46: ...arrows that show the bi directional flow within the IC and EC circulation loops The Outlet selection is depicted in green when the IC outlet line and or the EC outlet line are being used However when...

Страница 47: ...tabular view displays the same system information as the diagram view but it does not include a diagram of the Quantum system The tabular view provides an alternative way to input and view the setting...

Страница 48: ...Figure 3 5 Home screen set to the tabular view showing the select diagram view button Touch Screen Views Quantum Cell Expansion System Operator s Manual for Software Version 2 1 3 11...

Страница 49: ...Reports window Change Password When touched displays the Change Password window About When touched displays the Quantum System Information dialog box which lists the following information The serial n...

Страница 50: ...tion screen For example to view a list of the Set Management tasks touch Set Management Set Management changes to black to indicate that it is selected and another list of buttons appears Each button...

Страница 51: ...System Management tasks Washout When touched allows you to access the Washout tasks Load and Attach When touched allows you to access the Load and Attach tasks Feed and Add When touched allows you to...

Страница 52: ...s for you If you choose to perform a task using the default values you do not need to enter any settings manually therefore you can immediately start the task by touching Start If you choose to use di...

Страница 53: ...d needed to complete that step of the task 5 Reset When touched allows you to reset all the settings for all the steps of the task to the configured default values 6 Start When touched allows you to b...

Страница 54: ...s all the buttons that can appear on the Setup screen 8 1 3 4 7 6 2 5 10 9 Figure 3 9 Setup screen Table 3 7 Setup screen buttons Name Function 1 Outlet When touched allows you to designate the pathwa...

Страница 55: ...Inlet When touched allows you to select the fluid source line for the IC inlet This selection controls the inlet valve positions Not shown Next Step When touched allows you to display the Setup scree...

Страница 56: ...let Rate When touched allows you to enter a value for the Maximum IC Inlet Rate up to a specified limit This button appears only on the Setup screen when High Density Washout is selected Setup Screen...

Страница 57: ...a task the system disables Start on the Setup Confirmation screen and enables Help If you touch Help the Help window appears and provides information about any settings issues that you must resolve b...

Страница 58: ...as long as it falls within the numeric range specified on the data entry pad The system will not allow you to enter a value that falls outside the acceptable numeric range You can input decimals only...

Страница 59: ...ow 2 Default value dependent on the setting you are entering 3 Acceptable numeric range 4 Number buttons 5 Plus minus button 6 Decimal button 7 Enter 8 Clear button 9 Cancel Touch Screen 3 22 Quantum...

Страница 60: ...4 Troubleshooting Quantum Cell Expansion System Operator s Manual for Software Version 2 1 4 1...

Страница 61: ...Alarm window If the Continue button is disabled you must resolve the condition that caused the critical alarm before you can clear the alarm If the Continue button is enabled you should resolve the c...

Страница 62: ...es of the alarm Each possible cause includes an action you should perform to resolve the condition that is causing the alarm 4 Mute button When touched allows you to mute the sound of any current alar...

Страница 63: ...that caused the alarm 11 shown in Figure 4 2 Maximize button When touched allows you to view additional detail about an individual alarm including the Alarm Description the System Response and the Pos...

Страница 64: ...tification system at your facility so that you can receive notification of alarms that occur on the Quantum system when an operator is not present at the device If remote alarm notification is enabled...

Страница 65: ...at was in progress If the incubator door was open when the power failure occurred the system restores the task that was in progress but it pauses the task so that no parts are moving on the device dur...

Страница 66: ...5 Operator Procedures Quantum Cell Expansion System Operator s Manual for Software Version 2 1 5 1...

Страница 67: ...ch as 150 mL min to prime the filter When priming the filter hold it upright After the filter cartridge is full and the fluid begins to flow into the bag you can slowly increase the flow rate of the t...

Страница 68: ...em is performing a task Caution When you attach a bag to the cell expansion set ensure that the bag is attached to the proper line and that the sterile weld is completely open before starting any task...

Страница 69: ...e lines are each a different size and are made of different materials to accommodate various sizes and types of tubing Choose the appropriate tubing size and type before you attach the cell product or...

Страница 70: ...one tab Figure 5 3 shows the sample coil and the sample coil strain relief located on the cell expansion set Figure 5 3 Cell expansion set 1 Sample coil strain relief 2 Tab on the sample coil strain...

Страница 71: ...ample coil strain relief Figure 5 5 Sample coil loaded into the sterile tubing welder Note Sterile welding near the midpoint of the sample coil allows you to simultaneously take a sample and reconnect...

Страница 72: ...ng in the EC circulation loop 4 Draw 3 mL of media through the filter and the sample port and then discard the media 5 Repeat step 2 to clean the sample port Note To avoid drawing waste into the EC ci...

Страница 73: ...Operator Procedures 5 8 Quantum Cell Expansion System Operator s Manual for Software Version 2 1...

Страница 74: ...6 Performing Tasks Quantum Cell Expansion System Operator s Manual for Software Version 2 1 6 1...

Страница 75: ...performs the task using the modified settings but the system does not save any modified settings for future use However you can configure the default settings for a task so that each time you select...

Страница 76: ...ch fluid required to complete that task This information is based on performing a task using the factory default settings for that task The instructions for a task may also include one or more precond...

Страница 77: ...stem automatically populates an IC Inlet Rate of 10 mL min for step 2 This operator s manual denotes dependent settings by listing one of the following phrases in the settings table for the affected s...

Страница 78: ...Figure 6 2 Setup screen About Settings Quantum Cell Expansion System Operator s Manual for Software Version 2 1 6 5...

Страница 79: ...hat you touched IC Inlet in this example changes to black Figure 6 3 Menu of IC Inlet setting options 2 Touch the desired setting in the menu The button now displays the setting you selected and it ch...

Страница 80: ...entered and changes from black to yellow Automatically Calculated Pump Rates A task may include a pump rate such as the IC Circulation Rate that the system automatically calculates based on another pu...

Страница 81: ...ble 6 3 Example of an automatically calculated pump rate override not available Setting Factory Default Setting Options IC Inlet Rate 260 mL min 50 to 500 mL min IC Circulation Rate 45 mL min N A The...

Страница 82: ...e the EC outlet valve closes and the EC inlet pump turns off In order to achieve an average flow rate equal to the entered value the actual IC inlet rate is double the value that has been set 2 The EC...

Страница 83: ...the desired setting in the menu Outlet changes to green and displays the setting you selected Note If you select Harvest Outlet changes to purple not green Performing Tasks 6 10 Quantum Cell Expansion...

Страница 84: ...he start and end positions indicate the number of degrees from the home position of 0 and both positions must fall within the range of 180 to 270 The bioreactor moves back and forth between the start...

Страница 85: ...tion field A data entry pad appears 7 Use the data entry pad to enter the desired number of degrees from the home position of 0 8 Touch Enter on the data entry pad The End Position field displays the...

Страница 86: ...ationary as the rocker setting for a step of a task For information about using the data entry pad see Using the Data Entry Pad on page 3 21 From the Setup screen 1 Touch Rocker The Setup Rocker windo...

Страница 87: ...ds a task or a step of a task Manual The Manual stop condition requires the operator to stop the system manually by touching Finish or starting another task The following example shows how this operat...

Страница 88: ...ected appears to the right of Stop Condition Time The Time stop condition allows you to specify the total number of minutes that must elapse before the system ends the step The following example shows...

Страница 89: ...IC circulation loop volume plus an approximated inlet line volume EC Volumes reflects the EC circulation loop volume plus an approximated inlet line volume 1 IC Volume the volume of fluid in the IC ci...

Страница 90: ...C Volumes you entered 9 Touch Confirm The Setup Stop Condition window closes IC Volume The IC Volume stop condition allows you to specify the total IC inlet volume that must be added before the system...

Страница 91: ...entry field displays the volume you entered 6 Touch Confirm The Setup Stop Condition window closes Empty Bag The Empty Bag stop condition allows you to empty a bag into the system completely The foll...

Страница 92: ...condition Inlet Volume 1000 mL System The System stop condition is used when the system performs an internal process that is required to complete a task The operator cannot select the System stop con...

Страница 93: ...of the IC side of the bioreactor page 8 2 Remove EC Air Yes Yes Allows you to remove any visible air from the inlet port and the outlet port of the EC side of the bioreactor page 8 4 Condition Media...

Страница 94: ...rafiltration to remove excess IC fluid page 11 2 Feed Cells Yes No Allows you to continuously add fluid at a low flow rate to the IC circulation loop and or the EC circulation loop There are several o...

Страница 95: ...nt Cells And Harvest Yes No Allows you to release and harvest cells page 12 5 Harvest Cells Yes Yes Transfers cells in suspension from the IC circulation loop including cells in the bioreactor to the...

Страница 96: ...7 Set Management Tasks Quantum Cell Expansion System Operator s Manual for Software Version 2 1 7 1...

Страница 97: ...ject or you may puncture the tubing The purpose of this task is for the system to open all the valves which allows you to load the cell expansion set 1 Touch Task 2 Touch Set Management 3 Touch Load C...

Страница 98: ...ontal position as shown in Figure 7 2 and if they are not perform the following steps a Grasp the top internal mounting clip bend it to the side and pull and rotate it one quarter turn clockwise to op...

Страница 99: ...re 7 3 Take out the coils and the bags and set them aside 11 Press on the sides of the tubing organizer to snap it onto the mounting plate and ensure that all five external mounting clips lock over th...

Страница 100: ...step 12 with the bottom internal mounting clip 14 Ensure that the rotor latches are unlocked and that the rotor covers on the pumps are open Note TherotorcoverontheECinletpumpcannotremainopenbecauseof...

Страница 101: ...6 Figure 7 6 Loading the tubing into the pump 1 Blue collar correctly loaded behind the notch 17 Ensure that the tubing is centered on the pump rotor as shown in Figure 7 7 Figure 7 7 Tubing centered...

Страница 102: ...n the right side of the EC inlet pump into the EC fluid detector Figure 7 9 shows the EC inlet line properly loaded into the EC fluid detector Figure 7 9 EC inlet line properly loaded 1 EC inlet line...

Страница 103: ...g the harvest bag on the bag pole 26 Check for kinked lines 27 Press the tubing line guide onto the pegs located on the top right side of the incubator door frame as you face the mounting plate Figure...

Страница 104: ...prime the set until the following day turn off the external gas supply to avoid excess gas buildup in the waste bag 32 Touch Finish 33 Touch Yes The home screen appears the system changes to an idle...

Страница 105: ...screen appears 6 Touch Start Priming begins and the system updates the Prime Cell Expansion Set status screen and the status message at each step throughout the prime process Note During the final ste...

Страница 106: ...teachresultinglinehasanametag For example theECmediatagshouldbelocatedononelineandthereagenttagontheotherline theICmediatagshould be located on one line and the wash tag on the other line Note All sea...

Страница 107: ...line 10 Turn off the external gas supply 11 Remove the bioreactor from the rocker arm 12 Remove the tubing line guide from the pegs 13 Grasp the top internal mounting clip bend it to the left and rota...

Страница 108: ...ld A menu of IC inlet source options appears and the IC Inlet Source field changes to black The available IC inlet source options for this task include IC Media Reagent EC Media and Wash 5 Select the...

Страница 109: ...coil accessory set to the remaining end of the existing sample coil 13 Open the sterile welds 14 Connect the sample coil strain relief to the sample coil line 15 Recoil the sample coil around the rock...

Страница 110: ...8 System Management Tasks Quantum Cell Expansion System Operator s Manual for Software Version 2 1 8 1...

Страница 111: ...d the outlet port of the IC side of the bioreactor Figure 8 1 shows the IC inlet and IC outlet headers located on the bioreactor Figure 8 1 IC headers 1 IC inlet header 2 IC outlet header To perform R...

Страница 112: ...include IC Media Reagent EC Media and Wash 5 Select the desired inlet source from the menu The Inlet Source field displays the option you selected and changes to gray 6 Touch Start When the system com...

Страница 113: ...removing air from the EC outlet then it removes air from the EC inlet and then it removes any residual air left in the EC outlet Figure 8 3 shows the EC inlet and EC outlet ports located on the biore...

Страница 114: ...include IC Media Reagent EC Media and Wash 5 Select the desired inlet source from the menu The Inlet Source field displays the option you selected and changes to gray 6 Touch Start When the system com...

Страница 115: ...based on the factory default settings for this task Table 8 1 Solutions for Condition Media Line Solution Attached to the Line Required Volume estimate based on factory default settings Cell None N A...

Страница 116: ...A IC Circulation Rate 100 mL min Same as step 1 EC Inlet EC Media Same as step 1 EC Inlet Rate 0 1 mL min Same as step 1 EC Circulation Rate 30 mL min 0 to 100 mL min Outlet EC Outlet N A Rocker Stati...

Страница 117: ...s for Coat Bioreactor Line Solution Attached to the Line Required Volume estimate based on factory default settings Cell None N A Reagent Reagent As desired IC Media None N A Wash Wash solution 0 1 L...

Страница 118: ...n Rate 100 mL min Same as step 1 EC Inlet None N A EC Inlet Rate 0 mL min N A EC Circulation Rate 30 mL min Same as step 1 Outlet EC Outlet N A Rocker Stationary 0 Same as step 1 Stop Condition IC Vol...

Страница 119: ...ual Manual Time 0 1 to 2880 min 4 Touch Start 5 Check the status line to confirm that the task has started 6 Touch Finish when you are ready to complete the task 7 Touch Yes The home screen appears th...

Страница 120: ...9 Washout Tasks Quantum Cell Expansion System Operator s Manual for Software Version 2 1 9 1...

Страница 121: ...1 Solutions for High Density Washout Line Solution Attached to the Line Required Volume estimate based on factory default settings Cell None N A Reagent None N A IC Media Media with protein Approximat...

Страница 122: ...one N A EC Media Media without protein 0 1 L Rapid IC Washout pathway Task Washout Rapid IC Washout 1 Confirm the settings for Rapid IC Washout shown in Table 9 4 Table 9 4 Settings for Rapid IC Washo...

Страница 123: ...in IC Volume 1 to 4000 mL Exchange 0 5to5 0ICVolumes N AforECVolumes 2 Touch Start 3 Check the status line to confirm that the task has started When the system completes the task the home screen appea...

Страница 124: ...IC EC Washout pathway Task Washout IC EC Washout 1 Confirm the settings for IC EC Washout shown in Table 9 6 Table 9 6 Settings for IC EC Washout Setting Factory Default Setting Options IC Inlet IC M...

Страница 125: ...sec In Motion 180 to 270 0 to 3600 sec Stationary 180 to 270 Stop Condition Exchange 2 5 IC Volumes 2 5 EC Volumes Exchange 0 5 to 5 0 IC Volumes 0 5 to 5 0 EC Volumes 2 Touch Start 3 Check the status...

Страница 126: ...Volume estimate based on factory default settings Cell None N A Reagent None N A IC Media Media with protein 0 3 L Wash None N A EC Media Media without protein 0 4 L IC EC Washout Through Membrane pat...

Страница 127: ...rate based on the EC Inlet Rate for this task Outlet EC Outlet N A Rocker In Motion 90 180 1 sec In Motion 180 to 270 0 to 3600 sec Stationary 180 to 270 Stop Condition Exchange 1 0 IC Volumes 1 0 EC...

Страница 128: ...destination bags 1 Touch Task 2 Touch Washout 3 Touch Inlet Line Washout The Setup Inlet Line Washout screen appears which prompts you to select the inlet source and the inlet destination as shown in...

Страница 129: ...ay 8 Follow the on screen instructions and lower the destination bag so that it hangs below the source bag 9 Touch Start The Inlet Line Washout status screen appears and includes a progress bar 10 Fol...

Страница 130: ...10 Load and Attach Tasks Quantum Cell Expansion System Operator s Manual for Software Version 2 1 10 1...

Страница 131: ...default settings for this task As a precondition before starting this task Fill the cell inlet bag with a minimum of approximately 40 mL of air Table 10 1 Solutions for Load Cells With Circulation Lin...

Страница 132: ...min Same as step 1 IC Circulation Rate 139 mL min Same as step 1 EC Inlet None N A EC Inlet Rate 0 mL min N A EC Circulation Rate 30 mL min Same as step 1 Outlet EC Outlet N A Rocker In Motion 90 180...

Страница 133: ...tlet N A Rocker In Motion 90 180 1 sec Same as step 1 Stop Condition IC Volume 63 mL IC Volume 22 to 84 mL 4 Touch Start 5 Check the status line to confirm that the task has started When the system co...

Страница 134: ...of air Follow the instructions in Using the In Line Filter 200 Micron Accessory Set on page 5 4 to add the in line filter to the cell line of the cell expansion set if desired Table 10 5 Solutions fo...

Страница 135: ...ia IC Inlet Rate 50 mL min Same as step 1 IC Circulation Rate 0 mL min Same as step 1 EC Inlet None N A EC Inlet Rate 0 mL min N A EC Circulation Rate 30 mL min Same as step 1 Outlet EC Outlet N A Roc...

Страница 136: ...e N A EC Media Media without protein 6 mL hour Attach Cells pathway Task Load and Attach Attach Cells 1 Confirm the settings for Attach Cells shown in Table 10 9 Table 10 9 Settings for Attach Cells S...

Страница 137: ...ouch Yes The home screen appears the system changes to an idle state and the status line displays Idle Load and Attach Tasks 10 8 Quantum Cell Expansion System Operator s Manual for Software Version 2...

Страница 138: ...t settings for this task As a precondition before starting this task Fill the cell inlet bag with a minimum of approximately 40 mL of air Table 10 10 Solutions for Load Cells With Uniform Suspension L...

Страница 139: ...tions IC Inlet IC Media Reagent IC Media Wash EC Media IC Inlet Rate 25 mL min Same as step 1 IC Circulation Rate 150 mL min Same as step 1 EC Inlet None N A EC Inlet Rate 0 mL min N A EC Circulation...

Страница 140: ...utlet N A Rocker In Motion 90 180 1 sec Same as step 1 Stop Condition Time 2 min Time 0 1 to 20 min 4 Touch Start 5 Check the status line to confirm that the task has started When the system completes...

Страница 141: ...Load and Attach Tasks 10 12 Quantum Cell Expansion System Operator s Manual for Software Version 2 1...

Страница 142: ...11 Feed and Add Tasks Quantum Cell Expansion System Operator s Manual for Software Version 2 1 11 1...

Страница 143: ...timate based on factory default settings Cell None N A Reagent None N A IC Media Media with protein 6 mL hour Wash None N A EC Media None N A Feed Cells With Ultrafiltration pathway Task Feed and Add...

Страница 144: ...00 mL EC Volume 1 to 4000 mL 2 Touch Start 3 Check the status line to confirm that the task has started 4 Touch Finish when you are ready to complete the task 5 Touch Yes The home screen appears the s...

Страница 145: ...otein 6 mL hour Wash None N A EC Media None N A Feed Cells pathway Task Feed and Add Feed Cells 1 Confirm the values for each setting for Feed Cells shown in Table 11 4 Table 11 4 Settings for Feed Ce...

Страница 146: ...00 mL EC Volume 1 to 4000 mL 2 Touch Start 3 Check the status line to confirm that the task has started 4 Touch Finish when you are ready to complete the task 5 Touch Yes The home screen appears the s...

Страница 147: ...N A EC Media None N A Add Bolus pathway Task Feed and Add Add Bolus 1 Confirm the settings for Add Bolus shown in Table 11 6 Table 11 6 Settings for Add Bolus Setting Factory Default Setting Options I...

Страница 148: ...L EC Volume 1 to 300 mL Time 0 1 to 20 min 2 Touch Start 3 Check the status line to confirm that the task has started When the system completes the task the home screen appears the system changes to a...

Страница 149: ...minimum of approximately 40 mL of air Table 11 7 Solutions for Add Bag Contents Line Solution Attached to the Line Required Volume estimate based on factory default settings Cell None N A Reagent Reag...

Страница 150: ...Media IC Inlet Rate 10 mL min Same as step 1 IC Circulation Rate 100 mL min Same as step 1 EC Inlet None N A EC Inlet Rate 0 mL min Same as step 1 EC Circulation Rate 30 mL min Same as step 1 Outlet...

Страница 151: ...hour Wash None N A EC Media None N A Add Fluid Continuously pathway Task Feed and Add Add Fluid Continuously 1 Confirm the values for each setting for Add Fluid Continuously shown in Table 11 11 Table...

Страница 152: ...4000 mL EC Volume 1 to 4000 mL 2 Touch Start 3 Check the status line to confirm that the task has started 4 Touch Finish when you are ready to complete the task 5 Touch Yes The home screen appears th...

Страница 153: ...ached to the Line Required Volume estimate based on factory default values Cell None N A Reagent None N A IC Media Media with protein 6 mL hour Wash None N A EC Media None N A Add Fluid Continuously W...

Страница 154: ...0 1 to 1440 min Manual IC Volume 1 to 4000 mL EC Volume 1 to 4000 mL 2 Touch Start 3 Check the status line to confirm that the task has started 4 Touch Finish when you are ready to complete the task...

Страница 155: ...Feed and Add Tasks 11 14 Quantum Cell Expansion System Operator s Manual for Software Version 2 1...

Страница 156: ...12 Release and Harvest Tasks Quantum Cell Expansion System Operator s Manual for Software Version 2 1 12 1...

Страница 157: ...ult settings for this task As a precondition before starting this task Fill the cell inlet bag with a minimum of approximately 40 mL of air Table 12 1 Solutions for Release Adherent Cells Line Solutio...

Страница 158: ...et IC Outlet IC and EC Outlet Rocker In Motion 90 180 1 sec In Motion 180 to 270 0 to 3600 sec Stationary 180 to 270 Stop Condition Exchange 2 5 IC Volumes 2 5 EC Volumes Exchange 0 5 to 5 0 IC Volume...

Страница 159: ...5 Step 4 Settings for Release Adherent Cells Setting Factory Default Setting Options IC Inlet None N A IC Inlet Rate 0 mL min N A IC Circulation Rate 300 mL min 30 to 300 mL min EC Inlet None N A EC I...

Страница 160: ...needed to attach to each line when performing Release Adherent Cells And Harvest These solutions and corresponding volumes are based on the factory default settings for this task As a precondition bef...

Страница 161: ...es and EC Volumes used for the Exchange stop condition for this step EC Circulation Rate 1 7 mL min N A The system automatically calculates this rate based on the EC Inlet Rate for this step Outlet IC...

Страница 162: ...IC Circulation Rate 300 mL min Same as step 2 EC Inlet None N A EC Inlet Rate 0 mL min N A EC Circulation Rate 30 mL min Same as step 2 Outlet EC Outlet N A Rocker In Motion 90 180 1 sec Same as step...

Страница 163: ...to 18 mL min The system automatically calculates this rate based on the IC Inlet Rate for this step EC Inlet EC Media Reagent IC Media Wash EC Media EC Inlet Rate 60 mL min 0 to 100 mL min EC Circulat...

Страница 164: ...Media Harvest media 0 4 L Wash None N A EC Media Media without protein 0 1 L When harvesting non adherent cells you can use PBS or a similar electrolyte solution as the harvest media in this situation...

Страница 165: ...3600 sec Stop Condition IC Volume 378 mL IC Volume 50 to 1000 mL 2 Touch Start 3 Check the status line to confirm that the task has started When the system completes the task the home screen appears...

Страница 166: ...13 Custom Tasks Quantum Cell Expansion System Operator s Manual for Software Version 2 1 13 1...

Страница 167: ...min 300 to 300 mL min EC Inlet None Reagent IC Media Wash EC Media None EC Inlet Rate 0 mL min 0 to 300 mL min EC Circulation Rate 0 mL min 300 to 300 mL min Outlet EC Outlet EC Outlet IC Outlet IC an...

Страница 168: ...14 Quantum System Configuration Quantum Cell Expansion System Operator s Manual for Software Version 2 1 14 1...

Страница 169: ...e Configuration Selection screen as shown in Figure 14 1 If user authentication is enabled the system prompts you to enter your user ID and password before it displays the Configuration Selection scre...

Страница 170: ...election buttons 2 Purple border and the wrench symbol that indicate configuration screens 3 Close which allows you to close the Configuration Selection screen Quantum System Configuration Quantum Cel...

Страница 171: ...Quantum System Configuration 14 4 Quantum Cell Expansion System Operator s Manual for Software Version 2 1...

Страница 172: ...15 Reports Quantum Cell Expansion System Operator s Manual for Software Version 2 1 15 1...

Страница 173: ...rough the completion of Unload Cell Expansion Set The system records the following information in each run report Each task the system performed including tasks that were stopped prior to completion a...

Страница 174: ...cubator Temperature 37 0 C IC Inlet Pressure 2 0 mmHg IC Outlet Pressure 3 0 mmHg EC Inlet Pressure 6 0 mmHg EC Outlet Pressure 7 0 mmHg Task Stopped Load Cell Expansion Set Task Started Load Cells Wi...

Страница 175: ...ure set point and low temperature alarm configuration Default settings for all tasks Records if steps were omitted from a task Report settings Run report generation automatic report sending selected r...

Страница 176: ...rts screen appears 3 Under Run Reports touch Manage The Manage Run Reports screen appears and shows a list of all the stored run reports as shown in Figure 15 2 on page 15 6 The list also includes the...

Страница 177: ...eports have been sent to the configured FTP server 1 Touch Utilities The Utilities screen appears 2 Touch Reports The Reports screen appears 3 Under Run Reports touch Manage The Manage Run Reports scr...

Страница 178: ...un Reports screen Complete the following steps to delete stored run reports 1 Touch Utilities The Utilities screen appears 2 Touch Reports The Reports screen appears 3 Under Run Reports touch Manage T...

Страница 179: ...at you want to send to the FTP server touch View For example if you want to send the current configuration report to the server touch View under the Configuration Reports section The system displays t...

Страница 180: ...teps to edit the name of the current run report at the start of Load Cell Expansion Set From the Setup Load Cell Expansion Set screen 1 Touch the Report Name field A data entry pad appears 2 Use the d...

Страница 181: ...t any time during a run to record temperature and pressure on a run report 1 Touch Utilities The Utilities screen appears 2 Touch Reports The Reports screen appears as shown in Figure 15 3 3 Under Run...

Страница 182: ...16 Maintaining the Quantum System Quantum Cell Expansion System Operator s Manual for Software Version 2 1 16 1...

Страница 183: ...the instructions in this chapter to clean and disinfect the Quantum system Other than to ensure that the system is clean and undamaged before use you are not required to maintain the system Cleaning...

Страница 184: ...6 0 commercial household bleach diluted with 18 parts water to disinfect any portion of the Quantum system that comes in contact with a biohazardous spill Allow the surfaces to air dry For maximum eff...

Страница 185: ...Maintaining the Quantum System 16 4 Quantum Cell Expansion System Operator s Manual for Software Version 2 1...

Страница 186: ...17 System Specifications Quantum Cell Expansion System Operator s Manual for Software Version 2 1 17 1...

Страница 187: ...General Requirements Safety standards Complies with EN 61010 1 Safety requirements for electrical equipment for measurement control and laboratory use Part 1 General Requirements EN 61326 Electrical...

Страница 188: ...ace Physical dimensions Height 50 cm 19 65 in Height with the bag pole 96 5 cm 38 in Width 48 3 cm 19 in Depth 58 4 cm 23 in Weight Weight without the bag pole less than or equal to 56 7 kg 125 lb Cle...

Страница 189: ...i Discharge area when facing the back of the device the discharge area is located on the back on the bottom left side Internal 40 micron filter installed Device has a 303 stainless steel ARO shape hos...

Страница 190: ...gh frequencies only for its internal function e g computer timing signals and internal communication The RF emissions meet the requirements of CISPR 11 Therefore its RF emissions are very low and are...

Страница 191: ...ent Voltage dips short interruptions and voltage variations on power supply input lines IEC 61000 4 11 0 during half cycle 0 during 1 cycle 70 during 25 30 cycles1 0 during 250 300 cycles2 0 during ha...

Страница 192: ...ble to the frequency of the transmitter Recommended separation distance Conducted RF IEC 61000 4 6 3 Vrms 150 kHz to 80 MHz 3 V m 80 MHz to 1 0 GHz 3 Vrms 150 kHz to 80 MHz 3 V m 80 MHz to 1 0 GHz For...

Страница 193: ...Hz and 800 MHz the higher frequency range applies Note These guidelines may not apply in all situations Electromagnetic propagation is affected by absorption and reflection from structures objects and...

Страница 194: ...munications equipment Table 17 9 Recommended Separation Distances Between Portable and Mobile RF Communications Equipment and the Quantum System Rated maximum output power of transmitter W Separation...

Страница 195: ...r use Indicates that the equipment is subject to directive 2002 96 EC concerning waste electrical and electronic equipment WEEE and must be disposed of accordingly Indicates that the product was manuf...

Страница 196: ...et with fluid to displace the existing contents and to move the contents from one location to another For example you could use media to chase cells from the ARC to the IC circulation loop CO2 The abb...

Страница 197: ...abbreviation for Hank s Buffered Salt Solution I IC The abbreviation for intracapillary Incubator The environmentally controlled chamber in which the cell expansion process takes place Intracapillary...

Страница 198: ...that determines how and when the system stops performing the current task or step of a task T Task A series of one or more steps Each step includes a set of valve and pump states that achieve a speci...

Страница 199: ...report A report that contains a list of all the current users in the system including the User Role that is assigned to each user User Role When user authentication is enabled this setting determines...

Страница 200: ...ndles 2 4 cautions 1 3 1 6 cell expansion process 1 6 service 1 6 system 1 6 cell expansion set 1 6 2 2 2 13 7 2 7 10 7 12 cell inlet bag 5 2 5 3 9 9 10 2 10 5 10 9 11 8 12 5 cell line 2 9 5 4 9 9 cel...

Страница 201: ...n buttons 3 7 glucose 1 9 H harvest bag 2 10 2 13 12 9 Harvest Cells 12 9 harvest line 2 10 2 13 harvest valve 2 10 6 9 HBSS 7 10 Help Window 3 20 High Density Washout 6 18 9 2 home position 6 11 6 13...

Страница 202: ...ase Adherent Cells And Harvest 12 5 Release and Harvest tasks 6 20 remote alarm notification 4 5 Remove EC Air 1 6 8 4 Remove IC Air 1 6 8 2 reports configuration 15 4 deleting 15 7 editing name 15 9...

Страница 203: ...hed window 6 2 task pathway 6 3 Task Selection screen 3 13 temperature window 3 4 time display 3 5 stamp 4 3 Time stop condition 6 15 touch screen 2 2 2 3 3 2 3 9 17 4 troubleshooting alarms 4 2 tryps...

Страница 204: ...ca Ikaroslaan 41 1930 Zaventem Belgium Phone 32 2 715 05 90 Fax 32 2 721 07 70 Terumo BCT Japan Inc Takanawa Park Tower 13F 20 14 3 chome Higashi Gotanda Shinagawa ku Tokyo 141 0022 Japan Phone 81 3 6...

Отзывы: