background image

Installation and Operating Guide  


High- 

IonBar™ (Ionizing Bar) 

© 

Copyright 2016 Terra Universal Inc. All rights reserved. 

• Revised November 2016 • Document No. 1800-45 

Terra Universal, Inc.  •  TerraUniversal.com  •  800 S. Raymond Ave.  •  Fullerton, CA  92831  •  TEL: (714) 578-6000  •  FAX: (714) 578-6020 


2.0


Installation 


Carefully unpack your ionizing equipment. Report any shipping damage immediately to the freight company. 


Installation on Fan/Filter Units 


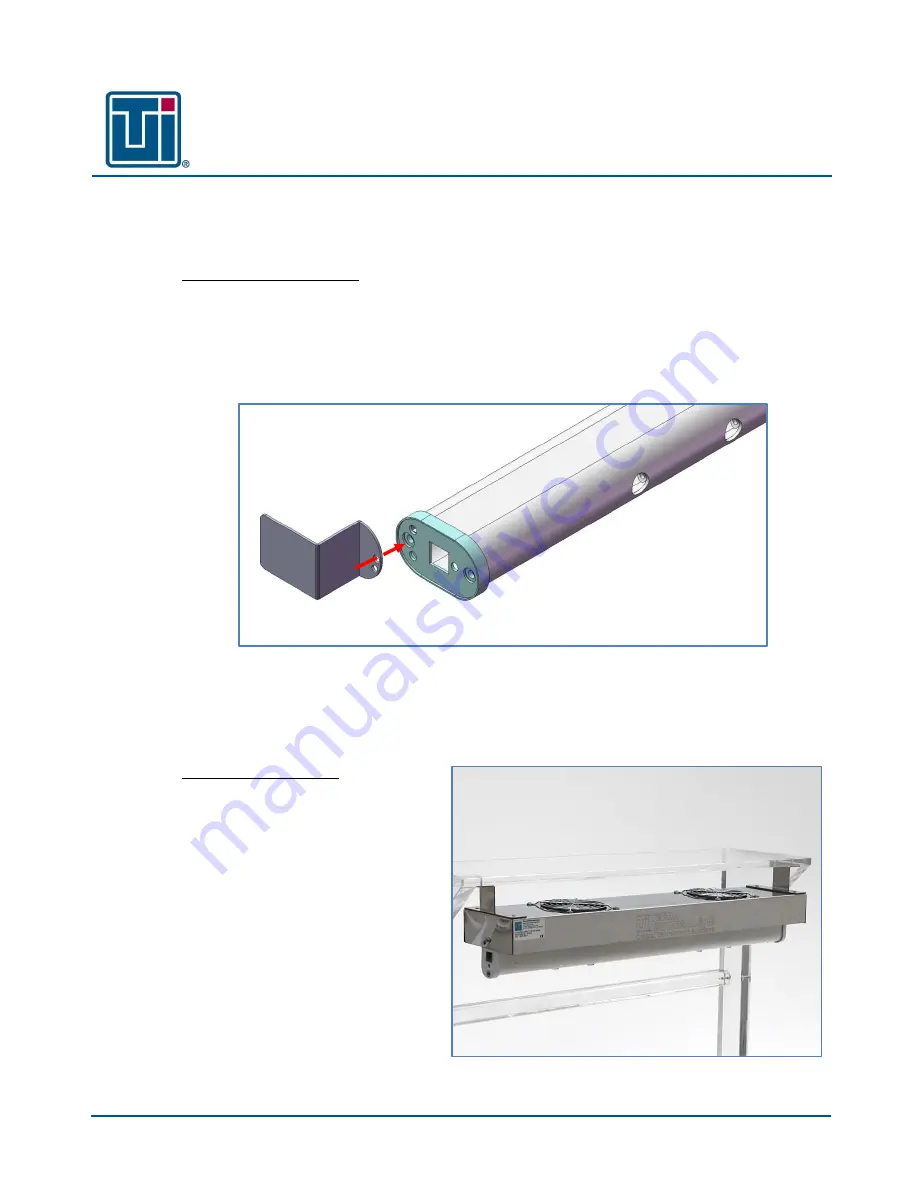
When  ordered  with  a  fan/filter  unit,  the  IonBar™  includes  a  set  of  stainless  steel  mounting  brackets  designed  to 

suspend the IonBar™ within the stream of HEPA-filtered air.  The airflow is required for the ions to reach the targeted 

surface before they are dispersed, allowing for efficient neutralization of static charges. 


Attach the mounting brackets according to the diagram below (one on each end), using the provided screws. 


With  the  mounting  brackets  installed,  place  the  IonBar™  in  the  ceiling  bay  where  the  fan/filter  unit  goes.    The 

mounting brackets will rest upon the frame of the ceiling bay; no other fasteners are required.  Simply lower the FFU 

into the ceiling bay and allow the weight of the FFU to hold the IonBar™ in position. 


Installation on Gloveboxes 


When ordered with a glovebox, the IonBar™ 

will be mounted to a stainless steel fan module 

that will aid in the dispersal of ions.  The 

IonBar™ assembly will be preinstalled in the 

chamber, in the orientation specified by the 

original order.   


Typically, the ions need to be directed 

downward towards the main work area.  

However, in some cases, the application 

requires the ions to be directed towards the 

user, eliminating static around the gloves.  The 

design of the mounting brackets allows for a 

wide range of mounting locations to best suit 

your application. 


Figure 1: 

Fasten the mounting bracket in the orientation shown above. 

Figure 2: 

The airflow from the fan module is required to 

disperse the generated ions throughout the glovebox


Содержание IonBar

Страница 1: ...ide Document No 1800 45 IonBar Ionizing Bar Copyright 2016 Terra Universal Inc All rights reserved Revised November 2016 Terra Universal Inc TerraUniversal com 800 S Raymond Ave Fullerton CA 92831 TEL 714 578 6000 FAX 714 578 6020 ...

Страница 2: ...ods Preinstalled IonBars can also be purchased individually and installed by the user in the desired application An installation kit with standard FFU mounting brackets is sold separately and includes the power supply transformer NOTE For installation in a hood the overall hood width should be at least 2 greater than the length of the desired IonBar Proprietary Notice This manual pertains to propr...

Страница 3: ...e mounting brackets installed place the IonBar in the ceiling bay where the fan filter unit goes The mounting brackets will rest upon the frame of the ceiling bay no other fasteners are required Simply lower the FFU into the ceiling bay and allow the weight of the FFU to hold the IonBar in position Installation on Gloveboxes When ordered with a glovebox the IonBar will be mounted to a stainless st...

Страница 4: ...r transformer If the IonBar is ordered with the Installation Kit the power transformer power cable and appropriate mounting clips will be included 1 Use a telephone type connector and low voltage cable to connect the IonBar to the power transformer 2 Connect the transformer to the appropriate power supply 120VAC or 240VAC NOTE A single transformer provides ample power for up to 20 emitter pairs De...

Страница 5: ...emove deposits from the emitter points 3 If deposits cannot be removed or if the tips appear worn or bent the IonBar may not discharge surfaces with optimal efficiency In this case replace the tips Use a pencil eraser or needle nosed pliers to remove the old tip Insert the new tip and gently press until it seats against the connector no twisting is necessary 4 0 Specifications Replacement Parts Pr...

Страница 6: ...0Hz Power Rating 1A List of Input Connections Telephone cable connector low voltage List of Output Connections Telephone cable connector wall transformer Equipment Installation Assembly See Section 2 Installation Page 3 Protective Earthing Grounding N A Utility Requirements None Equipment Operation Operating Controls None Disconnect Device Wall transformer see warning on Page 5 Accessory Connectio...

Страница 7: ...separately For Terra s Policy and Procedures for Returning Goods see Terra s Internet site www TerraUniversal com Generally customers can improve the chance of collecting on a freight claim by following these procedures 1 formally requesting that the carrier inspect the shipment immediately upon suspecting damage or shortage to verify condition 2 notifying the carrier upon discovery of concealed d...

Отзывы: