background image

15 

2.


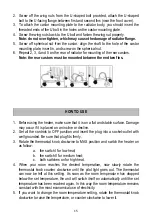
Screw off the wing nuts from the U-shaped bolt provided, attach the U-shaped 

bolt to the U-facing flange between first and second fins (near the front cover). 

3.


To attach the castor mounting plate to the radiator body, you should insert the 
threaded ends of the U bolt in the holes on the castor mounting plate. 

4.


Screw the wing nuts back to the U bolt and fasten the wing nut properly.  

Note: do not over tighten, which may cause the damage of radiator flange. 

5.


Screw off spherical nut from the castor, align the shaft to the hole of the castor 

mounting plate, insert in, and screw on the spherical nut.


6.


Repeat 2, 3, 4 and 5 on the rear of radiator for mounting of the rear castors. 


Note: the rear castors must be mounted between the end two fins. 


HOW TO USE 

 
1.


Before using the heater, make sure that it is on a flat and stable surface. Damage 

may occur if it is placed on an incline or decline. 

2.


Set all the controls to OFF position and insert the plug into a socket-outlet with 

well grounded. Be sure that plug fits firmly. 

3.


Rotate the thermostat knob clockwise to MAX position and switch the heater on 
as follow: 

a.


the switch I for low heat; 

b.


the switch II for medium heat; 

c.


both switches on for high heat. 

4.


When  your  room  reaches  the  desired  temperature,  now  slowly  rotate  the 

thermostat knob counter clockwise until the pilot light goes out. The thermostat 
can now be left at this setting. As soon as the room temperature has dropped 

below the set temperature, the unit will switch itself on automatically until the set 

temperature has been reached again. In this way the room temperature remains 

constant with the most economical use of electricity. 

5.


If you want to change the room temperature setting, rotate the thermostat knob 
clockwise to raise the temperature, or counter clockwise to lower it. 

Содержание TZR20

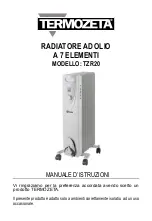
Страница 1: ... A 7 ELEMENTI MODELLO TZR20 MANUALE D ISTRUZIONI Vi ringraziamo per la preferenza accordata avendo scelto un prodotto TERMOZETA Il presente prodotto è adatto solo a ambienti correttamente isolati o ad un uso occasionale ...

Страница 2: ...eve essere letto attentamente prima dell utilizzo perché fornisce importanti indicazioni riguardanti la sicurezza di installazione d uso e di manutenzione Conservare quindi con cura Cordialmente Lange Distribution S r l Leggere attentamente questo manuale d istruzioni poichè all interno vi sono importanti informazioni sulla sicurezza l uso e la manutenzione dell elettrodomestico Conservare il manu...

Страница 3: ...pparecchio dall alimentazione 6 Nel caso in cui si verificassero situazioni anomale spegnere immediatamente l apparecchio e contattare il rivenditore o il servizio di assistenza 7 Questo prodotto è previsto per esclusivo impiego domestico Non permettere che parti del prodotto vengano in contatto con elementi atmosferici 8 Non utilizzare questo apparecchio di riscaldamento con programmatori tempori...

Страница 4: ... non dovranno inserire la spina di alimentazione alla presa di corrente regolare l apparecchio e pulirlo o comunque operare qualsiasi manutenzione 21 L apparecchio può essere utilizzato da bambini di età non inferiore a 8 anni e da persone con ridotte capacità fisiche sensoriali o mentali o prive di esperienza o della necessaria conoscenza purché sotto sorveglianza oppure dopo che le stesse abbian...

Страница 5: ...34 Non far passare il cavo di alimentazione sotto moquette e non coprirlo tappeti passatoie etc Posizionare il cavo in luogo ove non ci si possa inciampare 35 Non utilizzare quando il cavo di alimentazione o la spina sono danneggiati o in caso di malfunzionamento o caduta dell unità 36 E sconsigliato l uso di prolunghe elettriche onde evitare qualsiasi rischio di incendio 37 Utilizzare l unità in ...

Страница 6: ...tiva Bassa Tensione 2014 35 CE Compatibilità Elettromagnetica 2014 30 CE e RohS II 2011 65 CE DESCRIZIONE 1 Manico trasporto 2 Manopola termostato 3 Interruttore On Off 4 Vano cavo d alimentazione 5 Elementi 6 Ruote ASSEMBLAGGIO L unità è presente nella confezione senza le ruote assemblate E necessario assemblarle prima di iniziare ad utilizzarla ATTENZIONE Non utilizzare senza aver assemblato le ...

Страница 7: ...radiatore 6 Svitare il dado sferico dal ricino allineare l asse al foro della piastra di fissaggio inserire ed avvitare il dado sferico 7 Ripetere 2 3 4 e 5 sul retro del radiatore per il montaggio delle ruote posteriori Nota le ruote posteriori devono essere montate tra i primi due elementi GUIDA ALL USO 1 Prima di utilizzare l unità assicurarsi che la superficie su cui è posizionata sia piana e ...

Страница 8: ...tezione il quale si attiva non appena la stufa raggiunge delle temperature troppo elevate spegnendosi ed evitando quindi il surriscaldamento degli elementi 7 Per spegnere completamente l unità ruotare tutti i controlli su OFF e scollegare dalla presa di corrente PULIZIA E MANUTENZIONE 1 Scollegare sempre il cavo di alimentazione dalla presa di corrente e lasciare che l unità si raffreddi prima di ...

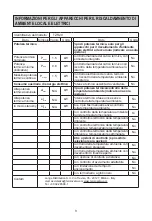
Страница 9: ... elettrica Potenza termica assistita da ventilatore No Alla potenza termica nominale elmax kW Tipo di potenza termica controllo della temperatura ambiente indicare una sola opzione Alla potenza termica minima elmin kW Potenza termica a fase unica senza controllo della temperatura ambiente No In modo stand by elSB kW Due o più fasi manuali senza controllo della temperatura ambiente Sì Con controllo...

Страница 10: ...10 OIL HEATER 7 ELEMENTS MODEL TZR20 INSTRUCTION MANUAL Read this instruction manual carefully Keep it for future reference This product is only suitable for well insulated spaces or occasional use ...

Страница 11: ...ow atmospheric agent go in touch with the product 8 Do not use this device connected to controllers timers remote control or any other device that may turn the unit automatically on risk of fire if the unit is covered or placed uncorrectly 9 Do not use flying sockets or damaged cables 10 Hold the plug firmly when disconnecting from the electric socket to prevent electric shock short circuit or fir...

Страница 12: ...pervision 22 Caution some parts of this product can become very hot and cause burns Particular attention has to be given where children and vulnerable people are present 23 If external cable is damaged it must be replaced by a qualified service assistance 24 Children should be supervised to ensure that they do not play with the appliance 25 The appliance must not be placed below electric socket on...

Страница 13: ...s as there may be a risk of fire Keep the above flammable materials surfaces or substances at least 1m from the front of the product and keep them away from the sides and rear 39 Do not use the heater in any areas where petrol paint or other flammable liquids are stored e g Garages or workshops as a hot arcing or sparking parts inside the heater 40 This heater is hot when in use To avoid burns and...

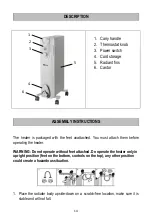
Страница 14: ...unattached You must attach them before operating the heater WARNING Do not operate without feet attached Do operate the heater only in upright position feet on the bottom controls on the top any other position could create a hazardous situation 1 Place the radiator body upside down on a scratch free location make sure it is stable and will not fall 1 2 3 4 6 5 ...

Страница 15: ...t is on a flat and stable surface Damage may occur if it is placed on an incline or decline 2 Set all the controls to OFF position and insert the plug into a socket outlet with well grounded Be sure that plug fits firmly 3 Rotate the thermostat knob clockwise to MAX position and switch the heater on as follow a the switch I for low heat b the switch II for medium heat c both switches on for high h...

Страница 16: ...he heater 2 Wipe radiator with a soft damp not wet cloth Warning 3 Do not immerse the heater in water 4 Do not use any cleaning chemicals such as detergents and abrasives 5 Do not allow the interior to get wet as this could create a hazard 6 To store away the heater wind the cable round bobbin and store the heater in a clean dry place 7 In case of malfunction or doubt do not try to repair the radi...

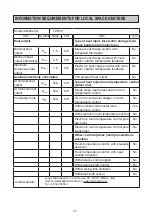
Страница 17: ...eedback No Auxiliary electricity consuption Fan assisted heat output No At nominal heat output elmax N A kW Type of heat output room temperature control select one At minimum heat output elmin N A kW Single stage heat output and no room temperature control No In standby mode elSB N A kW Two or more manual stages no room temperature control Yes With mechanic thermostat room temperature control No W...

Страница 18: ...0127 Milano Italy Lange Distribution S r l reserves the right to introduce technical and or aesthetic changes to its products intended to improve performances Termozeta is an international trademark Copyright 1995 All rights reserved Lange Distribution S r l Via Treviso 35 20127 Milano Italy Importato da Lange Distribution S r l Via Treviso 35 20127 Milano Tel 39 02 28506 1 Prodotto in Cina INFORM...

Отзывы: