background image

Part No. 40462

DPL-25S • DPL-30S • DPL-35S Super Series

 7 - 1

September 2016

  Section 7 - Repair Procedures

Repair Procedures

About This  Section

Most of the procedures in this section should only
be performed by a trained service professional
in a suitably equipped workshop. Select the
appropriate repair procedure after troubleshooting
the problem.

Perform disassembly procedures to the point
where repairs can be completed. Then to
re-assemble, perform the disassembly steps in
reverse order.

General Repair Process

Observe and Obey:

Repair procedures shall be completed by a

person trained and qualified on the repair of this
machine.

Immediately tag and remove from service a

damaged or malfunctioning machine.

Repair any machine damage or malfunction

before operating the machine.

Before Repairs Start:

Read, understand and obey the safety rules

and operating instructions in the 

Genie DPL

Super Series Operator's Manual.

Be sure that all necessary tools and parts are

available and ready for use.

Read each procedure completely and adhere to

the instructions. Attempting shortcuts may
produce hazardous conditions.

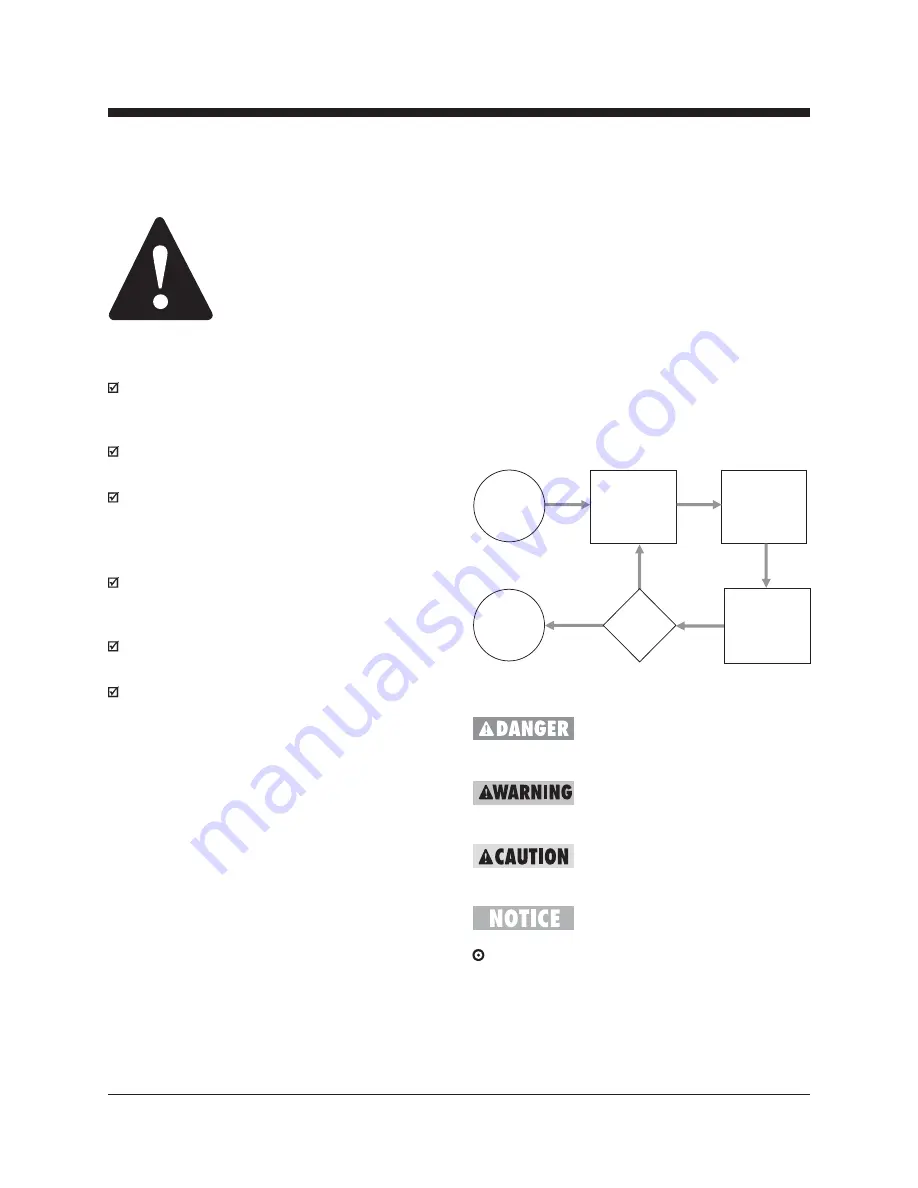
Malfunction
discovered

Identify

symptoms

Troubleshoot

Perform

repair

Return to

service

problem

solved

problem

still exists

Inspect

and test

Symbols Legend

Indicates the presence of a hazard
that 

will 

cause death or serious

injury.

Indicates the presence of a hazard
that 

may 

cause death or serious

injury.

Indicates the presence of a hazard
that 

will 

or 

may 

cause serious

injury or damage to the machine.

Indicates special operation or
maintenance information.

Indicates that a specific result is expected after

performing a series of steps.

Содержание 1501-915

Страница 1: ...ce Manual Part No 40462 Rev A6 September 2016 DPL 25S DPL 30S DPL 35S Super Series Serial Number Range from 1596 101 to 1501 915 from DPL02 916 to DPL16 2311 from DPL16G 2312 to DPL16G 2599 from DPLG...

Страница 2: ...perform most procedures However several procedures require specialized skills tools lifting equipment and a suitable workshop In these instances we strongly recommend that maintenance and repair be pe...

Страница 3: ...02 2010 DPL 16 G 1234 2 1 4 3 6 5 Model Elec Hydr Schematic Year of Manufacture Power supply voltage Pneumatic Pressure Maximum Wind Speed Maximum allowable inclination of the chassis Gradeability Ma...

Страница 4: ...of the hazards identified in the operator s manuals are also safety hazards when maintenance and repair procedures are performed Do Not Perform Maintenance Unless You are trained and qualified to perf...

Страница 5: ...not reused These components may fail if they are used a second time Be sure to properly dispose of old oil or other fluids Use an approved container Please be mindful of the environment Personal Safet...

Страница 6: ...heduledMaintenanceProcedures Introduction 4 1 A 1 Inspect the Operator s and Responsibility Manuals including storage container 4 2 A 2 Inspect the Decals and Placards 4 2 A 3 Inspect for Damage Loose...

Страница 7: ...C 2 Inspect the Mast Assemblies for Wear 4 12 C 3 Lubricate the Lifting Chains 4 13 C 4 Replace the Hydraulic Oil 4 13 C 5 Replacing the Auxiliary Platform Lowering Batteries 4 14 Section Five Troubl...

Страница 8: ...eries DC CE Models after serial number DPL07 1498 6 7 Electrical Schematic DPL Super Series AC All Models before serial number DPL07 1499 6 8 Electrical Schematic DPL Super Series AC ANSI Models from...

Страница 9: ...Models 7 8 3 3 How to Remove the Hydraulic Power Unit AC Models 7 10 3 4 How to Remove the Hydraulic Power Unit DC Models 7 10 3 5 How to Remove the Hydraulic Pump 7 11 3 6 How to Adjust the Pressure...

Страница 10: ...2 in 72 x 271 2 in l x w 182 9 x 69 9 cm 182 9 x 69 9 cm 182 9 x 69 9 cm Lift capacity 750 lbs 750 lbs 600 lbs 340 kg 340 kg 272 kg Power source 12V DC or 12V DC or 12V DC or 220V or 115V AC 220V or...

Страница 11: ...68 144 168 25 25 45 50 70 80 110 120 150 170 220 240 380 420 600 660 900 1000 7 8 16 19 34 34 61 68 95 109 149 163 204 231 298 326 515 570 814 895 1221 1356 Torque specifications for lubricated bolts...

Страница 12: ...pes of maintenance inspections that must be performed according to a schedule daily quarterly and annual To account for repeated procedures the Maintenance Tables and the Maintenance Inspection Report...

Страница 13: ...for Damage and Loose or Missing Parts A 4 Check for Hydraulic Leaks A 5 Check the Auxiliary Platform Lowering Operation A 6 Check the Manual Platform Lowering Operation A 7 Inspect the Battery and Bat...

Страница 14: ...ed MAINTENANCE TABLES Table B Complete all procedures in Table A B 1 Inspect the Electrical Wiring B 2 Inspect All Welds B 3 Check the Lifting Chain Adjustments B 4 Check the Battery DC Models B 5 Cle...

Страница 15: ...uggested Tools are required New parts required Table C Complete all procedures in Table A and Table B C 1 Inspect and Lubricate the Casters and Wheels C 2 Inspect the Mast Assembly for Wear C 3 Lubric...

Страница 16: ...Manual lowering operation A 7 Battery and charger DC models A 8 Columns A 9 Sequencing cables A 10 Interlock system operation A 11 Power and function controls A 12 Lifting chains and idler wheels A 13...

Страница 17: ...DPL 25S 30S DPL 35S Super Series Part No 40462 Section 3 Scheduled Maintenance Inspections September2016 Dealer service suggested Tools are required New parts required This page intentionally left bl...

Страница 18: ...hine Indicates special operation or maintenance information Indicates that a specific result is expected after performing a series of steps Observe and Obey Maintenance inspections shall be completed...

Страница 19: ...ers with operation and maintenance information An illegible decal will fail to alert personnel of a procedure or hazard and could result in unsafe operating conditions Table A Procedures 1 Refer to th...

Страница 20: ...or platform controls Detection of an auxiliary lowering malfunction is essential for safe machine operation An unsafe working condition exists if the auxiliary platform lowering function does not oper...

Страница 21: ...ater than 15 lifting cycles Set to the ON position 8 The charger will automatically shut off at the end of the set period Note If ammeter drops to 3A or less within the first 15 minutes the battery is...

Страница 22: ...onding light is on 5 Repeat steps 3 and 4 for each of the remaining outriggers A 11 Test the Power and Function Controls Testing the machine functions and the Emergency Stop buttons for malfunctions i...

Страница 23: ...ed idler wheels and related components 3 Inspect the chain terminations near the bottom of each column to confirm that each termination has a lock nut 4 Inspect the chain terminations near the bottom...

Страница 24: ...serious injury Remove all rings watches and other jewelry 1 Inspect the following areas for burnt chafed corroded and loose wires All base wiring Inside of the ground control box Inside of the base j...

Страница 25: ...less than 15 lifting cycles Set to 7 hours Heavy Use greater than 15 lifting cycles Set to the ON position 7 The charger will automatically shut off at the end of the set period Note If ammeter drops...

Страница 26: ...needed lubricate the inner and outer channels of the columns with a dry silicone spray or silicone wax Genie part no 90337 B 6 Test the Lifting Capacity Proper lifting capacity is essential to safe ma...

Страница 27: ...Deflection 11 2 to 21 2 inches 3 8 to 6 4 cm 3 Hold the end of the cable from turning and adjust the tension nut to obtain correct tension deflection Turn the adjustment nut clockwise to increase the...

Страница 28: ...eration Operating a machine with outriggers different from those originally designed for the model will result in death or serious injury 1 Measure each outrigger and verify for proper length DPLS Mod...

Страница 29: ...the casters roll smoothly 3 Pump grease into the caster until it can be seen coming out of the bearing seal gap Grease Type Lithium based C 2 Inspect the Mast Assemblies for Wear Detection of excessi...

Страница 30: ...from the hydraulic power unit 6 Remove the magnet from the reservoir and clean the magnet and reservoir using a mild solvent 7 Install the magnet then the reservoir 8 Apply pipe thread sealant to the...

Страница 31: ...6 liters DC models DPL 25S 6 quarts 5 6 liters DPL 30S 6 quarts 5 6 liters DPL 35S 6 quarts 5 6 liters TABLE C PROCEDURES C 5 Replacing the Auxiliary Platform Lowering Batteries 1 Turn the machine of...

Страница 32: ...essary tools and test equipment are available and ready for use Read each appropiate flow chart thoroughly Attempting shortcuts may produce hazardous conditions Be aware of the following hazards and f...

Страница 33: ...r ohmmeter pressure gauges The location of terminals mentioned in this section can be found on the appropriate electrical or hydraulic schematics provided in Section 6 Schematics Since various degrees...

Страница 34: ...air or replace the AC power cord and or the 12 3 cable Check the voltage at terminal 4 on the key switch N O contact Check the voltage at terminal 2 on the Emergency Stop button N C contact Replace th...

Страница 35: ...Repair the transformer wires OR replace the transformer Check the voltage on both sides of the 5 amp P C board fuse Put Neg lead of voltage meter on grounding terminal 10 of the 13 pole terminal stri...

Страница 36: ...trip J1 0V DC Trace the black input wire back to the motor start solenoid and repair open in the wire Check the voltage at terminal 4 on the key switch N O contact 0V DC Replace the key switch N O con...

Страница 37: ...e Check the voltage on both sides of the 5amp P C board fuse Put Neg lead of voltage meter on grounding terminal 10 of the 13 pole terminal strip J1 Replace the 5amp fuse If there is voltage on both s...

Страница 38: ...located in the ground control box Put Neg lead of voltage meter on grounding terminal 10 green yellow wire 0V DC Check for power at the black wires that are connected together with a wire nut in the l...

Страница 39: ...re from outrigger switch 3 connects to the blue wire good Repair open circuit in the black wire or the red wire from base interlock contacts bad 12V DC Check for power at the black wires that are conn...

Страница 40: ...not on check for power at the wire nut where the white wires connect in the ladder end junction box If LED 4 is not on check for power at the wire nut where the red wires connect good bad Repair or re...

Страница 41: ...rm control box Put Neg lead of voltage meter on terminal 10 green yellow wire of 13 pole terminal strip J1 in base control box Replace 16 6 cable because of open in red wire OR repair open in quick di...

Страница 42: ...rol box Replace 16 6 cable because of open in orange wire OR repair open in quick disconnect under ground control box Continued from the previous page 0V DC 12V DC 0V DC 12V DC 0V DC While pushing in...

Страница 43: ...on terminals white and black wires of the motor contactor Replace faulty circuit breaker While pushing in the control activate switch and activating the up function hold both switches and check for po...

Страница 44: ...p J1 This is a 1 second ON time delayed terminal 0V DC Replace P C board Replace or repair black wire because of an open circuit infinite ohms Replace N O valve coil Tee in pressure gauge at pressure...

Страница 45: ...e power unit remove and inspect the N O valve for contamination or damage Clean repair or replace valve and then perform pressure test again less than 1800 psi Adjust the pressure relief valve See Rep...

Страница 46: ...10 green yellow wire of 13 pole terminal strip J1 in ground control box Replace 16 6 cable because of open in red wire OR repair open in quick disconnect under ground control box Emergency Stop switch...

Страница 47: ...up switch contact Replace the up switch N O contact block While pushing in the control activate switch and activating the up function hold both switches and check for power at terminal 13 orange wire...

Страница 48: ...J1 in the ground control box 12V DC Repair open circuit in the green yellow wire 0V DC Repair open circuit in the red wire 12V DC Perform a continuity test across the motor contactor coil no continui...

Страница 49: ...a 3000 psi pressure gauge at the pressure port fitting stamped P of the power unit Push in the control activate switch activate the up function hold both switches and check the pressure 1800 to 2000 p...

Страница 50: ...e power unit remove and inspect the N O valve for contamination or damage Clean repair or replace valve and then perform pressure test again less than 1800 psi Adjust the pressure relief valve See Rep...

Страница 51: ...2V DC Check for a loose connection at the grounding stud in the ground control box OR check for a bad pin connection at the quick disconnect under the base control box OR replace 18 7 cable because of...

Страница 52: ...own contact block because of an open circuit 12V DC Inspect pin 2 for a defect in the quick disconnect located under the ground control box OR replace the 16 6 cable because of an open circuit in the...

Страница 53: ...t remove the return to tank hose off the T port fitting and put it into a bucket and activate the platfom up function Check for leaking from the hose Inspect the hydraulic system for contamination lea...

Страница 54: ...ck the power source Note on DC models the low battery indicator red LED light would be on indicting a low voltage condition low voltage Adjust the pressure relief valve See Repair procedure How to Adj...

Страница 55: ...l box wont lower from base Replace the auxillary down N O contact block located in the ground control box OR repair the red wire from terminal 9a of 13 pole terminal strip J1 Check for power at termin...

Страница 56: ...nie IWP Super Series Operator s Manual Be sure that all necessary tools and test equipment are available and ready for use About This Section There are two groups of schematics in this section Electri...

Страница 57: ...RD RD YL BN BL BK YL WH 87A 85 86 30 87 PR4 Electrical Legend Wire with description Circuits crossing no connection Diode Connection with no terminal Connector F11 Fuse Red Emergency Stop Button Togg...

Страница 58: ...35S Super Series 6 3 September2016 Section 6 Schematics Hydraulic Legend Motor Cylinder Check Valve Pump Filter Pressure compensated flow control Solenoid operated dump valve 2 position 2 way directio...

Страница 59: ...Super Series PartNo 40462 September2016 Section 6 Schematics Note Use this legend for the schematic on the opposing page WIRE COLOR LEGEND Color Description BL Blue BK Black GN YL Green Yellow OR Oran...

Страница 60: ...cal Schematic DPL Super Series DC Models before serial number DPL07 1499 September2016 1 2 3 4 5 6 7 8 N M L K J I H G F E D C B A Section 6 Schematics Part No 40462 DPL 25S DPL 30S DPL 35S Super Seri...

Страница 61: ...r right ground M5 Hydraulic power unit N C Normally closed N O Normally open N Note with description N17 Narrow platform units WH and BK wires replace BL and OR wires N27 Units with out plug WH and BK...

Страница 62: ...OR FOR AUXILIARY LOWERING U10 PC BOARD L13 L15 L14 L12 LEVELING INDICATORS GROUND CONTROL BOX EN2 GROUND STUD GND N O DUMP VALVE Y30 M5 GROUND STUD GN YL BK WH POWER TO PLATFORM GFCI RECEPTACLE EN4 PO...

Страница 63: ...Electrical Schematic DPL Super Series DC Models after serial number DPL07 1498 September2016 Section 6 Schematics Note Use these 2 legends for the schematic on the opposing page...

Страница 64: ...ORM GFCI RECEPTACLE EN4 POWER SUPPLY AC D5 SW11 N17 PLATFORM UP DOWN ACTIVATE CONTROL SW8 P2 EMERGENCY STOP PLATFORM CONTROL BOX EN1 SW12 AUXILIARY DOWN N O W5 TERMINAL STRIP QD1 LED 13 FRONT RIGHT LE...

Страница 65: ...Electrical Schematic DPL Super Series DC CE Models after serial number DPL07 1498 September2016 Section 6 Schematics Note Use this legend for the schematic on the opposing page...

Страница 66: ...cal Schematic DPL Super Series AC Models before serial number DPL07 1499 September2016 1 2 3 4 5 6 7 8 N M L K J I H G F E D C B A Section 6 Schematics Part No 40462 DPL 25S DPL 30S DPL 35S Super Seri...

Страница 67: ...Electrical Schematic DPL Super Series AC Models before serial number DPL07 1499 September2016 Section 6 Schematics Note Use these 2 legends for the schematic on the opposing page...

Страница 68: ...LUG KEY SWITCH PLATFORM MODE WH WH RD WH GN YL BK WH GN YL BK RD OPTIONAL WARNING LIGHT AND DESCENT ALARM H4 DESCENT ALARM FB2 WARNING LIGHT BASE MODE UNITS WITHOUT PLUG WH AND BK WIRES REPLACE BL 1 A...

Страница 69: ...Electrical Schematic DPL Super Series DC CE Models from serial number DPL07 1499 to DPL07 1562 September2016 Section 6 Schematics Note Use these 2 legends for the schematic on the opposing page...

Страница 70: ...1 3 1 2 BK RD BLK BK BK BN RD STRAIN RELIEF TO PLUG 4 GN YL WHT OR RD BK BL KEY SWITCH PLATFORM MODE WH WH RD WH WH GN YL BK RD OPTIONAL WARNING LIGHT AND DESCENT ALARM H4 DESCENT ALARM FB2 WARNING LI...

Страница 71: ...Electrical Schematic DPL Super Series AC Models after serial number DPL07 1562 September2016 Section 6 Schematics Note Use these 2 legends for the schematic on the opposing page...

Страница 72: ...TS WITHOUT PLUG WH AND BK WIRES REPLACE BL 1 AND BN 7 WIRES N27 ES0075_H U11 TRANSFORMER RD RD RD YL BN BL BK YL WH GN YL BL BN GN YL WH BK J BOX MOTOR 4 2 1 3 N10 220 V AC MOTOR DETAIL M5 EN6 GND GRO...

Страница 73: ...Electrical Schematic DPL Super Series AC Models from serial number DPL07 1499 to DPL07 1562 September2016 Section 6 Schematics Note Use these 2 legends for the schematic on the opposing page...

Страница 74: ...5 7 4 1 3 2 6 5 7 GN YL WHT OR RD BK BL RD BLK WH GN YL RD BK 12V DC OUTPUT 12V DC OUTPUT GROUND UP SIGNAL OUTPUT 1 2 3 4 5 6 7 8 9 9A 10 11 1 2 3 12V DC OUTPUT POSITIVE 12V DC AUX INPUT NEGATIVE 12V...

Страница 75: ...Electrical Schematic DPL Super Series AC CE Models after serial number DPL07 1562 September2016 Section 6 Schematics...

Страница 76: ...Hydraulic Schematic DPL Super Series ANSI Models 1 2 3 4 5 6 7 8 N M L K J I H G F E D C B A September2016 Section 6 Schematics Part No 40462 DPL 25S DPL 30S DPL 35S Super Series 6 13...

Страница 77: ...Hydraulic Schematic DPL Super Series ANSI Models September2016 Section 6 Schematics...

Страница 78: ...Hydraulic Schematic DPL Super Series CE Models 1 2 3 4 5 6 7 8 N M L K J I H G F E D C B A September2016 Section 6 Schematics Part No 40462 DPL 25S DPL 30S DPL 35S Super Series 6 14...

Страница 79: ...Hydraulic Schematic DPL Super Series CE Models September2016 Section 6 Schematics...

Страница 80: ...amage or malfunction before operating the machine Before Repairs Start Read understand and obey the safety rules and operating instructions in the Genie DPL Super Series Operator s Manual Be sure that...

Страница 81: ...threaded rod at the lever Be sure to maintain equal tension on the cable and threaded rod Do not over tighten the platform manual lowering cable The platform may not raise if there is to much tension...

Страница 82: ...the Resistance of a Valve Coil The valve coil is located at the bottom of the hydraulic lift cylinder 1 Lower the platform turn the machine off and remove the key 2 Connect the leads from an ohmmeter...

Страница 83: ...the Transformer AC Models 1 Fully lower the platform turn the key switch off and disconnect the power supply 2 Open the ground control box and locate the transformer 3 Label and then disconnect all wi...

Страница 84: ...PartNo 40462 DPL 25S DPL 30S DPL 35S Super Series 7 5 September2016 Section 7 Repair Procedures This page intentionally left blank...

Страница 85: ...enoid operated N O dump valve Diverts pump output back to reservoir during motor start up 5 10V DC coil Activates N O dump valve 6 Breather cap Reservoir vent 7 Sight gauge Hydraulic fluid level 8 Res...

Страница 86: ...PartNo 40462 DPL 25S DPL 30S DPL 35S Super Series 7 7 September2016 Section 7 Repair Procedures HYDRAULIC POWER UNITS...

Страница 87: ...raulic relief valve adjustment 4 Solenoid operated N O dump valve Diverts pump output back to reservoir during motor start up 5 10V DC coil Activates N O dump valve 6 Breather cap Reservoir vent 7 Sig...

Страница 88: ...PartNo 40462 DPL 25S DPL 30S DPL 35S Super Series 7 9 September2016 Section 7 Repair Procedures HYDRAULIC POWER UNITS...

Страница 89: ...ne Crushing hazard The power unit will fall unless it is properly supported Note If a new power unit is installed the pressure relief valve must be properly adjusted See 3 6 How to Adjust the Pressure...

Страница 90: ...into a container Properly discard of oil 5 Remove the power unit See 3 3 How to Remove the Power Unit AC Models or 3 4 How to Remove the Power Unit DC Models 6 Support the hydraulic reservoir with a l...

Страница 91: ...he base cover 3 6 How to Adjust the Pressure Relief Valve 1 Remove the base cover 2 Remove the breather cap from the reservoir 3 Fill the reservoir up to the sight gauge with Dexron ATF hydraulic oil...

Страница 92: ...ious injury Remove all rings watches and other jewelry Electrocution burnhazard Disconnect the ground cable from the battery before performing this procedure 1 Label and disconnect all the wiring from...

Страница 93: ...ber 4 column idler wheel assembly b number 3 column idler wheel assembly c number 2 column idler wheel assembly d number 1 column e number 2 column f number 3 column g number 4 column h carriage i num...

Страница 94: ...m the clevis block on the lift cylinder rod end a top of no 1 column b retaining bolt c clevis block Bodily injury hazard Spraying hydraulic oil can penetrate and burn skin Loosen hydraulic connection...

Страница 95: ...ment and a suitable workshop Attempting this procedure without these skills and tools may result in death or serious injury and significant component damage Dealer service is strongly recommended 1 Re...

Страница 96: ...el the location of each idler wheel assembly Be sure the shims and related components remain in the correct location 9 Remove the adjustment nuts from the chain tension rocker on the carriage MAST ASS...

Страница 97: ...le workshop Attempting this procedure without these skills and tools may result in death or serious injury and significant component damage Dealer service is strongly recommended 1 Thoroughly clean al...

Страница 98: ...he glide pads it is very important to maintain equal adjustment for both mast assemblies 1 Fully lower the platform turn off the machine and remove the key 2 Locate the upper and lower glide pad bolts...

Страница 99: ...ves over the idler wheels Visually inspect the chains for rust and corrosion Visually inspect the chains for lubrication Inspect chain link joints for easy movement Evidence of rust or corrosion When...

Страница 100: ...of flats on all V heads Wear on pin heads or noticeable wear in the profile of the outside link plate link plate wear Visually inspect chain terminals Broken chain terminals fingers Replace chain ter...

Страница 101: ...erhead crane If a platform is being replaced be sure that all appropriate safety and instructional decals are applied to the new platform Platform 5 2 Platform Control Box How to Test the Contactors 1...

Страница 102: ...nnect an AC voltage tester or a small hand tool to the platform GFCI receptacle 4 Test the voltage or test the hand tool operation Result The voltage should be 115V AC nominal or the hand tool should...

Страница 103: ...7 24 DPL 25S DPL 30S DPL 35S Super Series Part No 40462 September2016 Section 7 Repair Procedures This page intentionally left blank...

Страница 104: ......

Отзывы: