Tepui HyBox Скачать руководство пользователя страница 10

10

1. 

Retrieve mattress and fold lengthwise, placing into the tent from the back end.

2. 

Release all four cam buckles and push hardshell top up, so that all four hinges are 
extended and the top hardshell is parallel to the bottom.

3. 

Retrieve canopy and orient it so that the doors are on each side. Locate the upper canopy 
zipper, this will be at the back end of the tent.

4. 

Lift canopy over the top hardshell so it is loosly around the four hinges. 

5. 

Connect the top ZipperGimp™ to the top hardshell at the back of the tent and zip all the 
way around.

6. 

Ensure stabilizer straps are pulled tight enough to allow canopy to reach top and bottom 
shells with ease.

7. 

Connect the bottom ZipperGimp™ to the bottom hardshell at the front of the tent and zip 
all the way around.

8. 

The tension on the stabilizer straps can now be released.

9. 

Zip open doors and windows as needed. 
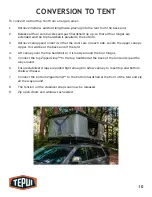
CONVERSION TO TENT

To convert to a Rooftop Tent from a Cargo Carrier:

Содержание HyBox

Страница 1: ...ully assembled at the factory Installation is composed of unpacking then mounting your Tepui HyBox onto your roof rack or aftermarket roof bars All of the tools and hardware required for installation...

Страница 2: ...TENTS GETTING STARTED 3 HARDWARE IDENTIFICATION CHART 4 ATTACHMENT TO ROOF RACK 5 HYBOX SETUP 6 7 CONVERSION TO CARGO 8 9 CONVERSION TO TENT 10 STORAGE AND HANDLING 11 LIMITED WARRANTY 12 Conversion t...

Страница 3: ...hen pullling strap out from buckle 3 Repeat on all four corners 4 Push tent top up from center on one side front or back and then the opposite side 5 Open zippered canvas door and mesh door 6 Remove h...

Страница 4: ...k Nut Metric Wrench 13mm 15mm Channel Slider Steel Mount Plate ITEM QUANTITY 8 8 1 8 4 TOOLS All of the tools you need to install your tent are included You may wish to use the following optional tool...

Страница 5: ...e bottom of the bolt securing with a nylock nut 3 Begin to slide each channel slider into the mounting tracks 4 Lift one side of the tent to position one set of channel sliders on the inner side of th...

Страница 6: ...tore in a side pocket 6 HYBOX SETUP OPENING TENT 2 Retrieve ladder from ladder bag and attach to ladder brackets by hooking on to lower portion of brackets Fold and store bag 4 Climb up ladder and unz...

Страница 7: ...sing 6 Pull down rear side of hardshell top using pull down strap 7 Loosely secure back cam buckles 8 Pull down front side of hardshell top using pull down strap 9 Loosely secure front cam buckles 10...

Страница 8: ...t 4 Zip close all doors and windows 5 Locate lower canopy zipper pull at front of tent and unzip all the way around detaching 6 Locate upper canopy zipper pull at back of tent and unzip all the way ar...

Страница 9: ...9 CONVERSION TO CARGO PHOTOS...

Страница 10: ...t 4 Lift canopy over the top hardshell so it is loosly around the four hinges 5 Connect the top ZipperGimp to the top hardshell at the back of the tent and zip all the way around 6 Ensure stabilizer s...

Страница 11: ...gent prior to drying 4 Dry tent in the sun with all windows open The tent must be completely dry before storage or mildew and mold may occur This is especially necessary after camping in rain or wet c...

Страница 12: ...failed due to a manufacturing or material defect we will repair or replace the product at our option without charge HOW TO OBTAIN WARRANTY SERVICE Return the product freight prepaid to the Tepui Deale...

Страница 13: ...13 Tepui Outdoors Inc 2500 Rosedale Avenue Soquel CA 95073 1 800 301 9874...

Отзывы: