background image

5

D

GB

F
E

I

Wie in der Abbildung zu sehen ist, zeigt das LCD-Display alle Funktionen und

Möglichkeiten an. Manche Funktionen sind nur unter bestimmten Bedingungen 

sichtbar.

Input

:

Zeigt an, ob das Soundsignal analog oder digital vorliegt. Wenn das Signal digital 

vorliegt, zeigt „Digital Mode“ an, ob es sich um ein Surround (AC-3) oder Stereo 

(PCM) Signal handelt.

Surround mode:

Gibt Auskunft über die Art des genutzten Surround Signals. Ist die Funktion „Pro 

Logic Auto On“ eingeschaltet, wird automatisch erkannt, ob einAC-3- oder Pro 

Logic-Signal vorliegt.

Mute

:

Blinkt, wenn „Mute“ gewählt ist und die Lautsprecher damit stummgeschaltet 

wurden. 

Test

Wird die Testfunktion durchgeführt, blinkt „Test“.

Speaker mode

Zeigt den gewählten Lautsprechermodus an.

Volume

Zeigt die eingestellte Lautstärke an.

Balance

Zeigt die Balance-Einstellungen an.

Delay

Zeigt den ggf. eingestellten Wert für den Zeitverzug zu den Surround-

Lautsprechern an.

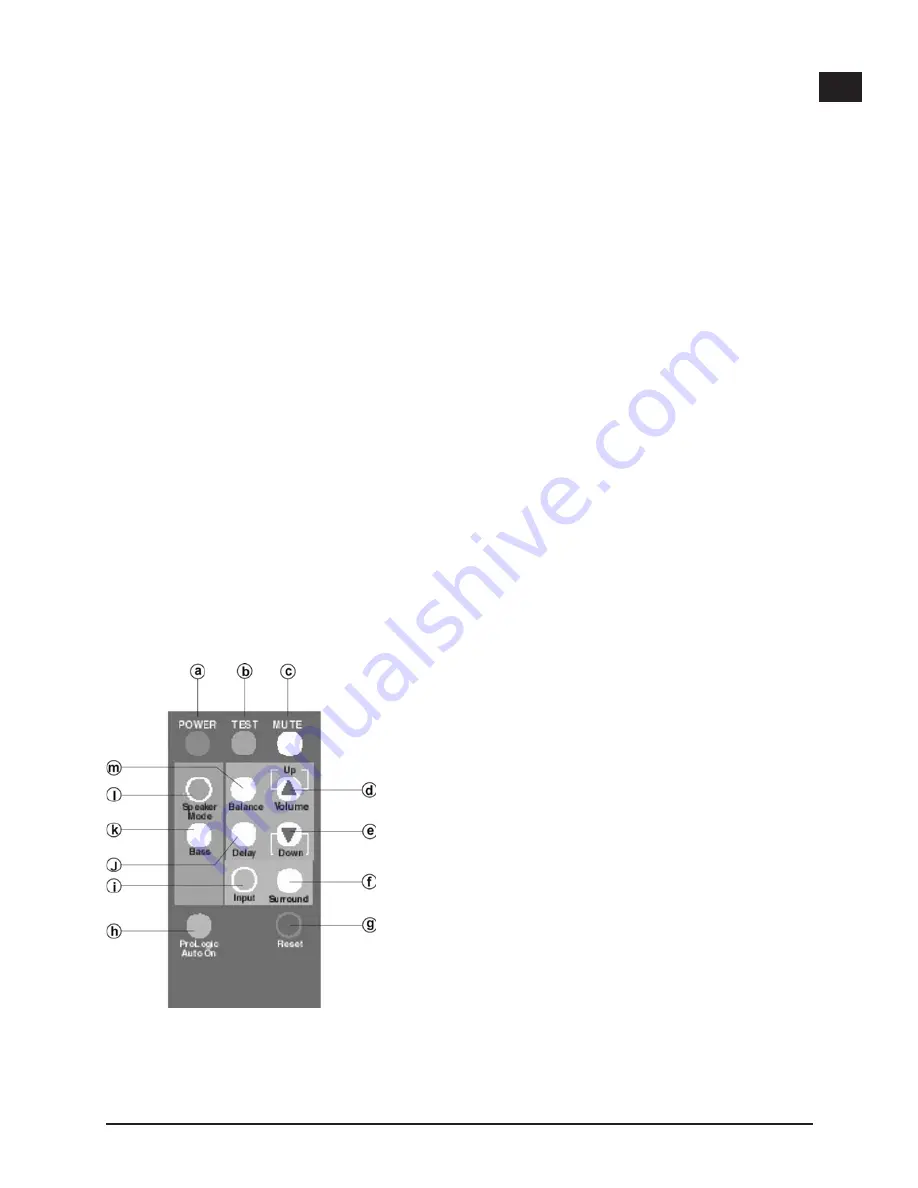
7. Fernbedienung


a:    EIN/AUS Taste   

b:    TEST EIN/AUS Taste

c:    MUTE EIN/AUS

d:    Taste zum Erhöhen der Lautstärke  

       (Balanceregler) und der Zeitverzögerung 

       (Delay).

e:    Taste zum Verringern der Lautstärke

       (Balanceregler) und der Zeitverzögerung 

       (Delay).

f:     Zum Bestimmen des SURROUND-MODUS.

g:    Reset Taste. Stellt die Grundeinstellungen

       des Gerätes wieder her.

h:    Pro Logic Auto-EIN Taste

i:     Auswahltaste für den INPUT MODUS

j:    DELAY- Einstellung (Zeitverzögerung zu den

      Surround-Lautsprechern)

k:    Auswahltaste BASS verstärkt/normal

l:    Lautsprecher Modus zur Bestimmung der

      Lautsprecheranzahl

m:  Taste zur Einstellung der Balance

Содержание SILVER LITHIUM 5.1

Страница 1: ...SILVER LITHIUM 5 1 Subwoofer System User s Guide Bedienungsanleitung Mode d emploi Manuale dell utente Manual de instrucciones Art nr X 451...

Страница 2: ...alle Funktionen Mit dem Universal Dolby Digital Audio Decoder k nnen Sie sich die Sound Atmosph re eines gro en Kinos nach Hause holen den wahren Dolby Sound 1 Inhalt der Verpackung 1 Subwoofer 5 Sate...

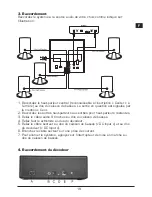
Страница 3: ...an die restlichen Lautsprecher ausg nge an 3 Schlie en Sie das 9 polige Audio Kabel an die R ckseite des Subwoofers an 4 Verbinden Sie das andere Ende mit der R ckseite des Decoders 5 Schlie en Sie d...

Страница 4: ...verbinden Sie es mit Ihrer Soundquelle 4 Je nach gew hltem Kabel stellen Sie den Schalter D in Position Op Optisch oder Co Coaxial 5 Verbinden Sie das vom Subwoofer kommende Netzanschlusskabel mit Buc...

Страница 5: ...durchgef hrt blinkt Test Speaker mode Zeigt den gew hlten Lautsprechermodus an Volume Zeigt die eingestellte Lautst rke an Balance Zeigt die Balance Einstellungen an Delay Zeigt den ggf eingestellten...

Страница 6: ...Dr cken Sie mehrmals die Mode Taste bis Input blinkt und w hlen Sie dann mit Hilfe der Aufw rts und Abw rts Tasten zwischen digitalem und analogem Signal Falls Sie AC 3 ausgew hlt haben leuchtet im Di...

Страница 7: ...ion 1 B Bass Konfiguration Konfiguration 2 3 Lautsprechereinstellung 3 Vier Lautsprecher Subwoofer A Bass Konfiguration Konfiguration 1 B Bass Konfiguration Konfiguration 2 4 Lautsprechereinstellung 4...

Страница 8: ...s Tasten stellen Sie den gew nschten Wert ein 2 Dasselbe k nnen Sie auch f r den Center Lautsprecher vornehmen Dr cken Sie erneut die Mode Taste bis Delay und C f r Center Lautsprecher blinkt 9 Fehler...

Страница 9: ...e L R SL SR C Netzanschluss AC 230V Eingang Decoder Ausgang Subwoofer DC 12V 0 5A Abmessungen Subwoofer 228x280x240 mm BxTxH Abmessungen Satelliten 116x148x96mm BxTxH Abmessungen Decoder 170x60x130mm...

Страница 10: ...trol over all functions With the Universal Dolby Digital audio decoder you bring home the sound atmosphere of a large cinema true Dolby sound 1 Package contents 1 subwoofer 5 satellite loudspeakers In...

Страница 11: ...fer The inscription Cen identifies the corresponding output 2 Connect the other speakers to the remaining speaker outputs 3 Connect the 9 pin audio cable to the back of the subwoofer 4 Connect the oth...

Страница 12: ...the decoder C or D and connect it to your sound source 4 Depending on the chosen cable set switch D to Op optical or Co coaxial 5 Connect the power supply cable from the subwoofer to socket F see pic...

Страница 13: ...hed off Test Test blinks when the test function is being performed Speaker mode Displays the chosen speaker mode Volume Displays the set volume Balance Displays the balance settings Delay Displays the...

Страница 14: ...Press the Mode button several times until Input blinks then select between digital and analogue signal using the upwards and downwards buttons If you have selected AC 3 Pro Logic Auto On lights in the...

Страница 15: ...Bass configuration configuration 2 To set Universal Dolby Digital decoder mode for the speakers proceed as follows 1 Adjust the number of speakers and their position with the help of the TEST function...

Страница 16: ...lance settings Unable to use speakers to full power Check the sound of the speakers for noise Treble or bass too strong Check the Balance settings Safety advice Do not expose the unit to direct sunlig...

Страница 17: ...coder 170x60x130 mm WxDxH Guarantee We guarantee this product in respect of workmanship and all built in components for a period of two years from date of purchase If you need help In the event of tec...

Страница 18: ...d codeur audio universel Dolby Digital recr ez chez vous l ambiance sonore des grandes salles de cin ma avec un son dolby v ritable 1 Contenu de l emballage 1 caisson de basses 5 haut parleurs satelli...

Страница 19: ...parleurs aux sorties pour haut parleurs restantes 3 Reliez le c ble audio 9 broches au dos du caisson de basses 4 Reliez l autre extr mit au dos du d codeur 5 Reliez le c ble secteur au dos du caisson...

Страница 20: ...utilis placez l interrupteur D en position Op optique ou Co coaxial 5 Reliez le c ble secteur provenant du caisson de basses la prise F voir illustration ci dessus 5 Description des touches du d codeu...

Страница 21: ...e et que les haut parleurs sont en sourdine Test La mention Test clignote durant le test Speaker mode Indique le mode s lectionn pour les haut parleurs Volume Indique le volume r gl Balance Indique le...

Страница 22: ...mention Input se mette clignoter puis s lectionnez l aide des touches Plus et Moins le type de signal num rique ou analogique Si vous avez s lectionn l option AC 3 la mention Pro Logic Auto On s allum...

Страница 23: ...urs 3 quatre haut parleurs caisson de basses A Configuration de basses configuration 1 B Configuration de basses configuration 2 4 R glage de haut parleurs 4 cinq haut parleurs caisson de basses A Con...

Страница 24: ...ter R glez la valeur de votre choix l aide des touches Plus Moins 2 Ce r glage peut galement tre effectu pour le haut parleur central Pour cela appuyez de nouveau sur la touche Mode jusqu ce que les m...

Страница 25: ...rdement au secteur AC 230V Entr e d codeur sortie caisson de basses DC 12V 0 5A Dimensions caisson de basses 228x280x240 mm LxPxH Dimensions satellites 116x148x96 mm LxPxH Dimensions d codeur 170x60x1...

Страница 26: ...n el Decodificador de audio Dolby Digital Universal se puede uno llevar a casa el ambiente sonoro que reina en una sala de cine el Dolby aut ntico 1 Contenido del pack 1 Subwoofer 5 altavoces sat lite...

Страница 27: ...cada con Cen 2 Conecte el otro altavoz a las restantes salidas para altavoces 3 Conecte el cable de audio de 9 polos a la parte posterior del subwoofer 4 El extremo opuesto se conecta a la parte trase...

Страница 28: ...r C o D y ench felo a la fuente de sonido 4 Seg n el cable que elija tiene que colocar el conmutador D en la posici n Op ptico o Co coaxial 5 Conecte a continuaci n el cable de red que sale del subwoo...

Страница 29: ...adea test Speaker mode Indica el modo de funcionamiento de los altavoces Volumen Indica el volumen regulado Balance Indica el balance de los altavoces Delay Indica el tiempo de retardo si ha sido ajus...

Страница 30: ...de hasta que parpadee Input y seleccione a continuaci n entre se al digital y anal gica mediante el bot n avance o retroceso Si ha seleccionado AC 3 en el display se enciende Pro Logic Auto On En este...

Страница 31: ...B Configuraci n de graves Configuraci n 2 Para los ajustes del modo Decodificador Universal Dolby Digital en los altavoces proceda de la siguiente manera 1 Ajuste el n mero de altavoces y su posici n...

Страница 32: ...o de fondo Los graves y los agudos son demasiado fuertes Compruebe el ajuste del balance en los altavoces Medidas de seguridad No exponga estos aparatos a la luz directa del sol o calor extremo esto p...

Страница 33: ...de dos a os a partir de la fecha de compra tanto para defectos de fabricaci n como de sus componentes Si precisa ayuda En caso de surgir cualquier problema t cnico acuda a los especialistas que le pr...

Страница 34: ...in corso Grazie al decoder audio universale Dolby DigitalTM potrete infatti riprodurre a casa l atmosfera e l acustica di una grande sala cinematografica in Dolby Digital Surround 1 Contenuto dell imb...

Страница 35: ...scite altoparlanti 3 Collegate il cavo audio da 9 chiodini al retro del subwoofer 4 Allacciate l altra estremit del cavo al retro del decoder 5 Collegate infine il cavo d alimentazione situato sul ret...

Страница 36: ...lla scelta del cavo portate il dispositivo di commutazione D in posizione Op ottico o Co coassiale 5 Allacciate il cavo d alimentazione proveniente dal subwoofer all ingresso F v ill sopra 5 Descrizio...

Страница 37: ...d AC 3 Surround mode informa sul tipo di segnale audio surround riprodotto Nel caso in cui la funzione Pro Logic Auto On sia attiva il sistema riconosce automaticamente se si tratti del segnale audio...

Страница 38: ...l basso il segnale analogico o digitale Se AC 3 attivo anche Pro Logic Auto On illuminato sul display In tal caso il decoder riconosce automaticamente il segnale Pro Logic attivando di conseguenza la...

Страница 39: ...illustrazioni fungono da aiuto 1 Configurazione altoparlanti 1 due altoparlanti subwoofer A Configurazione bassi configurazione 1 B Configurazione bassi configurazione 2 2 Configurazione altoparlanti...

Страница 40: ...re la configurazione 1 o 2 mediante il tasto BASS del telecomando in modalit altoparlanti 8 3 Impostazione del delay ritardo Grazie alla funzione Delay effetto ritardato del surround si compensa la di...

Страница 41: ...ione a non rovesciare liquidi sulle componenti poich le componenti potrebbero essere danneggiate Fate attenzione a non esercitare nessun tipo di pressione sulla rete degli altoparlanti poich ci potreb...

Страница 42: ...i tecnici Nel caso in cui dovessero verificarsi ulteriori problemi tecnici Vi preghiamo di contattare i nostri tecnici A tale proposito troverete sul retro di questo manuale di istruzioni il numero de...

Страница 43: ......

Страница 44: ......

Отзывы: