


8.
Place a slotted shelf (Ref. No. 4)
over the supports. IMPORTANT:
Be sure that the square hole
in the end of the shelf flange is
to the rear of the unit. If the
shelf is reversed, the dividers
will not fit in their slots.
9.
Insert a back stop (Ref. No. 6)
into the third keyhole slot
above the shelf. Make sure
that all rivets are firmly seated
in the keyhole slots, as
described in step 5.
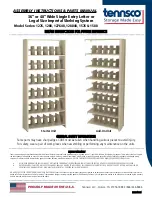
13.
If you are assembling only a single unit, assembly is now complete
(shown below left). If you are assembling multiple units joined
together, your starter unit should have been assembled with a “T”
upright (shown below right) as described in step one. Continue
with step 14.
14.
Repeat steps 7 through
11 adding a new “L”
or “T” upright and
connecting with shelf
supports to complete
the add-on unit.
15.
If installing units back to back, insert clothespins (Ref. No. 8)
through the top of the uprights to tie the units together.
NOTE: The plain shelf
(without slots) is for the
unit top.
10.
Continue the assembly by
placing supports, shelves and
backstops as described in
steps 8 and 9. The
recommended spacing
between shelves is twelve
inches, which equals six open
keyhole slots between supports.
11.
The top shelf supports and top shelf (Ref. No. 3) should be installed
flush with the upright top. Note that the top shelf has no divider slots.
12.
Insert shelf dividers (Ref. No. 7), five per shelf (or as needed), by
placing dividers into slots on the shelf and then hooking into the slot
in the back stop.
Square Hole goes
toward rear of unit
Round Hole goes
toward front of unit
Completed Single Unit
Completed Unit Ready for Add-on


