Teltonika RUT5 Series Скачать руководство пользователя страница 56


56 


Logging and FTP settings 


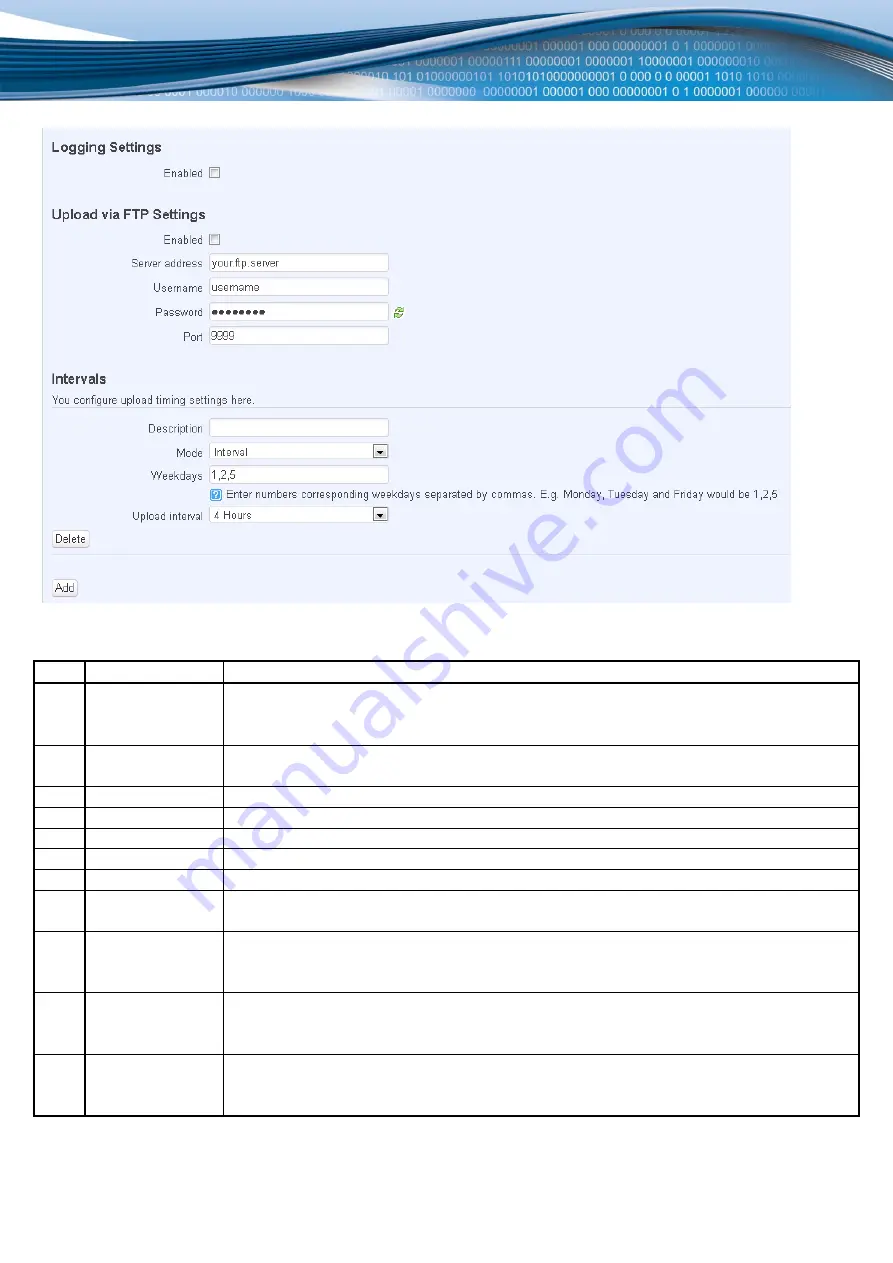
The above picture illustrates a sample configuration of the Logging and FTP settings portion of the page. 


Field name 

Explanation 

1. 

Logging enabled 

Check this box if you want to enable wireless traffic logging. This feature will produce logs 
which contain data on what websites each client was visiting during the time he was 
connected to your hotspot. 

2. 

FTP enabled 

Check this box if you want you logs to be periodically uploaded to an FTP server of your 
choice. 

3. 

Server address 

The IP address of the FTP server to which you want the logs uploaded. 

4. 

Username 

The username of the user on the aforementioned FTP server. 

5. 

Password 

The password of the user. 

6. 

Port 

The TCP/IP Port of the FTP server. 

7. 

Description 

The description of the schedule. 

8. 

Mode 

The mode of the schedule. Use “Fixed” if you want the uploading to be done on a specific 
time of the day. Use “Interval” If you want the uploading to be done at  fixed interval. 

9. 

Weekdays 

This field specifies on what weekdays the uploading should be done. The entry format is 
numbers from 1 to 7 separated by only commas. E.g. If you want to upload the logs on 
Monday, Wednesday and Saturday you should enter “1,3,6”.  

10. 

Interval 

Shows up only when “Mode” is set to Interval. Specifies the interval of regular uploads on 
one specific day. E.g. If you choose 4 hours, the uploading will be done on midnight, 4:00, 
8:00, 12:00, 16:00 and 20:00. 

11. 

Hours, Minutes 

Shows up only when “Mode” is set to Fixed. Uploading will be done on that specific time of 
the day. E.g. If you want to upload your logs on 6:48 you will have to simply enter hours: 6 
and minutes: 48. 

You can also one than more uploading schedule. Simply click Add at the very bottom of the configuration page and an 
additional configuration box will appear. 

Содержание RUT5 Series

Страница 1: ...1 USER MANUAL...

Страница 2: ...echnical improvement without prior notice Other product and company names mentioned herein may be trademarks or trade names of their respective owners Attention Before using the device we strongly rec...

Страница 3: ...nical Environmental 8 Applications 9 Setting up your router 10 Installation 10 Front Panel 10 Back Panel 11 SIM Card 11 Logging in 11 Operation Modes 16 Powering Options 17 Using terminal block for po...

Страница 4: ...Services 50 PING Reboot 50 SMS Reboot 51 Status via SMS 52 NTP 52 Dynamic DNS 53 Wireless hotspot 54 OpenVPN 57 IPsec 59 GRE Tunnel 61 Systems 63 Configuration Wizard 63 Administration 65 Administrati...

Страница 5: ...with the requirements of standard EN 60950 1 Do not mount or service the device during a thunderstorm To avoid mechanical damages to the device it is recommended to transport it packed in a damage pro...

Страница 6: ...6 Device connection...

Страница 7: ...cryption methods 3xLAN 10 100Mbps Ethernet ports 1xWAN 10 100Mbps Ethernet port Supports Auto MDI MDIX Remote local Web management 1x 5dBi wireless antenna SSID stealth mode and access control based o...

Страница 8: ...ions H x W x D 100mm x 85mm x 36mm Weight 210g Power Supply 100 240 VAC 9 VDC wall adapter Input voltage range 7 30VDC 8 18 VDC for older revision Power Consumption 7W Antenna connectors 2 x SMA for L...

Страница 9: ...9 Applications...

Страница 10: ...assemble your router by attaching the necessary antennas and inserting the SIM card 2 To power up your router please use the power adapter included in the box IMPORTANT Using a different power adapter...

Страница 11: ...adapter to the socket on the front panel of the device Then plug the other end of the power adapter into a wall outlet or power strip 4 Connect to the device wirelessly SSID Teltonika or use Ethernet...

Страница 12: ...col version 4 TCP IPv4 instead you ll have to select TCP IP Settings and click options Go to step 6 We first must set up our network card so that it could properly communicate with the router 1 Press...

Страница 13: ...right click on your wireless device that you use to connect to other access points It is the one with the name Wireless Network Connection and has signal bars on its icon 5 Select Internet Protocol Ve...

Страница 14: ...rm of 192 168 1 XXX where XXX is a number in the range of 2 254 192 168 1 2 192 168 1 254 192 168 1 155 and so on are valid 192 168 1 0 192 168 1 1 192 168 1 255 192 168 1 699 and so on are not Next w...

Страница 15: ...t A list should pop up with all available wireless networks Select Teltonika and click connect Then we launch our favourite browser and enter the routers IP into the address field Press enter If there...

Страница 16: ...ternet WAN via LTE standard Ethernet cable or via a wireless network If you connect to the internet via an Ethernet cable of Wi Fi you may also backup your connection with LTE for added stability On e...

Страница 17: ...hough only pin 5 is used in router for positive voltage input there is a posibility to connect power supplies that uses both pins 4 and 5 for positive voltage To power RUT550 using LAN3 or WAN etherne...

Страница 18: ...top of the plug so that the wires could fit into the plug holes Use a screwdriver with a flat tip 2 Strip the ends of the wires strip length 5 6mm then place the positive and negative wires into the p...

Страница 19: ...choise Recomended wattage of power supply 9W for powering only RUT550 24W for powering RUT550 and four MVC300 cameras connected to it In a RUT550 MVC300 solution recomended power supply voltage is 12V...

Страница 20: ...upply power for the connected MVC300 camera s from RUT550 first you need to remove the front and back panels then take the PCB out of the metal enclosure Now place a jumper on the contact pins associa...

Страница 21: ...ount all 6 jumpers When a jumper is mounted the associated LAN port is dedicated only for connecting MVC300 camera Do not connect a PC or any other device as there is a great risk for damaging them If...

Страница 22: ...mware that is currently loaded in the router Newer versions might become available as new features are added Use this field to decide whether you need a firmware upgrade or not 4 Kernel Version 3 2 15...

Страница 23: ...ze of the area in which data is temporarily stored before moving it to another location Network Information This page is much like the status page previously described though dedicated to data associa...

Страница 24: ...where traffic destined for the internet is routed to 6 DNS 8 8 8 8 Domain name server s 7 Expires 1h 57m 25s The amount of time before the routers DHCP lease expires 8 Connected 0h 2m 2s How long the...

Страница 25: ...ter and other possible devices that connect to the local AP 7 Country LT Country code AP Field Name Sample Value Explanation 1 Signal Quality 100 The quality between routers radio and some other devic...

Страница 26: ...necting to the router in Access Point mode DHCP Leases If you have enabled a DHCP server this field will show how many devices have received an IP address and what those IP addresses are The picture a...

Страница 27: ...every immediate device that was communicating with the router Active IPv4 Routes Shows the routers routing table The routing table indicates where a TCP IP packet with a specific IP address should be...

Страница 28: ...e graph consists out of three colour coded graphs each one corresponding to the average system load over 1 red 5 orange and 15 yellow most recent minutes Although not graphed the page also displays pe...

Страница 29: ...29 LAN WAN Graphs the total traffic that passes through both WAN and LAN network interfaces LAN Indicates how much traffic has been passed through your Ethernet LAN network...

Страница 30: ...30 WAN x Graphs the amount of traffic which passed through the current active WAN connection Wi Fi Shows the amount of traffic that has been sent and received through the wireless radio...

Страница 31: ...31 Wireless This graph illustrates how signal strength and the amount of noise change over time This graph illustrates how the physical rate of wireless changes over time...

Страница 32: ...nd peak connection amounts over 3 minutes On the same page you can also analyze a detailed list of all active connections that the router maintains Each entry consist of a type of network IPV4 protoco...

Страница 33: ...33 Network LTE Here you can configure the LTE specific settings which are used when connecting to your local LTE network Alternate model...

Страница 34: ...sh to connect E g if you choose GSM 2G the router will connect to a GSM 2G network so long as it is available otherwise it will connect to a UMTS 3G network If you select auto then the router will con...

Страница 35: ...35 You can switch between the Static DHCP or PPPoE protocol by selecting the protocol that you want to use and then pressing Switch Protocol...

Страница 36: ...address autogenerated if not set It is best to leave this blank unless you know what you are doing 5 custom DNS servers 8 8 8 8 8 8 6 6 Usually the gateway has some predefined DNS servers As such the...

Страница 37: ...ce Leave empty to autodetect Advanced These are the advanced settings for each of the protocols if you are unsure of how to alter these attributes it is highly recommended to leave them to a trained p...

Страница 38: ...the gateway in thinking that it is communicating with your computer 4 Override MTU 1500 Maximum transmission unit specifies the largest possible size of a data packet 5 Use gateway metric 0 The WAN co...

Страница 39: ...onally define a broadcast address and a custom DNS server How do I setup Wifi WAN First we must switch the mode to Wifi Do so by selecting Wifi from the list and wait for the page to quickly reload No...

Страница 40: ...omputers that you connect to the router will reside The common configuration and IP aliasing sections are identical to the ones found in WAN so for an explanation on how they work please follow throug...

Страница 41: ...f the start address is 192 168 2 100 then the end address will be 192 168 2 254 100 150 1 254 4 Lease time 12h How long can a leased IP be considered valid An IP address after the specified amount of...

Страница 42: ...Wifi or not the page will display either the options for configuring an Access Point or options for configuring a connection to some local access point Access Point Here you can see the Overview of th...

Страница 43: ...t can be fragmented and transmitted by multiple frames In areas were interference is a problem setting a lower fragment threshold might help reduce the probability of unsuccessful packet transfers thu...

Страница 44: ...one key and then specify it as the preferred one Length is important as well 10 or 26 characters in length in hex mode OR 5 or 13 in ASCII mode A hex key may only contain numbers 0 through 9 and lett...

Страница 45: ...ons you can also click the Scan button to rescan the surrounding area and attempt to connect to a new wireless access point Backup WAN Backup WAN is function that allows you to back up your wired OR w...

Страница 46: ...3 5 10 15 20 How many checks should pass for your WAN connection to be declared UP 6 DNS Servers Auto Custom Define custom DNS servers Has meaning when you select DNS as your Health Monitor ICMP HOST...

Страница 47: ...valid 3 Input Reject Drop Accept DEFAULT action that is to be performed for packets that pass through the Input chain 4 Output Reject Drop Accept DEFAULT action that is to be performed for packets tha...

Страница 48: ...et 3 External Port 1 65535 From what port on the WAN network will the traffic be forwarded 4 Internal IP address IPv4 address of some computer on your LAN The IP address of the internal machine that h...

Страница 49: ...straight into the iptables program Just type them out into the text field ant it will get executed as a linux shell script If you are unsure of how to use iptables check the internet out for manuals...

Страница 50: ...ation command line tool for querying the Domain Name System DNS to obtain domain name or IP address mapping or for any other specific DNS record Enter server hostname and click Nslookup Log containing...

Страница 51: ...NG to server after time interval if echo receive was unsuccessful Minimum retry number is 1 Second retry will be done after defined time interval 5 Server to PING Server IP address or host name which...

Страница 52: ...tatus This check box will enable and disable SMS status function SMS status is disabled by default 2 SMS text SMS text which will send routers status SMS text can contain letters numbers spaces and sp...

Страница 53: ...selected you must enter one or more working NTP servers Otherwise time sync feature will not work 5 NTP server candidates NTP server hostname You can add as many servers as you need by clicking add b...

Страница 54: ...ill be linked with dynamic IP address 5 Username Name of the user account 6 Password Password of the user account 7 IP renew interval Time interval in minutes to check if the IP address of the device...

Страница 55: ...e of containing all the wireless clients Such a network will be able to have 253 clients their IP addresses will be automatically granted to them and will range from 192 168 182 1 to 192 168 182 253 3...

Страница 56: ...de of the schedule Use Fixed if you want the uploading to be done on a specific time of the day Use Interval If you want the uploading to be done at fixed interval 9 Weekdays This field specifies on w...

Страница 57: ...r desired configuration name in New configuration name field select device role from Role drop down list For example to create a OpenVPN client with configuration name Demo select client role name it...

Страница 58: ...here Static means that OpenVPN client and server will use the same secret key which must be uploaded to the router using Static pre shared key option Tls authentication mode uses X 509 type certifica...

Страница 59: ...same time IPsec The IPsec protocol client enables the router to establish a secure connection to an IPsec peer via the Internet IPsec is supported in two modes transport and tunnel Transport mode cre...

Страница 60: ...TACT message 5 Peers identifier type Choose fqdn or user fqdn accordingly to your IPSec server configuration 6 Mode Select Main or Aggressive mode accordingly to your IPSec server configuration 7 My i...

Страница 61: ...l network This function may be used to automatically start the IPSec tunnel 2 Ping IP address Enter IP address to which ICMP echo requests will be sent 3 Ping period seconds Set sent ICMP request peri...

Страница 62: ...RE Tunnel function 2 TTL Specify the fixed time to live TTL value on tunneled packets 0 255 The 0 is a special value meaning that packets inherit the TTL value 3 PMTUD Check the box to enable the Path...

Страница 63: ...p to basic functionality The wizard is comprised out of 4 steps and they are as follows Step 1 Password change First the wizard prompts you to change the default password Simply enter the same passwor...

Страница 64: ...ration On a detailed instruction on how this should be done see the LTE Section under Network Step 3 LAN Next you are given the chance to configure your LAN and DHCP server options For a detailed expl...

Страница 65: ...e Explanation 1 Password Enter your new administration password 2 Confirmation Re enter your new administration password Important notes The only way to gain access to the web management if you forget...

Страница 66: ...S server port specify a port number for routers web management via HTTPS protocol Default port is 443 4 Remote HTTPS access if check box is selected users can access the router via the HTTPS WEB Inter...

Страница 67: ...router uses to reach the internet LAN A local area network LAN is a computer network that interconnects computers in a limited area such as a home school computer laboratory or office building DHCP T...

Страница 68: ...icate with some external server it needs to know it s IP its name www something com just won t do There are special servers set in place that perform this specific task of resolving names into IPs cal...

Отзывы: