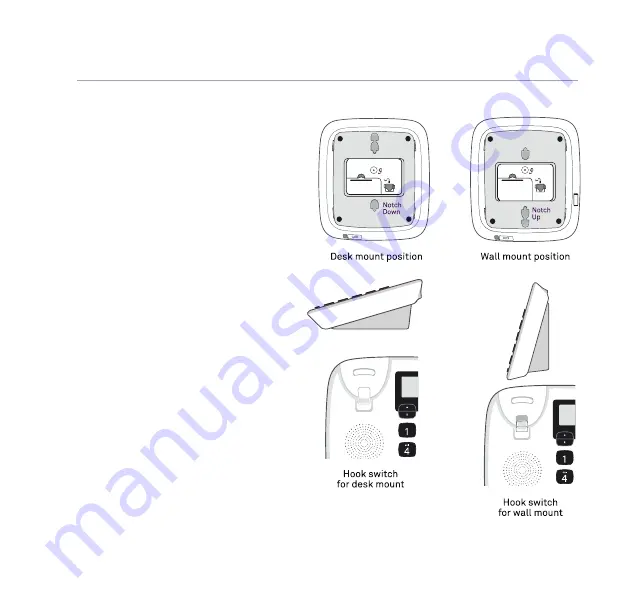
Telstra Easy Control TEC-D Скачать руководство пользователя страница 17


17

Wall mounting

Your phone will come ready to be 
placed on a table, but converts 
easily for wall mounting as follows:

1.  Turn the phone so that base faces up 

(notches point downward).

2.   Remove the detachable base bracket.
3.   Rotate base bracket 180 degrees, 


so that wedge is now at the base of 
phone. Place it back onto the phone 


unit and click in place (notches point 
upward). 

4.   Change hook switch position for hanging 

up the handset. Use finger pad to push
down the base of hook switch to flip


it into reverse position (with hollows 


facing up).

5.   Hang handset onto phone unit so that 


it clicks into the hook switch hollow to
hold it firm. 

6.   Keep the phone and power cables 

tidy by running them through the 
provided space.

If you need some help, call us on 

13 2200

 or go to 

https://go.telstra.com.au/helpandsupport/home-phone/

Содержание Easy Control TEC-D

Страница 1: ...Getting to know your Telstra Easy Control Desktop Phone Model TEC D ...

Страница 2: ...me phone TEC D corded telephone with handset Mains power adaptor Important Only use the mains power adaptor and cables that came with your TEC D Telstra accepts no responsibility for damage caused to your TEC D if you use any other cables 2 Check box contents Telephone line cord Battery pack ...

Страница 3: ...upport home phone Making calls 11 Mute 11 Handsfree 12 Viewing the Calls list 14 Time and date 15 Help 16 General information 18 Wall mounting 17 Menu map 4 Quick set up guide 5 Getting to know your phone Finding your way around your phone 9 Handset buttons 10 Using the phone Contents ...

Страница 4: ...sistant 3 Way Chat Answer Call Waiting Call Forward Call Fwd Immed Set up Call Fwd busy Cancel Call Fwd No Ans Check Status Cancel Call Back Call Waiting Turn CW On Turn CW off CW Status Voicemail Call Return Settings Ringer tone Melody 1 15 Ringer volume Keypad tones Tones On Tones Off Tones On Tones Off Display contrast Level 1 5 Software version Change system PIN Reset Reset settings Delete use...

Страница 5: ...he mains power adaptor into the base in the socket marked 2 Plug the other end of the power adaptor into the wall power socket and switch socket on 3 Plug the telephone line cord into the base in the socket marked Plug the other end of the cable into the phone wall socket 4 LCD display will light up Quick set up guide 5 1 Plug in 1 2 ...

Страница 6: ...e The default time format setting is 24 hours but you can change this to 12 hours under Time format in the Time Date menu 3 Press Next then enter the date in the format DD MM YYYY 4 Press to Save If you need some help call us on 13 2200 or go to https go telstra com au helpandsupport home phone Setup OK Back Settime and date Time date Next Back Set time 15 32 Time date Save Back Set date 05 01 202...

Страница 7: ...a press twice and do the same thing to complete the rest of the name 10 save press Next Tip if you make a mistake go back a digit by selecting Clear 11 Then use the keypad to enter the telephone number and press Save 12 To add another select Yes and then repeat steps 9 to 11 If you need some help call us on 13 2200 or go to https go telstra com au helpandsupport home phone calls will get straight ...

Страница 8: ...3 2200 or go to https go telstra com au helpandsupport home phone Quick set up guide 13 If you don t want to add more contacts now select No how to use the most popular features of your TEC D please read the rest of this quick user guide ...

Страница 9: ...left option button Use or to scroll through the available sub menu options When the sub menu you want is highlighted press OK Select the Back option if you want to return to the previous screen To exit a menu and return to the home screen press If no buttons are pressed for one minute the display returns to the idle screen automatically If you need some help call us on 13 2200 or go to https go te...

Страница 10: ...Getting to know your phone 10 If you need some help call us on 13 2200 or go to https go telstra com au helpandsupport home phone Handset buttons ...

Страница 11: ...r display service the display shows the incoming call caller s number if available or the caller s name 1 Lift the receiver to answer the call To use Handsfree press A green light will show when it s switched on Mute 1 During a call select Mute by pressing The red light on the button will show If the light is on the call is muted and your caller can t hear you 2 Press the button again to return to...

Страница 12: ...all press the again Contacts Store a contact up to 200 1 From the idle screen press 2 Press Options Add new contact is highlighted press OK 3 Enter the new contact name using the keypad then press Next Enter the phone number and select Save Contact saved From the idle screen you can press to change the ringer volume settings too You can add up to 14 characters for contact names and 24 digits for t...

Страница 13: ...k l 5 6 m n o 6 7 p q r s 7 8 t u v 8 9 w x y z 9 0 space 0 Changes text entry mode sentence case upper lower or numeric View dial a contact 1 From the idle screen with the handset down press to open your contact list 2 Press to scroll through and view the entries 3 When you have found the contact you wish to call lift the handset to connect the call and Back Calls List ...

Страница 14: ...ost recent entry is at the top of the list If there are no entries Calls list empty will be displayed 2 Press or to scroll through and view the list 3 To dial lift the handset when the entry you want is highlighted Save a Calls list entry to your contacts 1 Press then press and to highlight the entry you want to save and select Options 2 Save number is displayed press OK 3 Enter the name of the ne...

Страница 15: ...ur preference 1 Select Menu scroll through to Time Date and press OK 2 Use the and to scroll to Time format then use the or buttons to highlight the format you want to use and press OK Set the time and date 1 Select Menu scroll to display Time Date and press OK 2 Scroll through to Set time date then press OK 3 Enter the digits for the time and press Next Then enter the digits for the date and pres...

Страница 16: ...receive calls Check that the mains power is correctly connected Check that product call barring is not active Has there been a power cut If so the screen will show the Power Cut Set time message Reset the time and date and check that you can now hear the dialling tone You have a dial tone but the phone won t dial out If you re connected to a switchboard check whether you need to dial an access cod...

Страница 17: ...ack onto the phone unit and click in place notches point upward 4 Change hook switch position for hanging up the handset Use finger pad to push down the base of hook switch to flip it into reverse position with hollows facing up 5 Hang handset onto phone unit so that it clicks into the hook switch hollow to hold it firm 6 Keep the phone and power cables tidy by running them through the provided sp...

Страница 18: ...uct from the wall outlet before cleaning Do not use liquid cleaners or aerosol cleaners Use a damp cloth for cleaning Guarantee Our goods come with guarantees that cannot be excluded under the Australian Consumer Law You are entitled to a replacement or refund for a major failure and compensation for any other reasonably foreseeable loss or damage You are also entitled to have the goods repaired o...

Страница 19: ...andset due to the presence of magnetic when used where metal objects can be picked up Cleaning Clean the handset and base or charger with a damp not wet cloth or an anti static wipe Never use household polish as this will damage the product Never use a dry cloth as this may cause static shock Technical Information How many telephones can I have All items of telephone equipment have a Ringer Equiva...

Страница 20: ......

Страница 21: ...crowdsupport telstra com au 13 22 00 ...

Отзывы: