TELIKOU
BK-501 Belt Pack
2
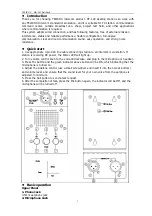
3.5mm microphone jacl
3. Gooseneck Microphone Connector
3-pin XLR female connector. Configuration pin outs:
Pin 1 -- Mic common
Pin 2 -- Mic hot
Pin 3 -- Null
4. Mic LED
A green LED indicator. When Mic switch is turned on, this light will be ON.
5. Power LED
A green LED indicator. When DT-100 is powered on, this light will be ON.
6. Call LED
A red LED indicator. When a call signal from the intercom system is received, this light will be
ON, indicating that there has a talk request of some station.
7. Call Button
Pressing down this button will send a call signal to the intercom system, and the LED indicator
above it will be ON to indicate that the call function is activated.
8. Volume Control
This knob is used to control the level of audio signal received from the intercom line, and can
be used to adjust the volume of internal speaker and earphone.
9. Talk Button
The talk button turns the microphone circuit on and off. Press button, the Mic LED will light,
that indicate the microphone is turned on, and the sound from the microphone will be sent
into the intercom line. This button controls an internal flip circuit. When it is pressed once, the
circuit will be turned on, and the Mic LED indicator will be ON; when it is pressed again, the
circuit will be turned off, and the Mic LED will be OFF. When the connection between DT-100
and any TELIKOU Intercom main station is established, the Remote-Mic-Kill button of the
main station can turn off the microphone of the DT-100 remotely.
Bottom Panel
10. Intercom Line
A pair of 3-pin XLR male and female connectors parallel connected at internal for loop through
connection of the intercom station.
XLR-3 configuration pin outs:
Pin 1--Common
Pin 2--DC supply
(
12-30V
)
Pin 3--Audio signal
11. Mic Gain
It is used to increase or decrease the gain for panel microphone to achieve proper
microphone output level. It has no effect on the sensitivity of the headset microphone. The
microphone is set according to the Electret type before delivery. If the type of panel
microphone is changed, re-adjustment is required.
12. Sidetone Controls
It is in the hole at the bottom of the unit, and can be used to adjust the sound level of your
own voice that you can hear while you are talking, aiming to decrease sound feedback and
avoid squeal. When making adjustment, turn on the Mic key and adjust volume to proper
level, then make a sound against microphone, or make a sound via rubbing microphone with
finger. At the same time, use a small screwdriver rotate the knob at clockwise and
anticlockwise slowly, until the sound or rubbing sound is minimal.


